25 Schaltpläne von alter DDR-Technik, Weichen, Signale usw. (Bild anklicken für mehr)
12 Bilder zu:
Bild 1 von 12 - MBS Wendezugautomatik W 0.2 incl. Beschreibung
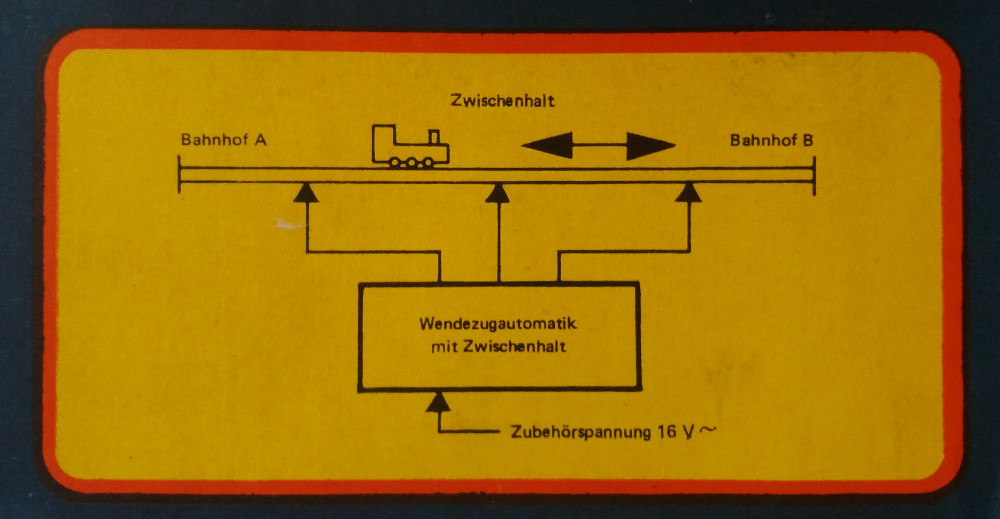 Bild 2 von 12 - MBS Wendezugautomatik W 0.2 incl. Beschreibung
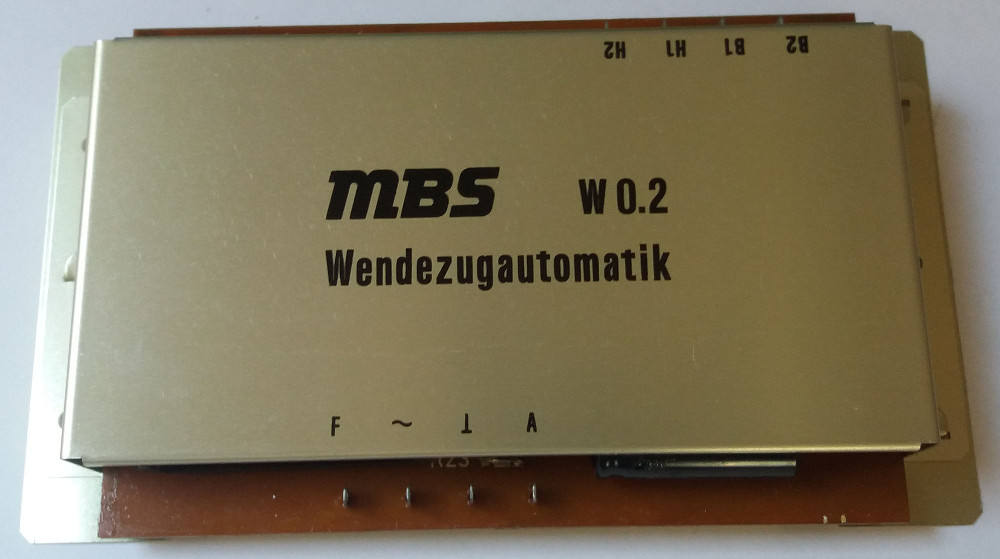 Bild 3 von 12 - MBS Wendezugautomatik W 0.2 incl. Beschreibung
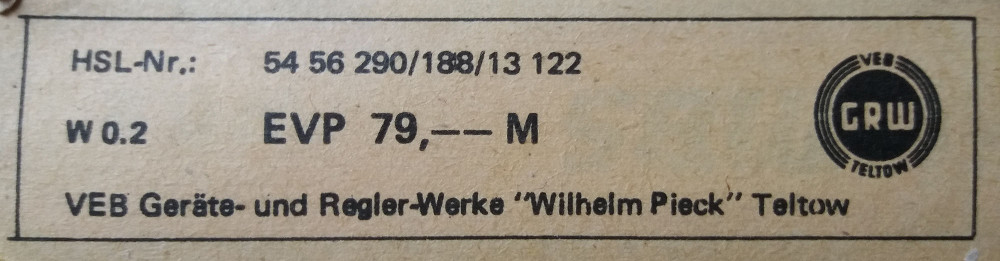 Bild 4 von 12 - MBS Wendezugautomatik W 0.2 incl. Beschreibung
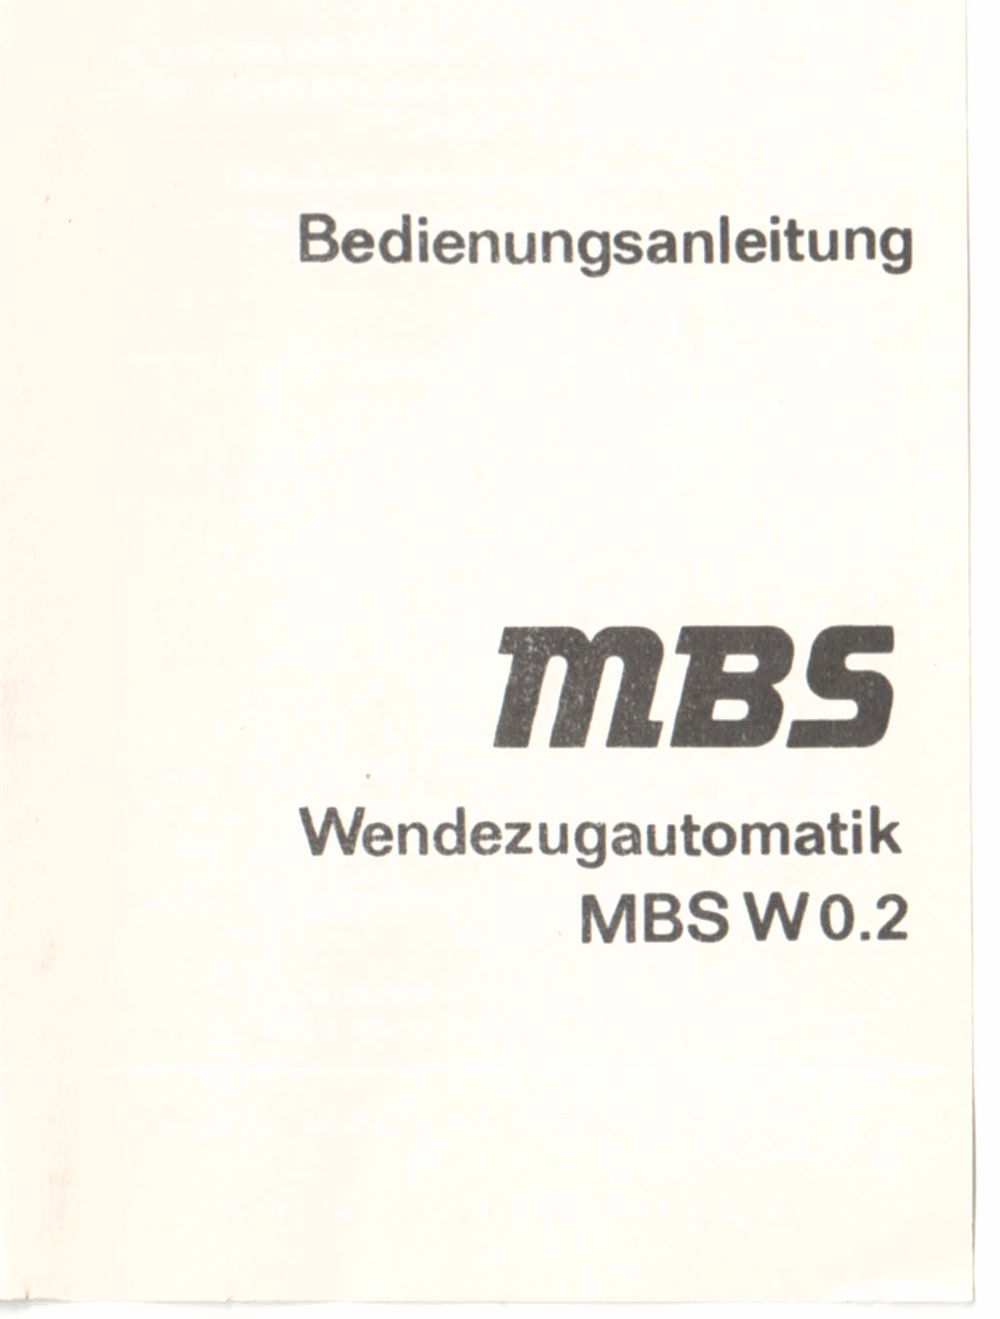 Bild 5 von 12 - MBS Wendezugautomatik W 0.2 incl. Beschreibung
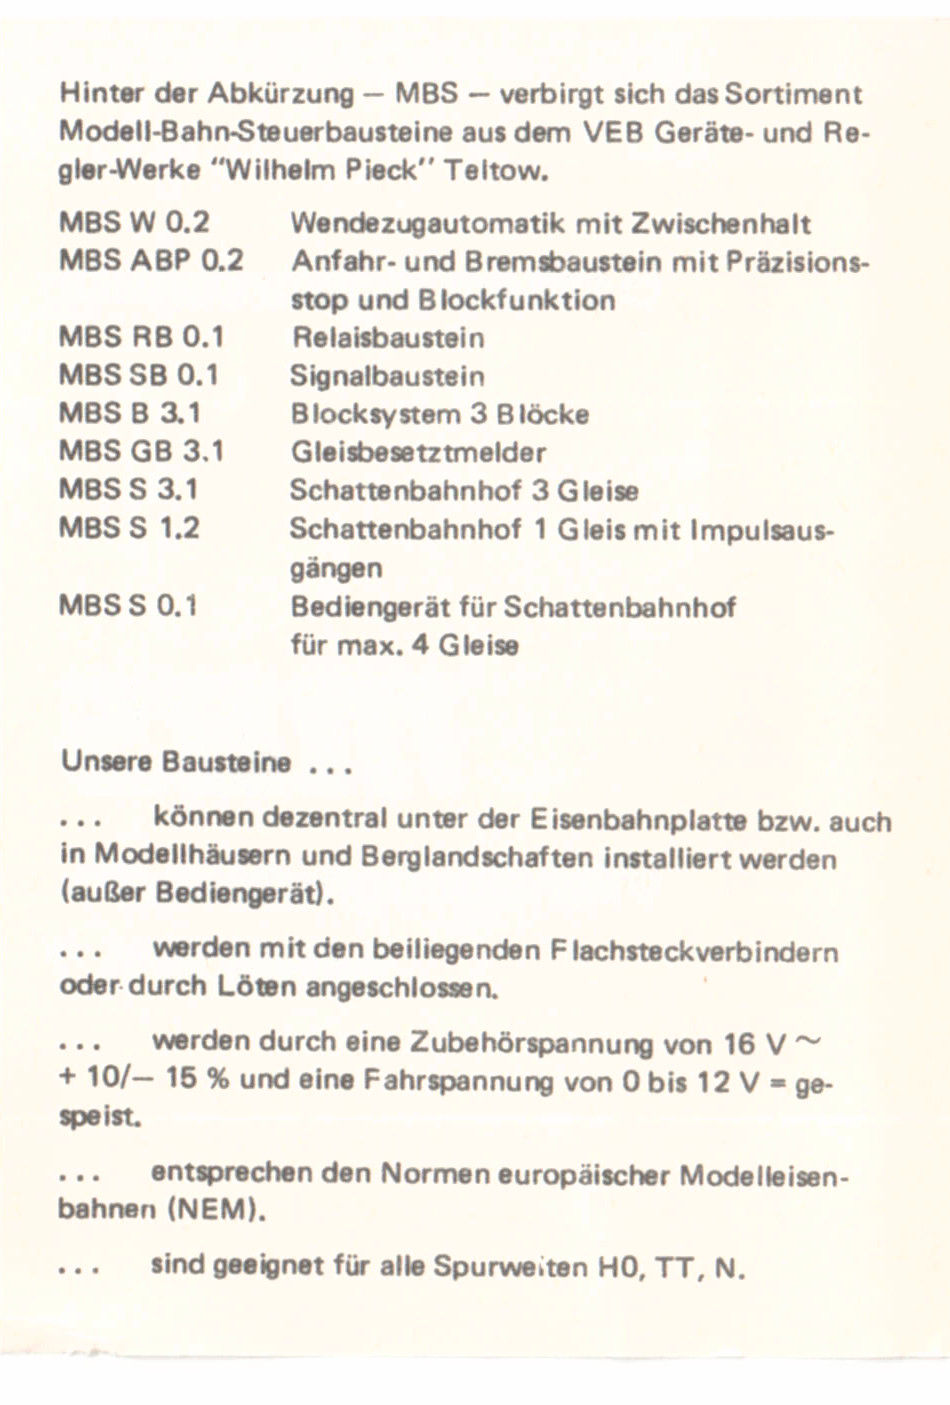 Bild 6 von 12 - MBS Wendezugautomatik W 0.2 incl. Beschreibung
 Bild 7 von 12 - MBS Wendezugautomatik W 0.2 incl. Beschreibung
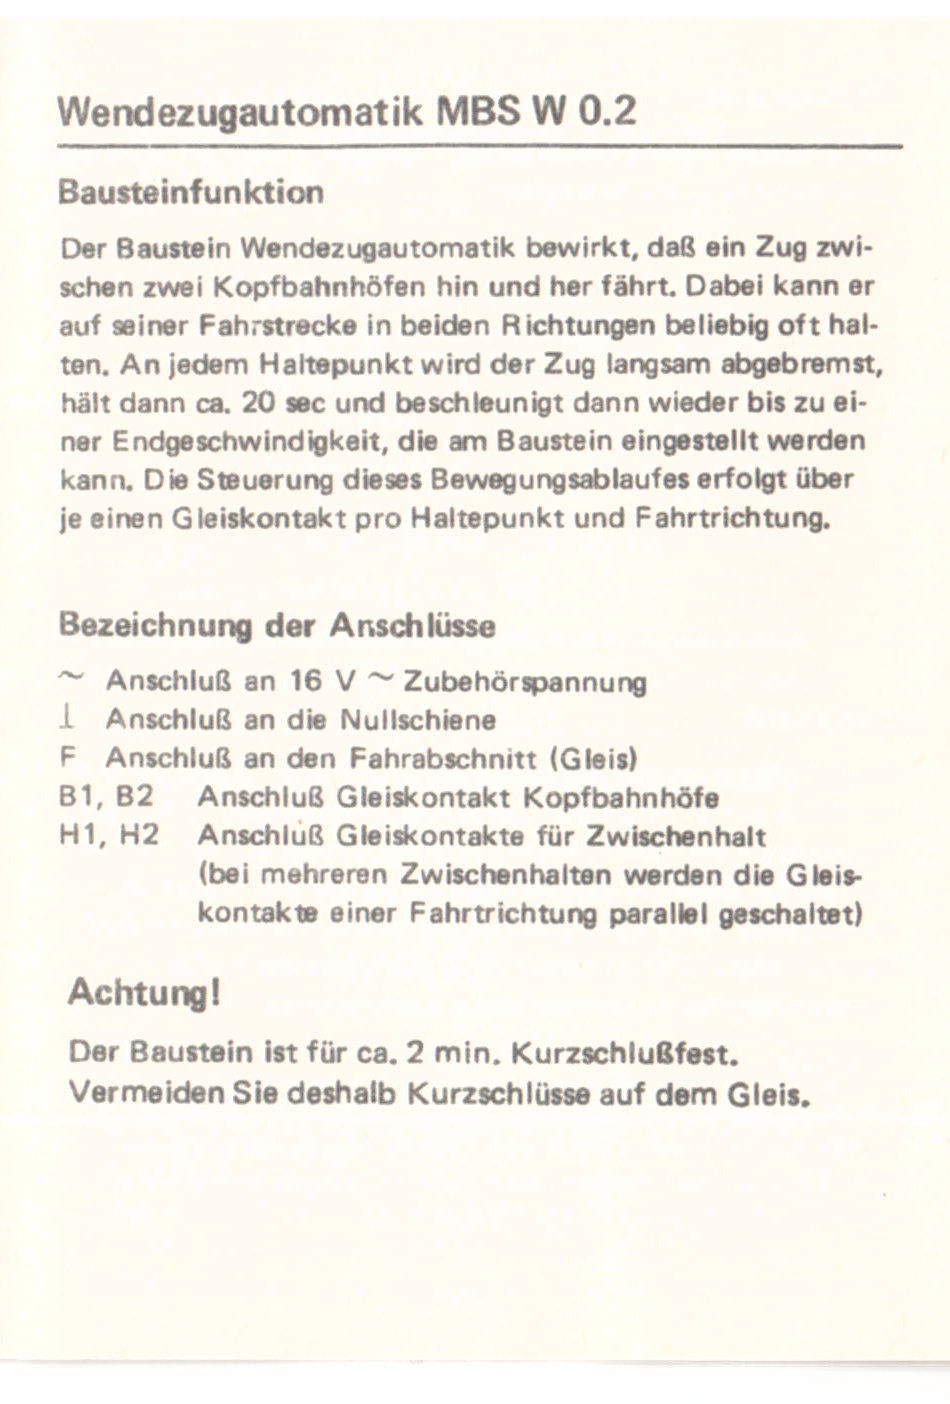 Bild 8 von 12 - MBS Wendezugautomatik W 0.2 incl. Beschreibung
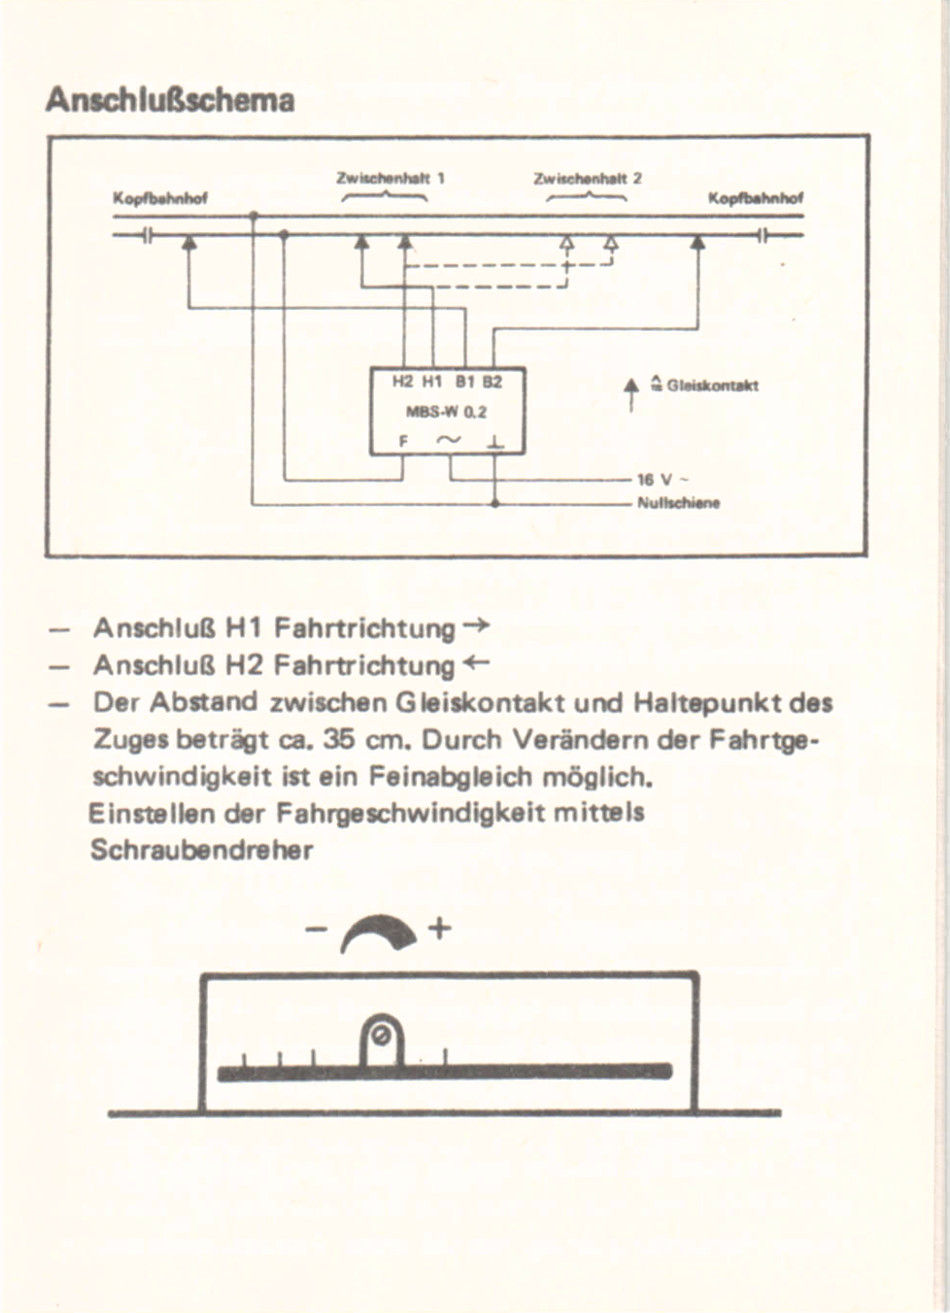 Bild 9 von 12 - MBS Wendezugautomatik W 0.2 incl. Beschreibung
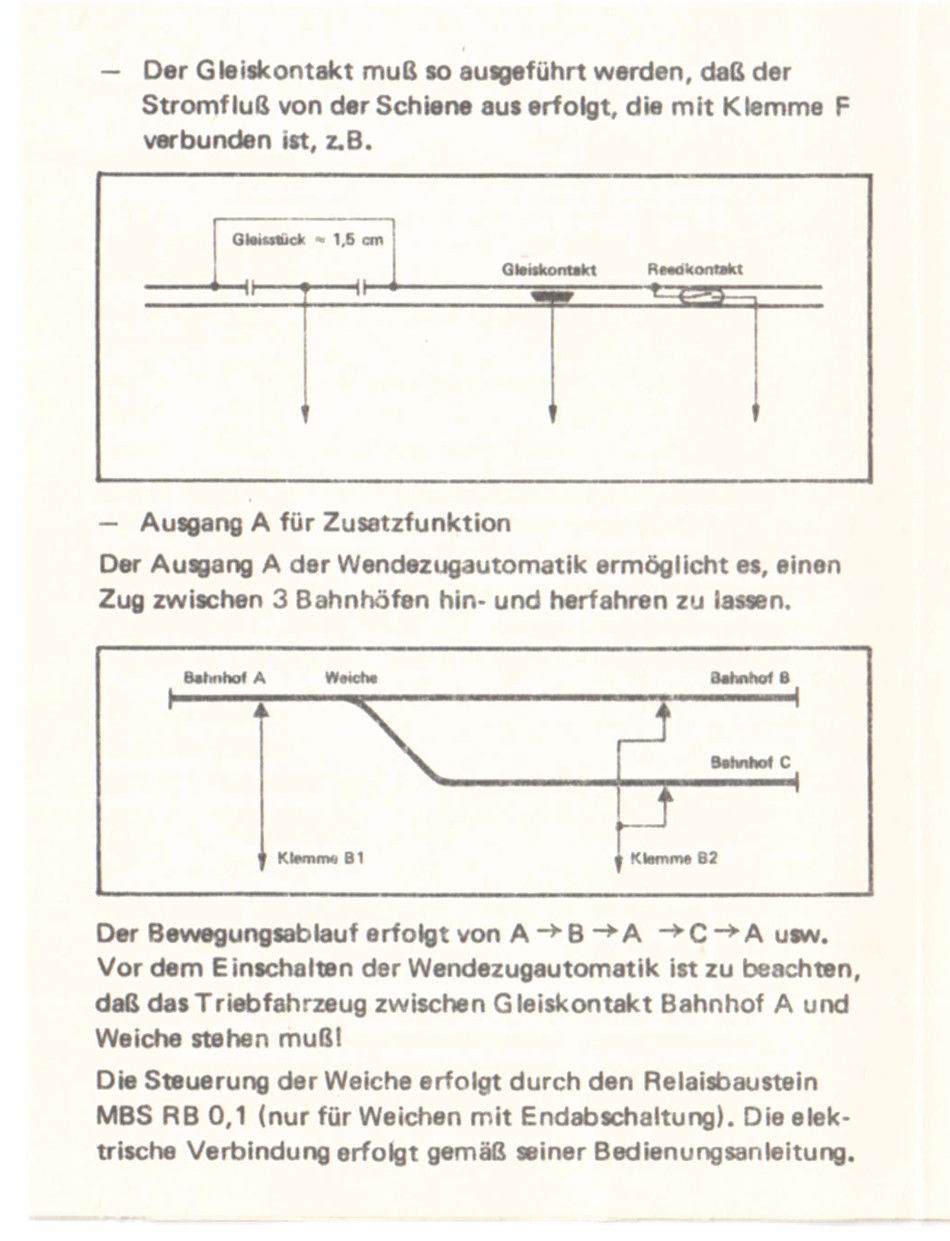 Bild 10 von 12 - MBS Wendezugautomatik W 0.2 incl. Beschreibung
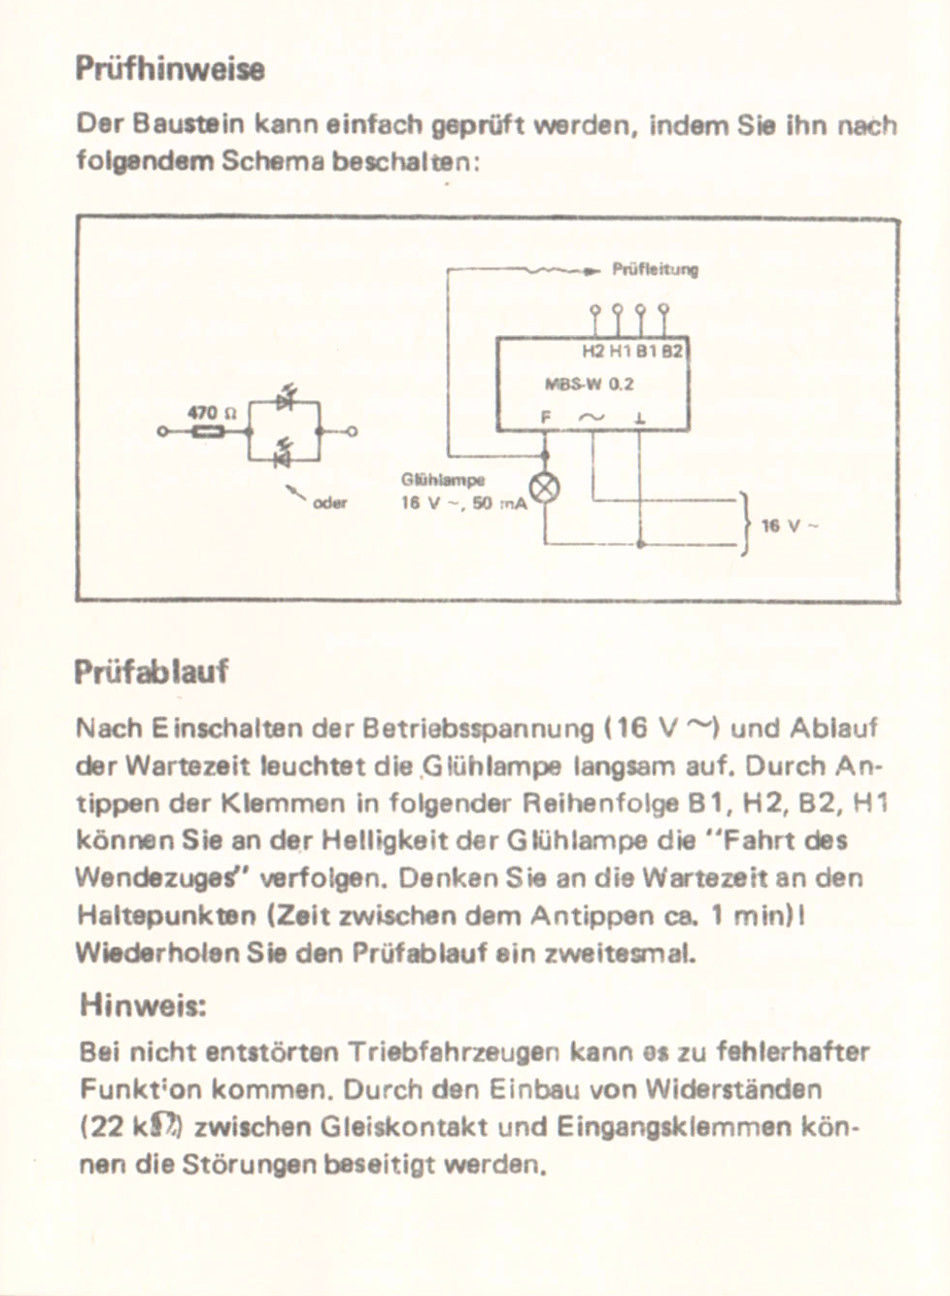 Bild 11 von 12 - MBS Wendezugautomatik W 0.2 incl. Beschreibung
 Bild 12 von 12 - MBS Wendezugautomatik W 0.2 incl. Beschreibung
MBS W 0.2 Wendezugautomatik
mit Zwischenhalt
incl. Bedienungsanleitung und Anschlussplan
10 Bilder zu:
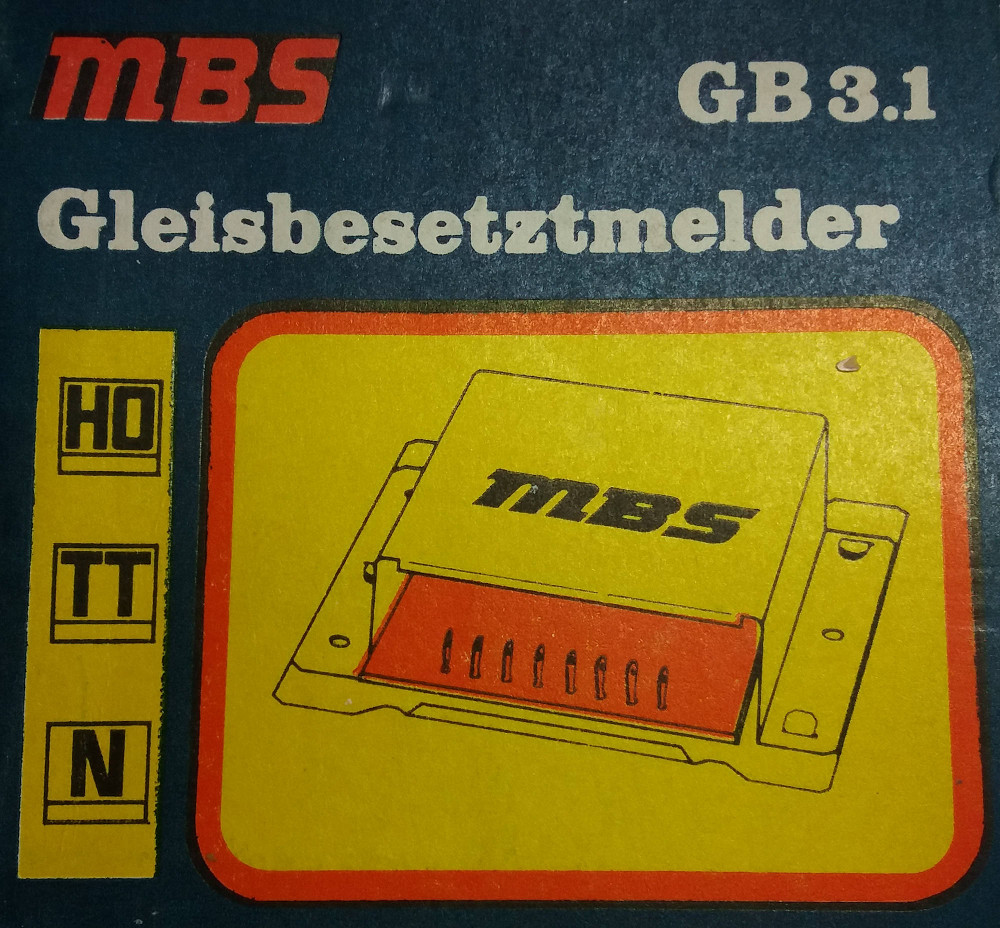
Bild 1 von 10 - MBS Gleisbesetztmelder GB 3.1 incl. Beschreibung
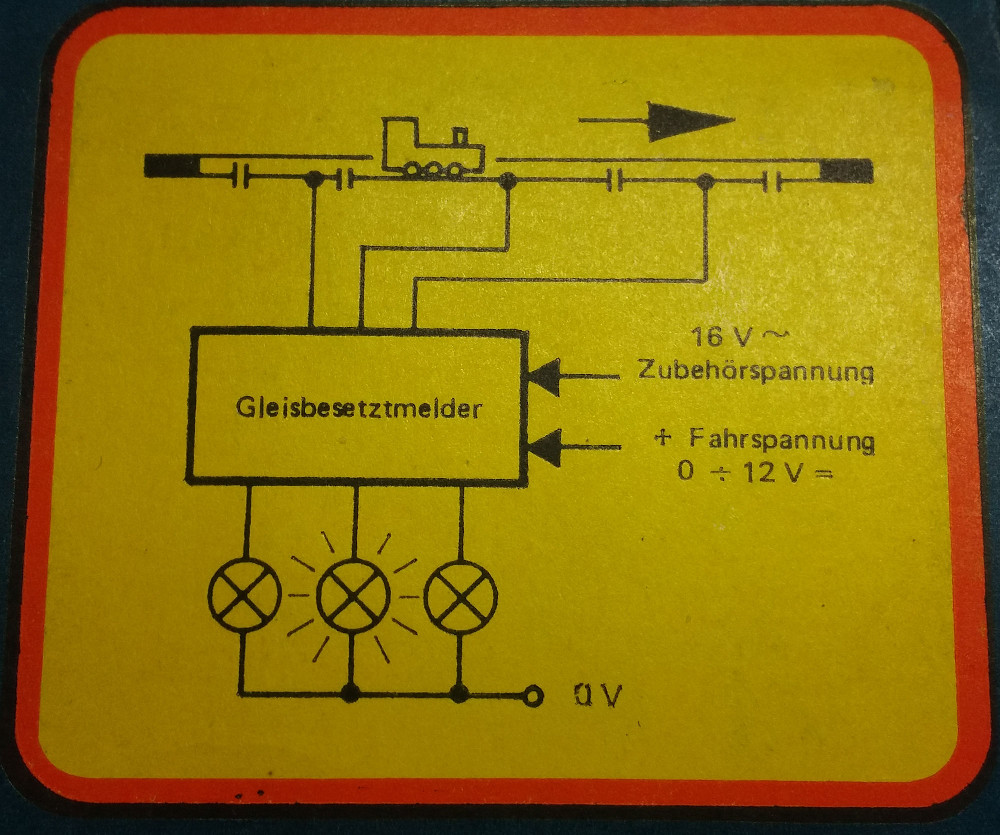 Bild 2 von 10 - MBS Gleisbesetztmelder GB 3.1 incl. Beschreibung
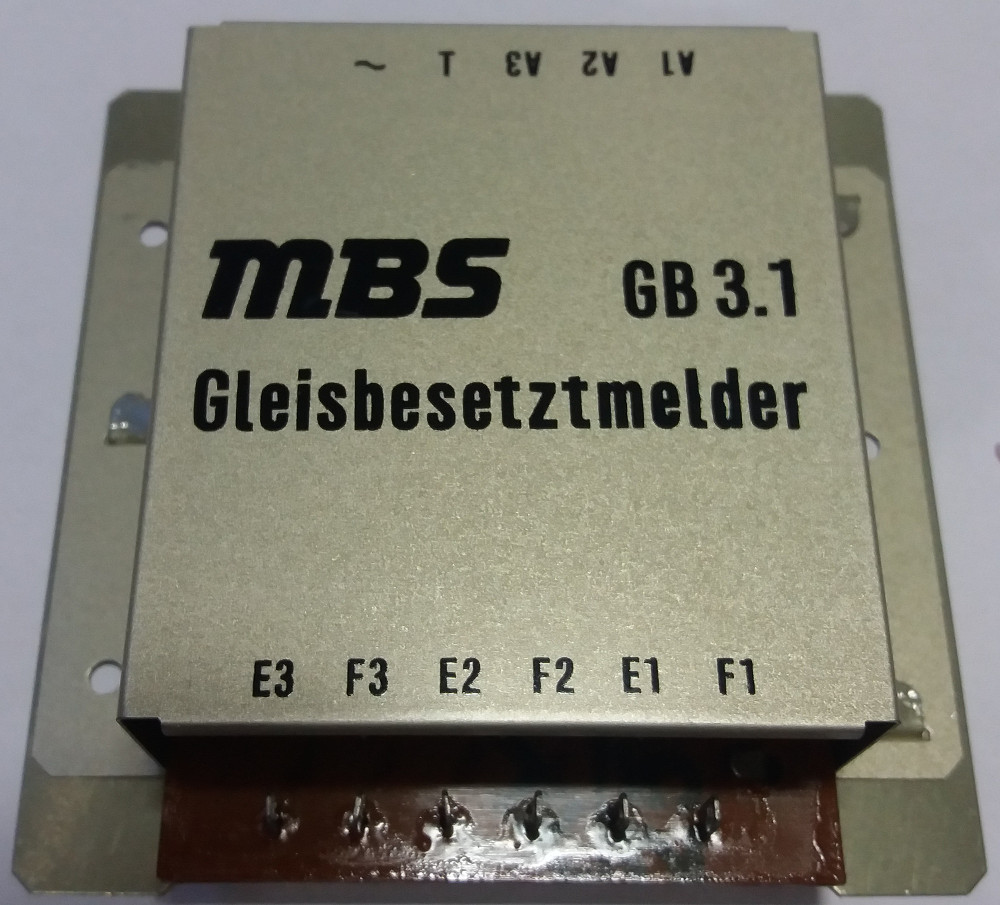 Bild 3 von 10 - MBS Gleisbesetztmelder GB 3.1 incl. Beschreibung
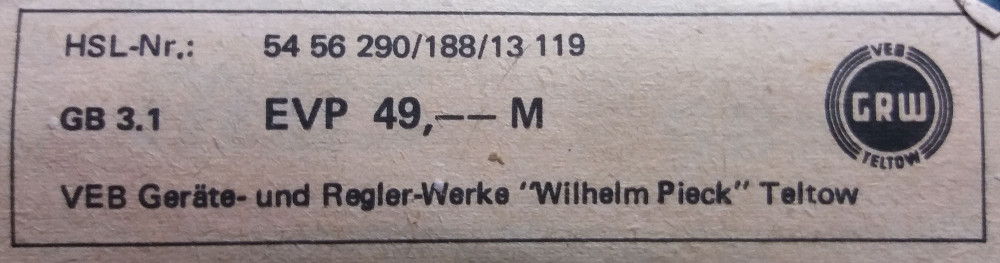 Bild 4 von 10 - MBS Gleisbesetztmelder GB 3.1 incl. Beschreibung
 Bild 5 von 10 - MBS Gleisbesetztmelder GB 3.1 incl. Beschreibung
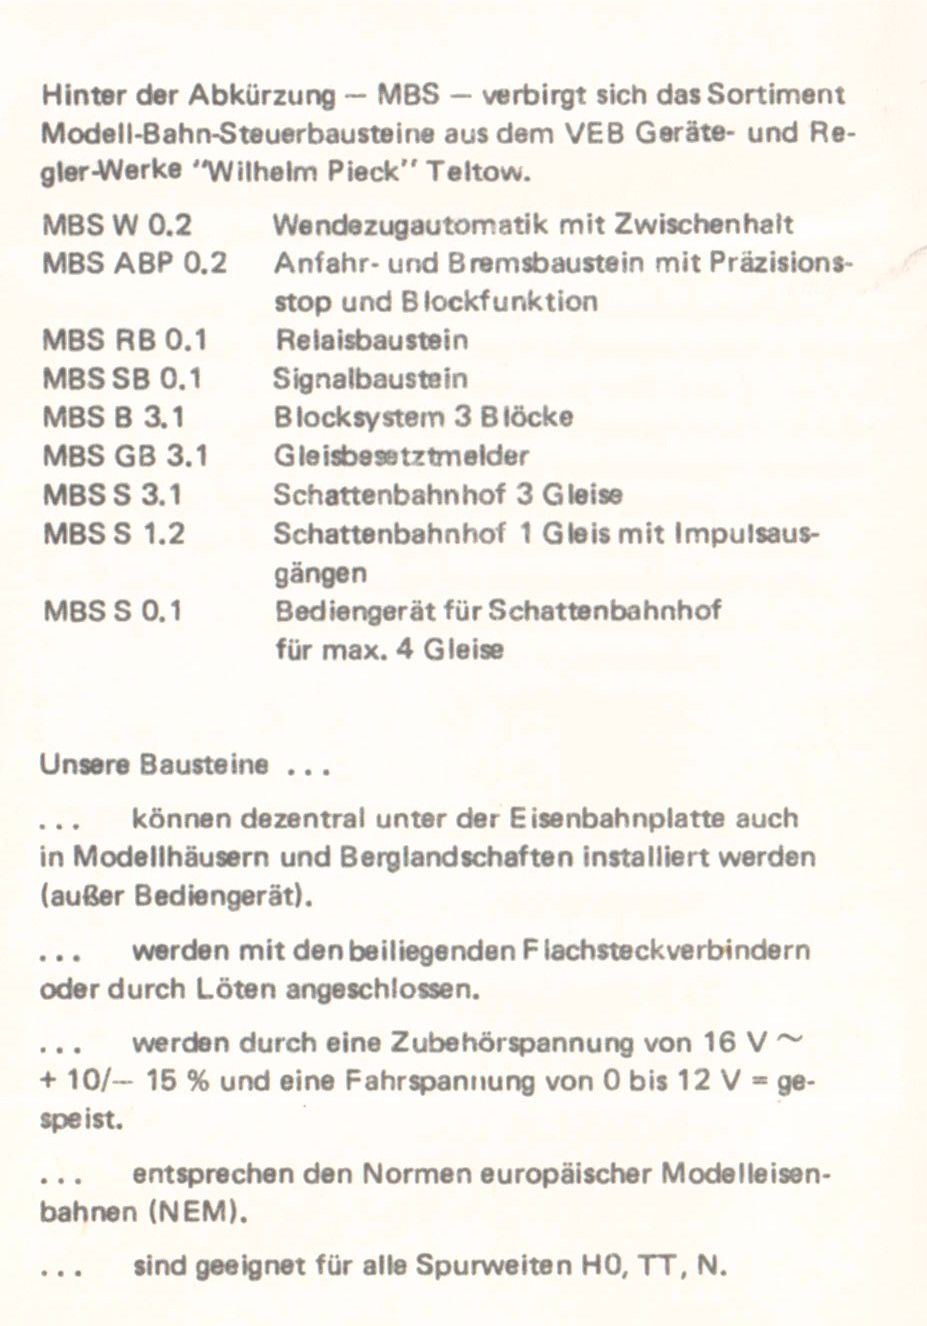 Bild 6 von 10 - MBS Gleisbesetztmelder GB 3.1 incl. Beschreibung
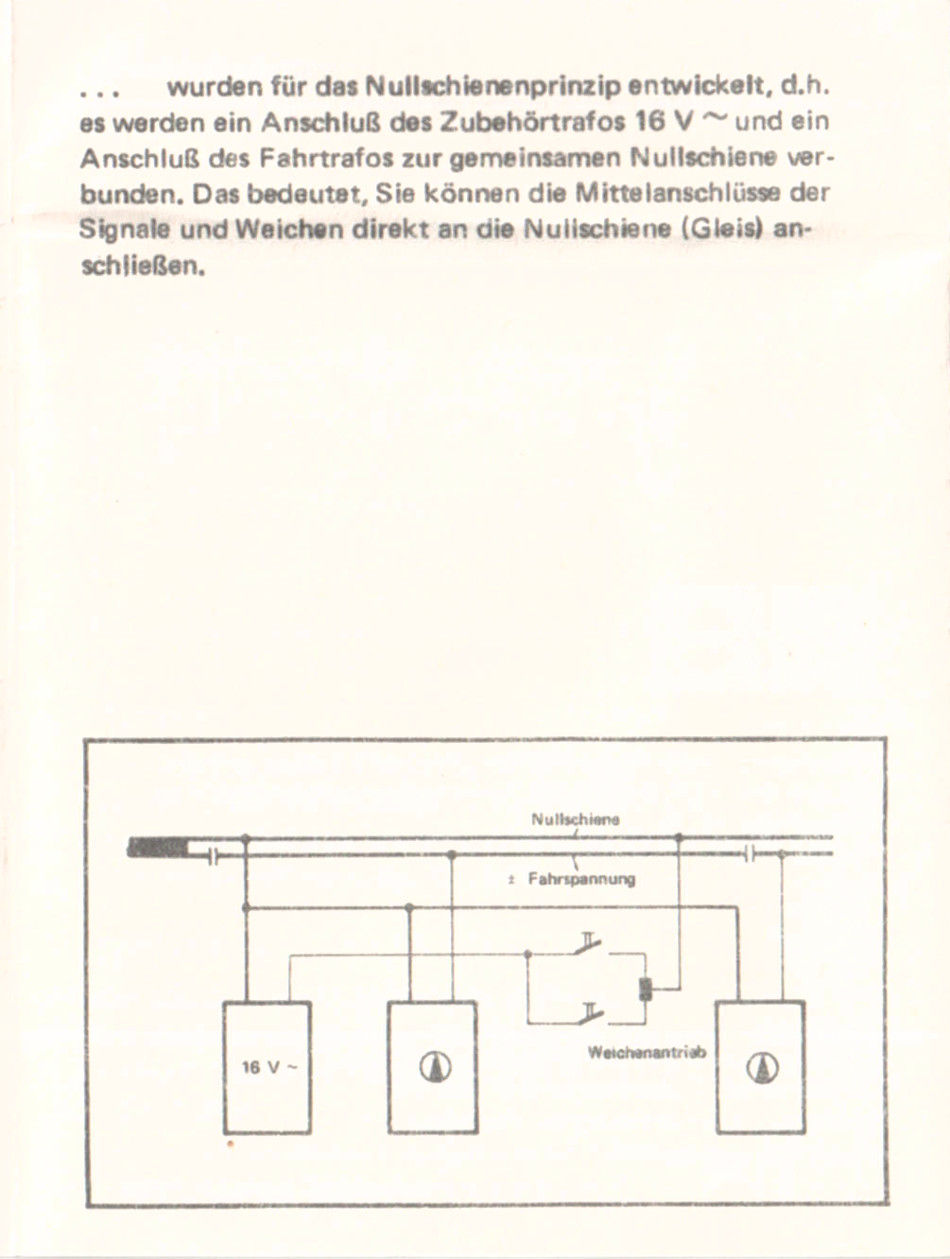 Bild 7 von 10 - MBS Gleisbesetztmelder GB 3.1 incl. Beschreibung
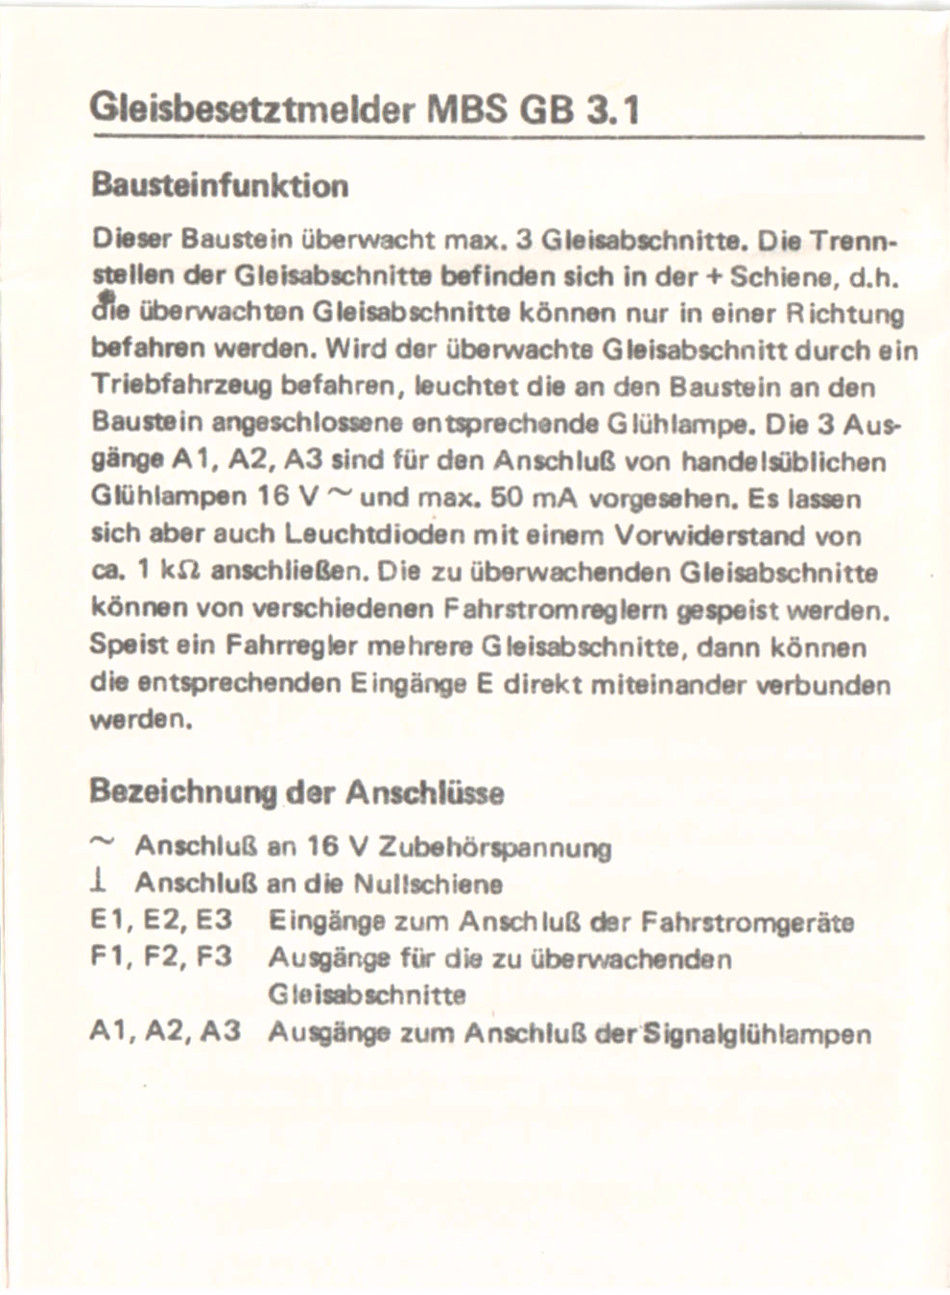 Bild 8 von 10 - MBS Gleisbesetztmelder GB 3.1 incl. Beschreibung
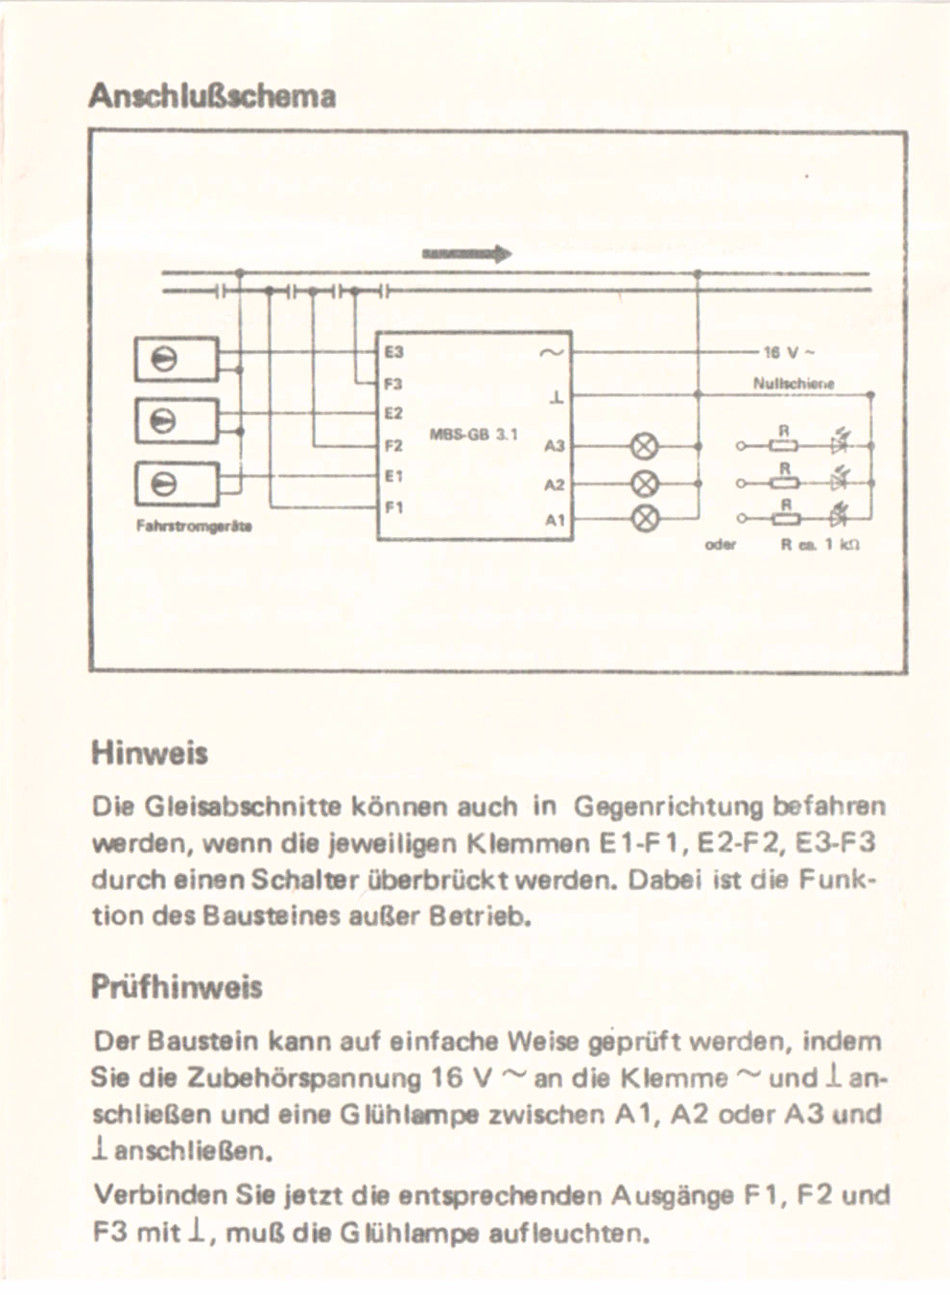 Bild 9 von 10 - MBS Gleisbesetztmelder GB 3.1 incl. Beschreibung
 Bild 10 von 10 - MBS Gleisbesetztmelder GB 3.1 incl. Beschreibung
MBS GB 3.1 Gleisbesetztmelder
incl. Bedienungsanleitung und Anschlussplan
10 Bilder zu:
Bild 1 von 10 - MBS Signalbaustein SB 0.1 incl. Beschreibung
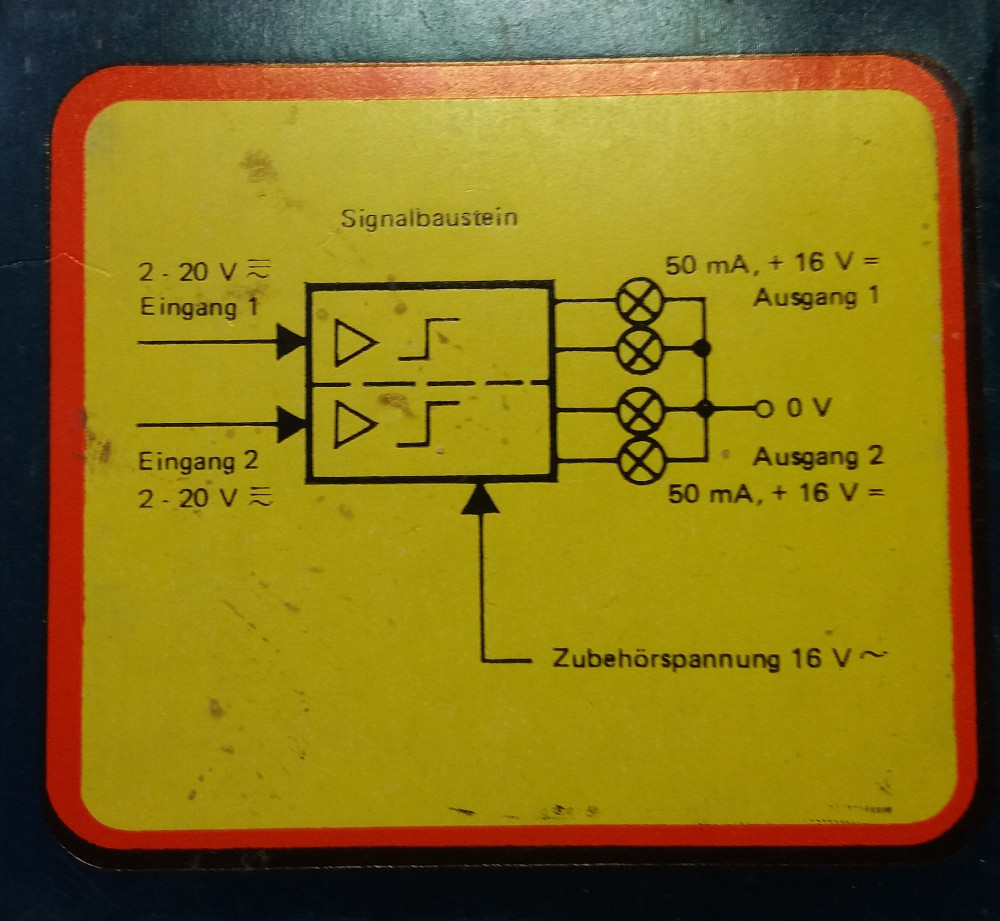 Bild 2 von 10 - MBS Signalbaustein SB 0.1 incl. Beschreibung
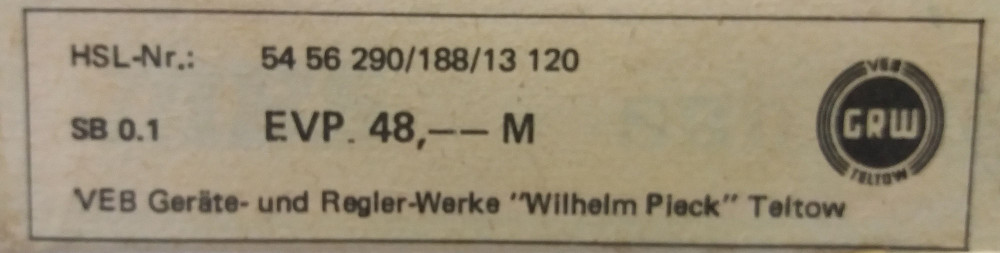 Bild 3 von 10 - MBS Signalbaustein SB 0.1 incl. Beschreibung
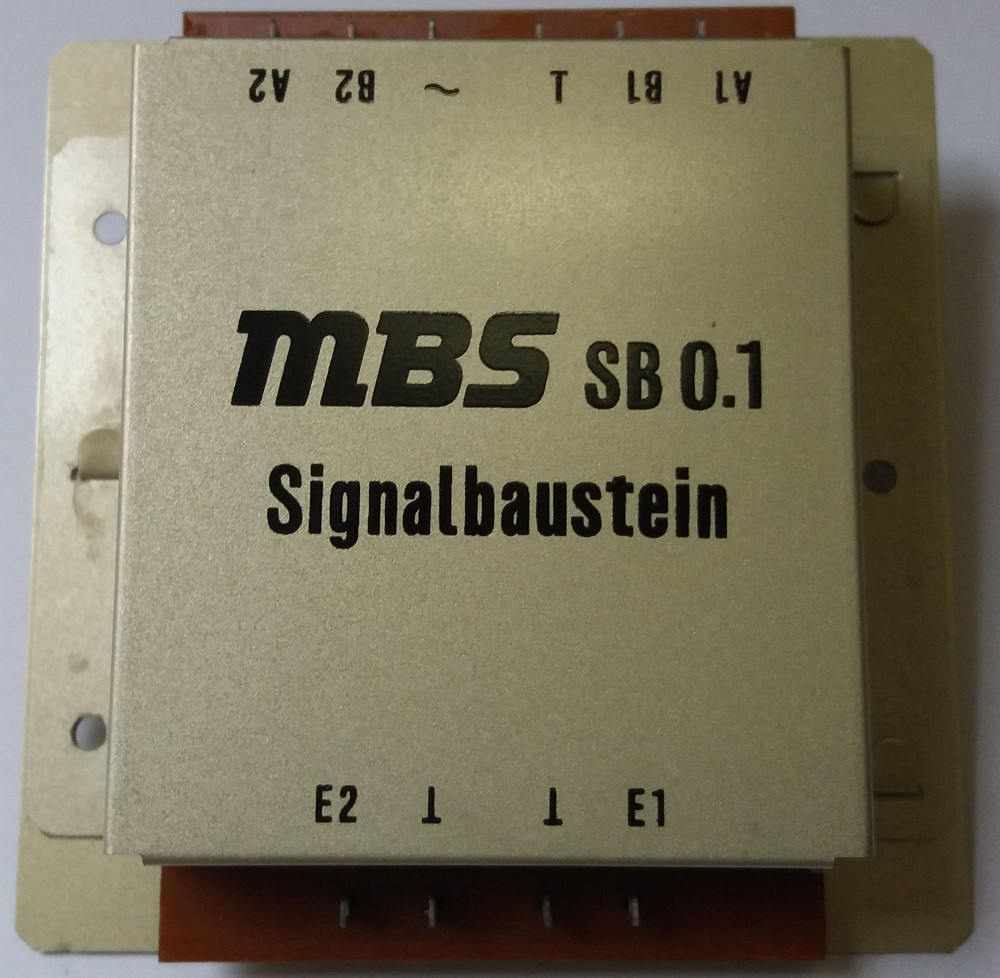 Bild 4 von 10 - MBS Signalbaustein SB 0.1 incl. Beschreibung
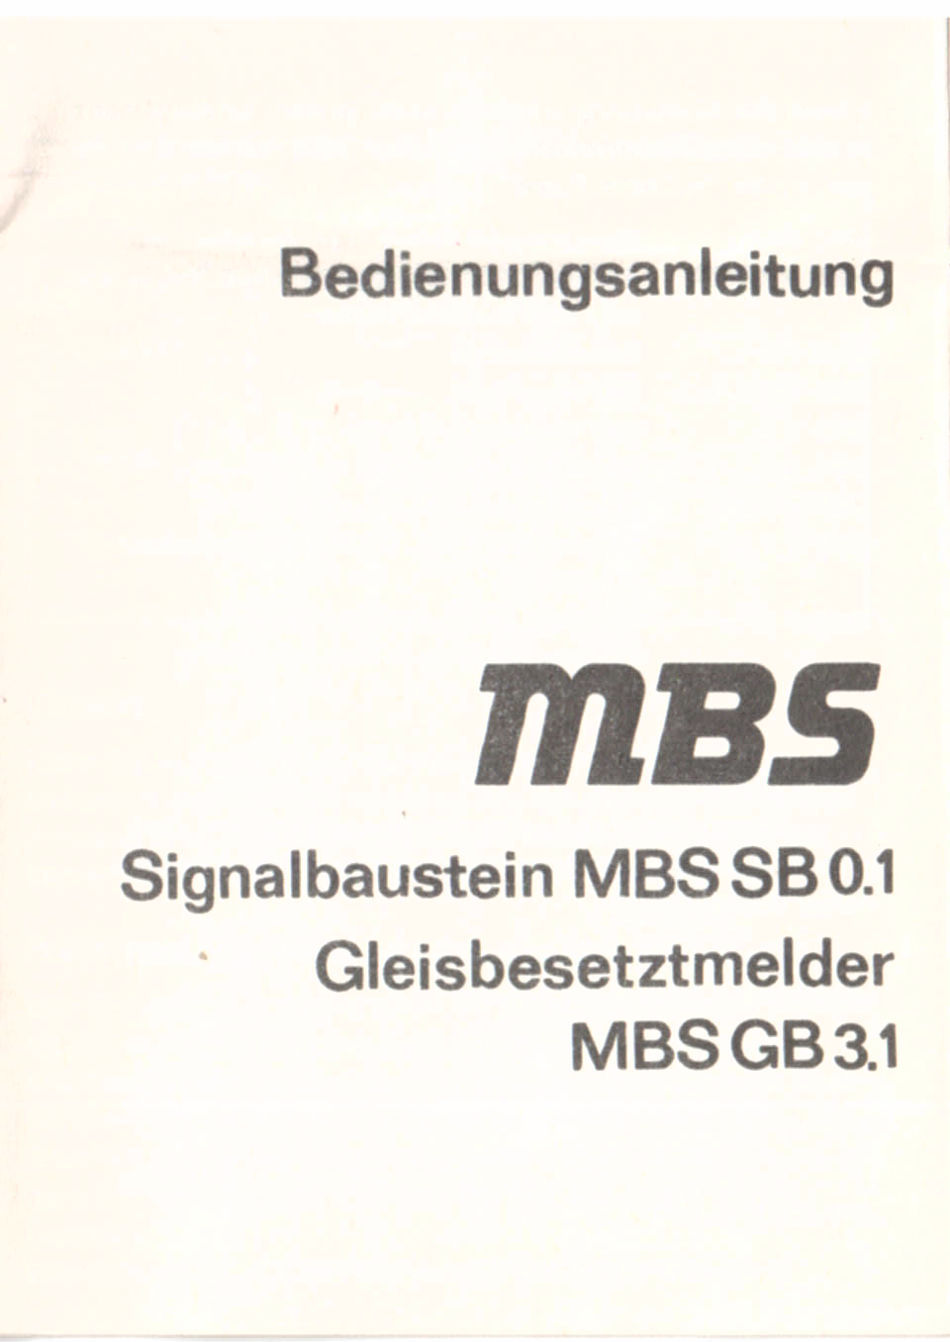 Bild 5 von 10 - MBS Signalbaustein SB 0.1 incl. Beschreibung
 Bild 6 von 10 - MBS Signalbaustein SB 0.1 incl. Beschreibung
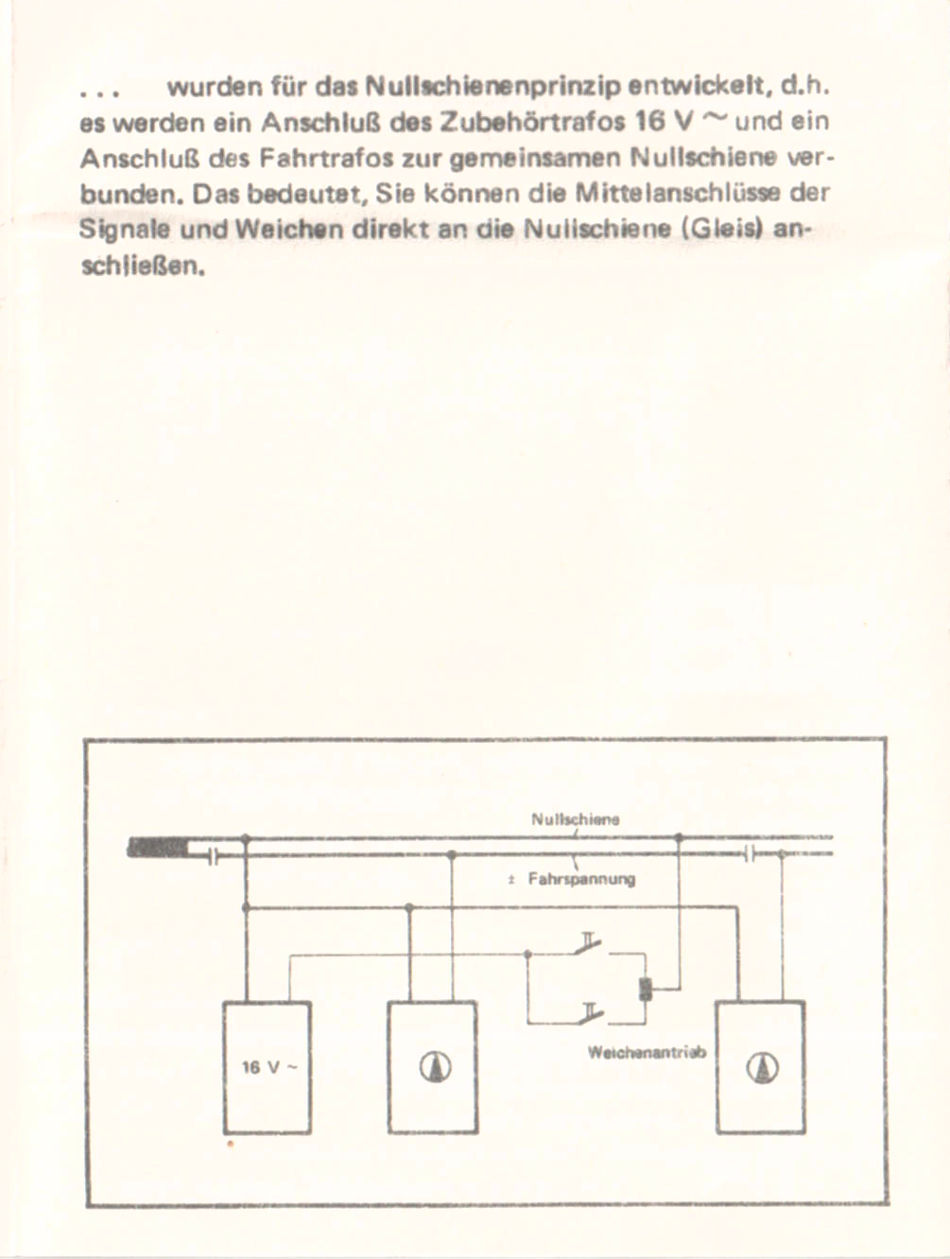 Bild 7 von 10 - MBS Signalbaustein SB 0.1 incl. Beschreibung
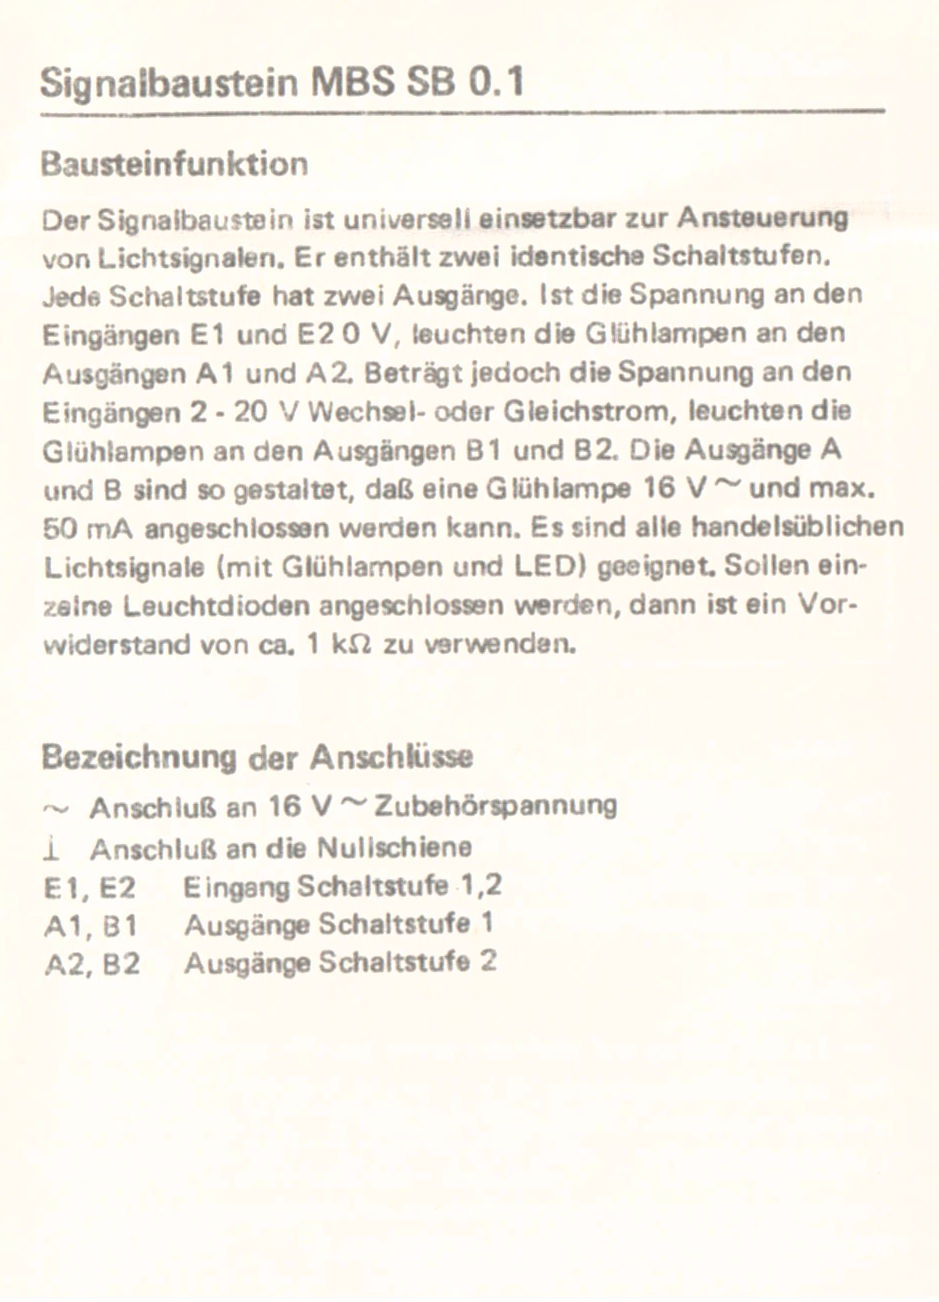 Bild 8 von 10 - MBS Signalbaustein SB 0.1 incl. Beschreibung
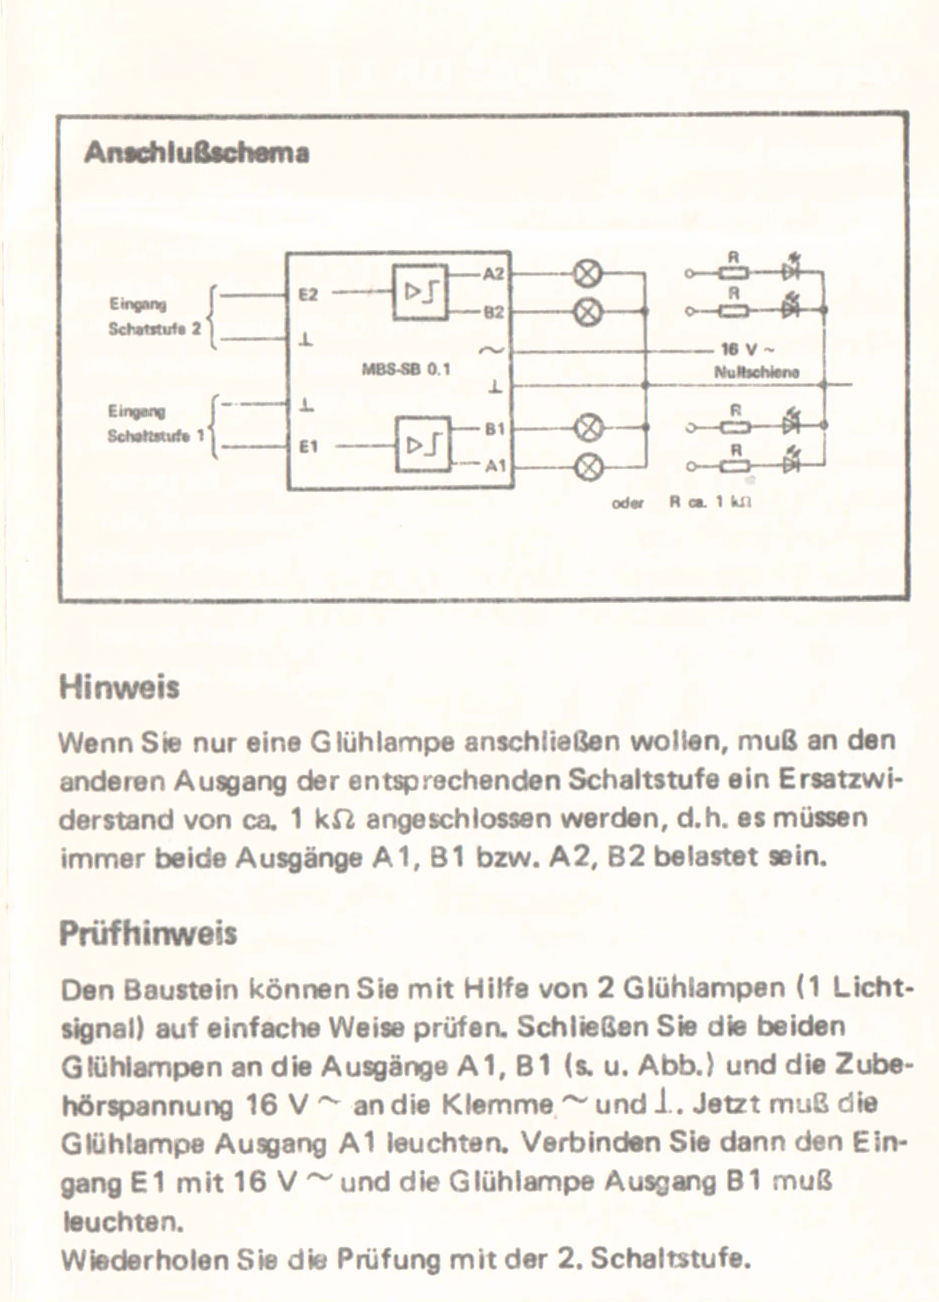 Bild 9 von 10 - MBS Signalbaustein SB 0.1 incl. Beschreibung
 Bild 10 von 10 - MBS Signalbaustein SB 0.1 incl. Beschreibung
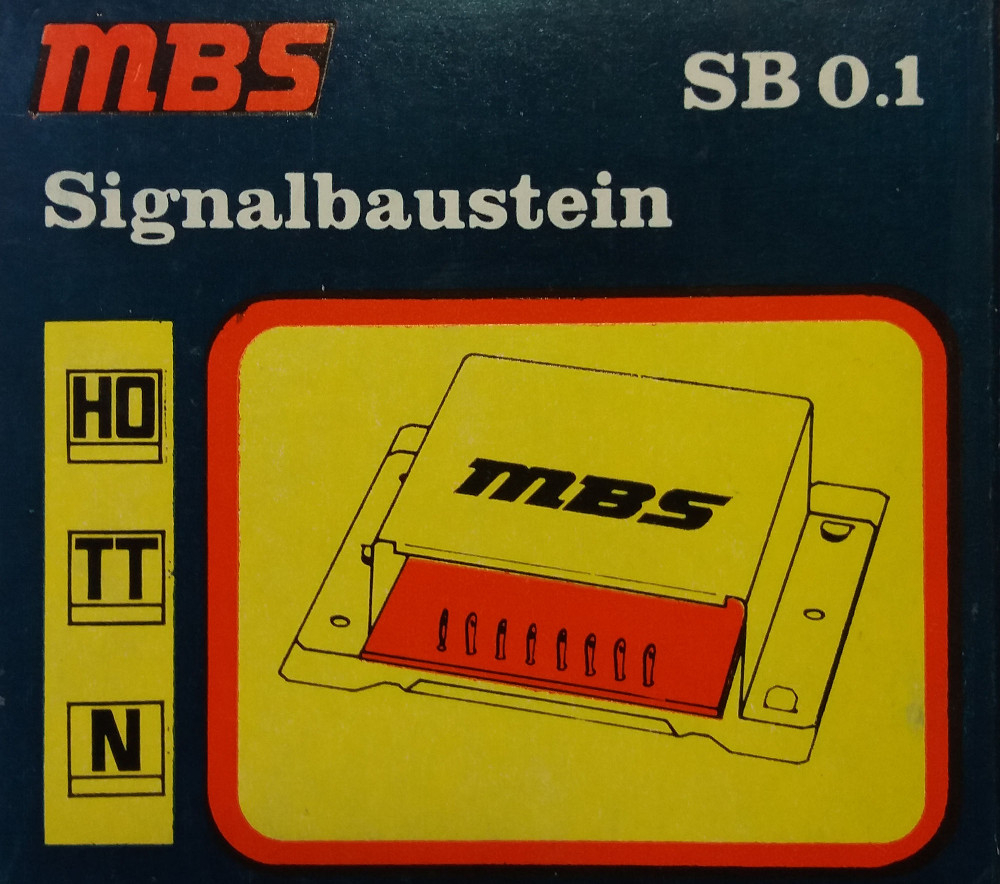
MBS SB 0.1 Signalbaustein
incl. Bedienungsanleitung und Anschlussplan
12 Bilder zu:
Bild 1 von 12 - MBS Block-, Anfahr- und Bremsbaustein mit Päzisionsstopp incl. Beschreibung
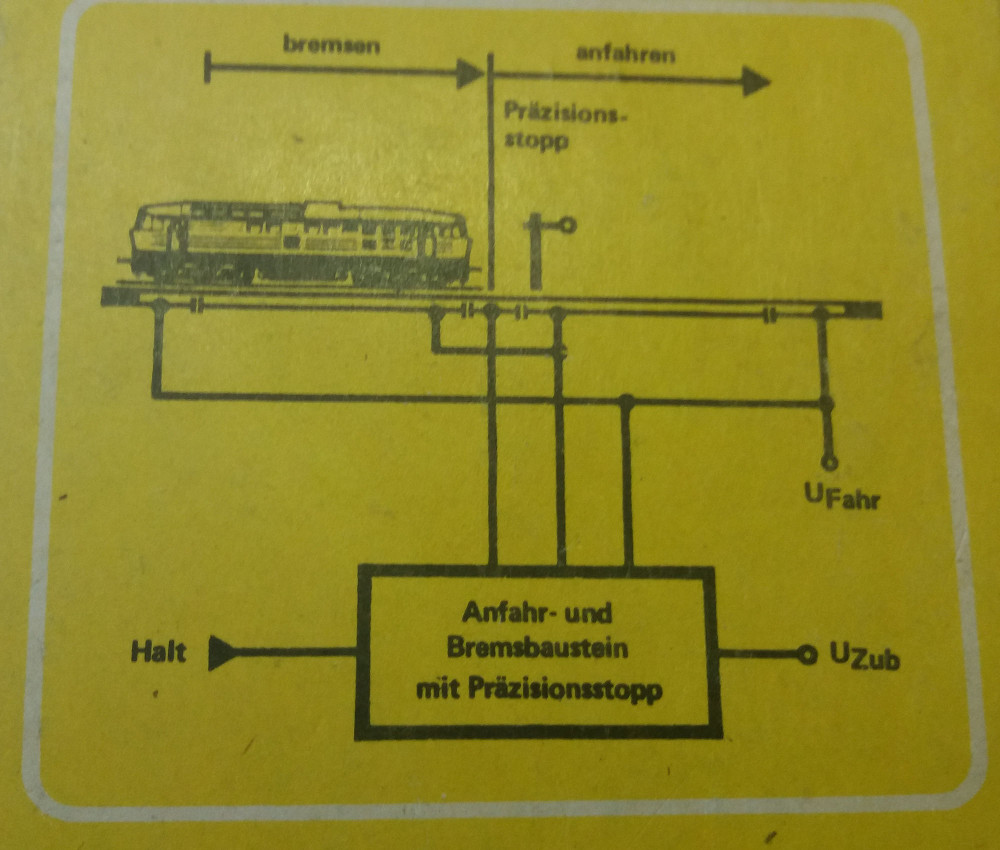 Bild 2 von 12 - MBS Block-, Anfahr- und Bremsbaustein mit Päzisionsstopp incl. Beschreibung
 Bild 3 von 12 - MBS Block-, Anfahr- und Bremsbaustein mit Päzisionsstopp incl. Beschreibung
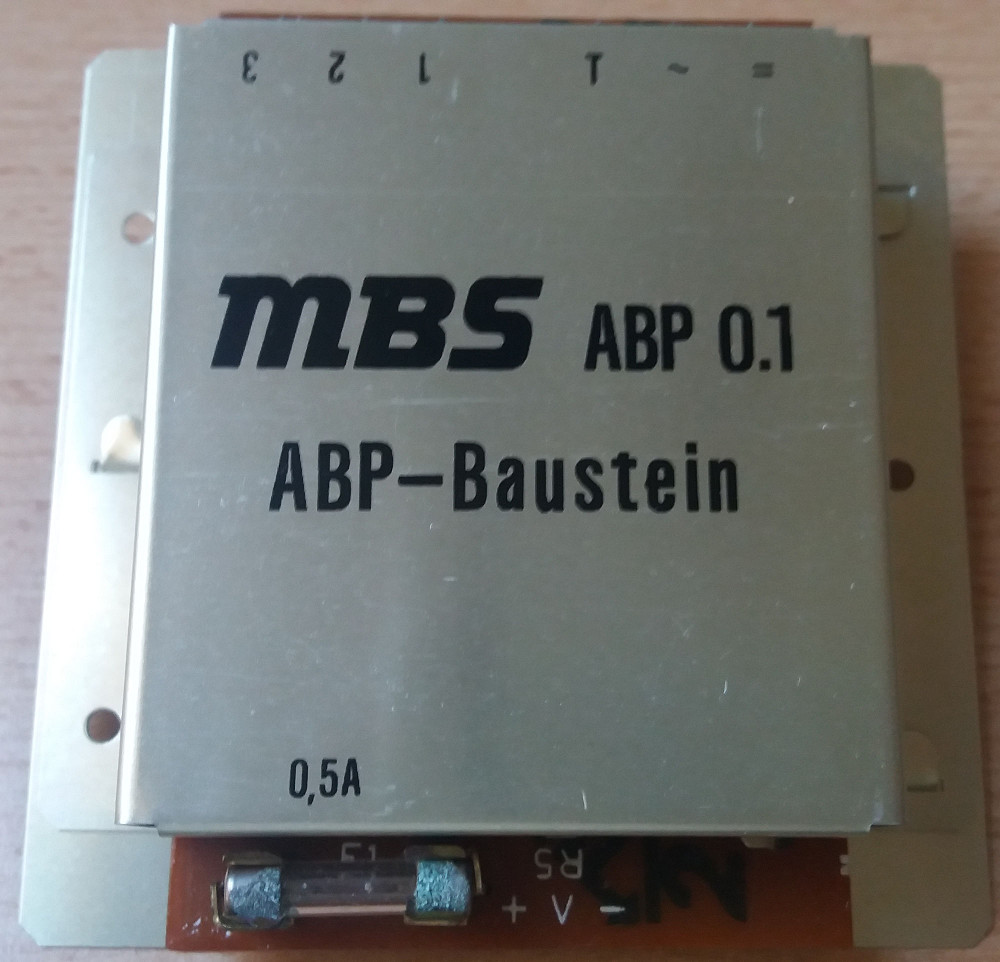 Bild 4 von 12 - MBS Block-, Anfahr- und Bremsbaustein mit Päzisionsstopp incl. Beschreibung
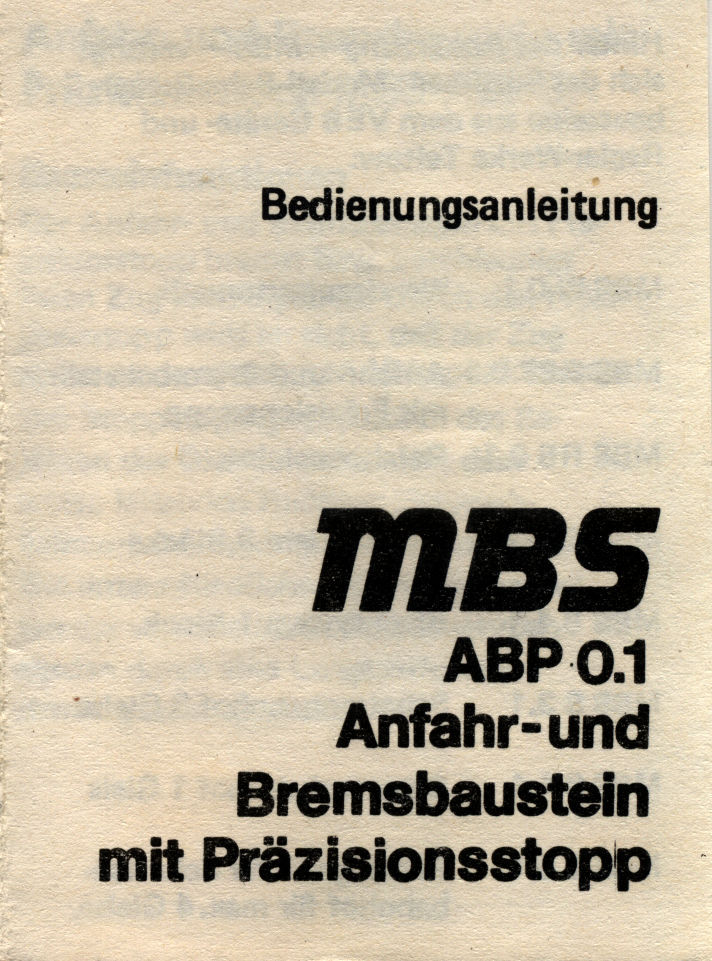 Bild 5 von 12 - MBS Block-, Anfahr- und Bremsbaustein mit Päzisionsstopp incl. Beschreibung
 Bild 6 von 12 - MBS Block-, Anfahr- und Bremsbaustein mit Päzisionsstopp incl. Beschreibung
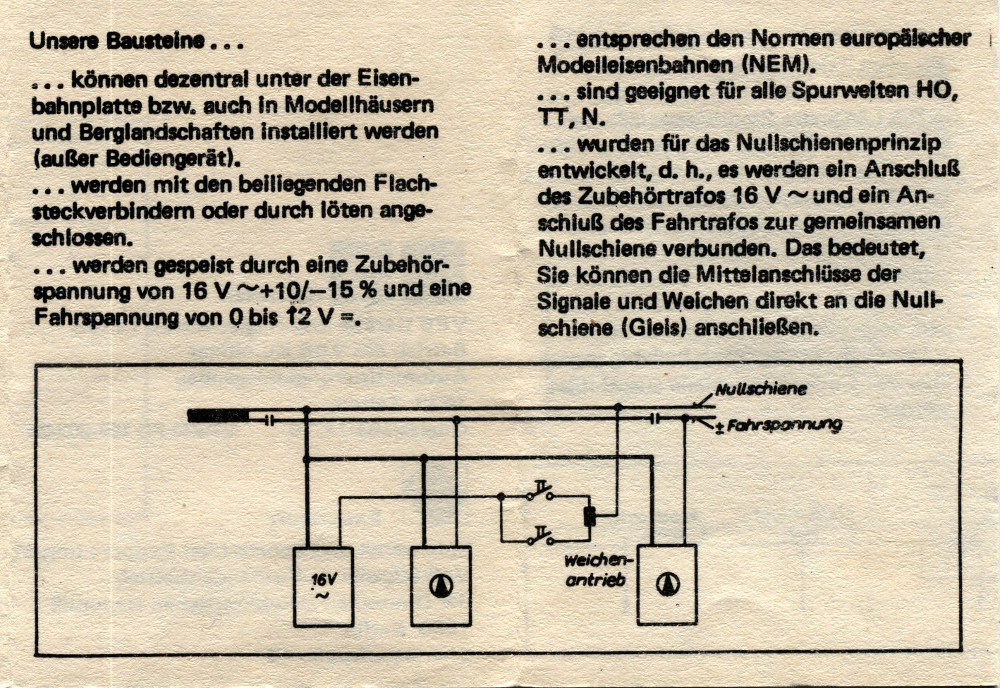 Bild 7 von 12 - MBS Block-, Anfahr- und Bremsbaustein mit Päzisionsstopp incl. Beschreibung
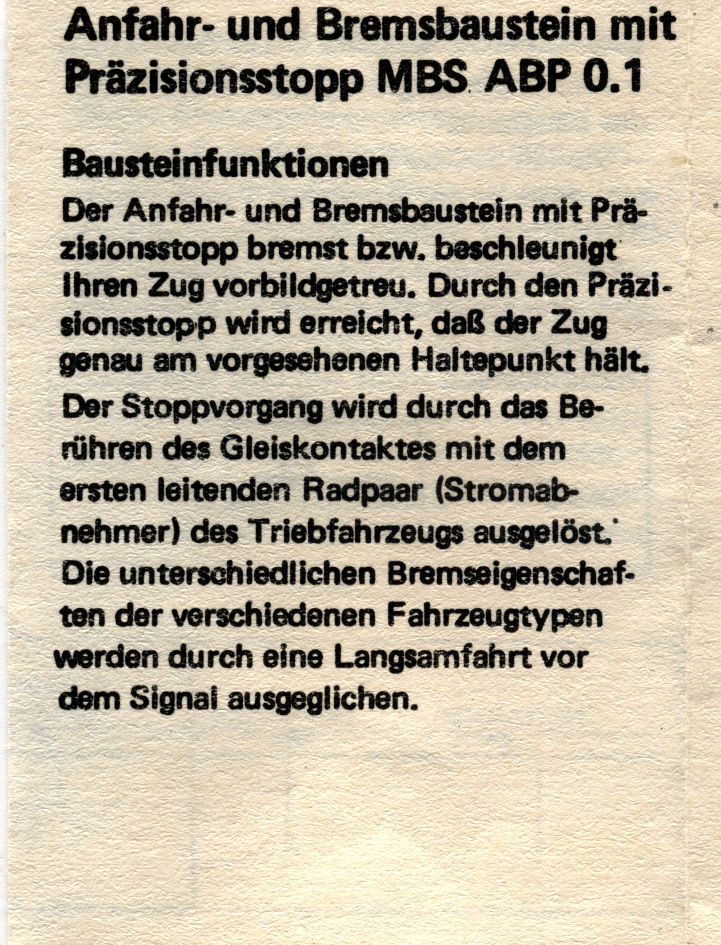 Bild 8 von 12 - MBS Block-, Anfahr- und Bremsbaustein mit Päzisionsstopp incl. Beschreibung
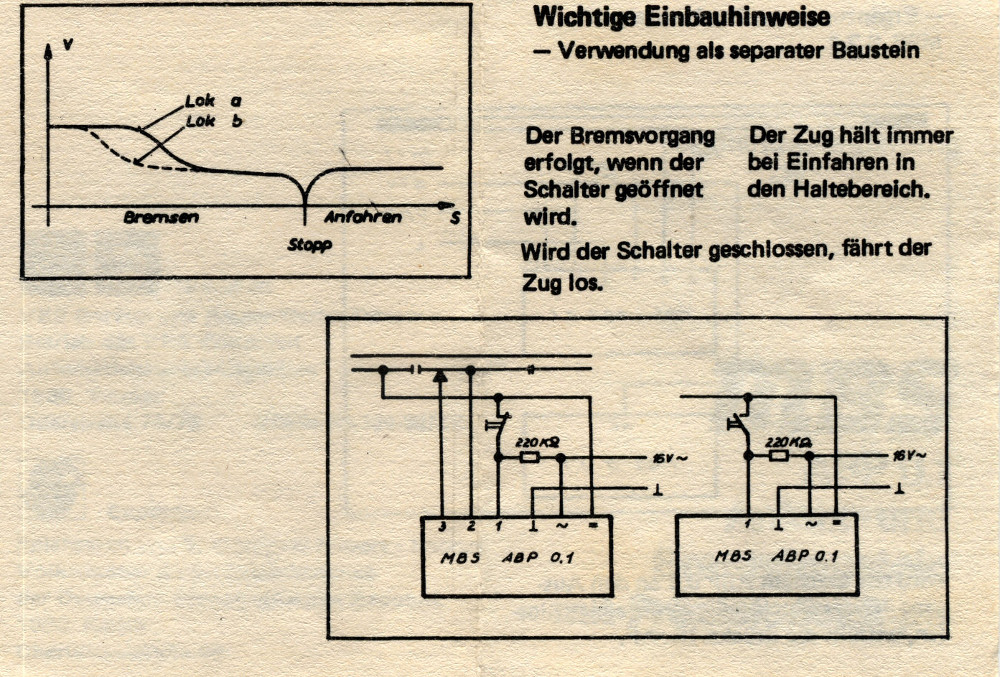 Bild 9 von 12 - MBS Block-, Anfahr- und Bremsbaustein mit Päzisionsstopp incl. Beschreibung
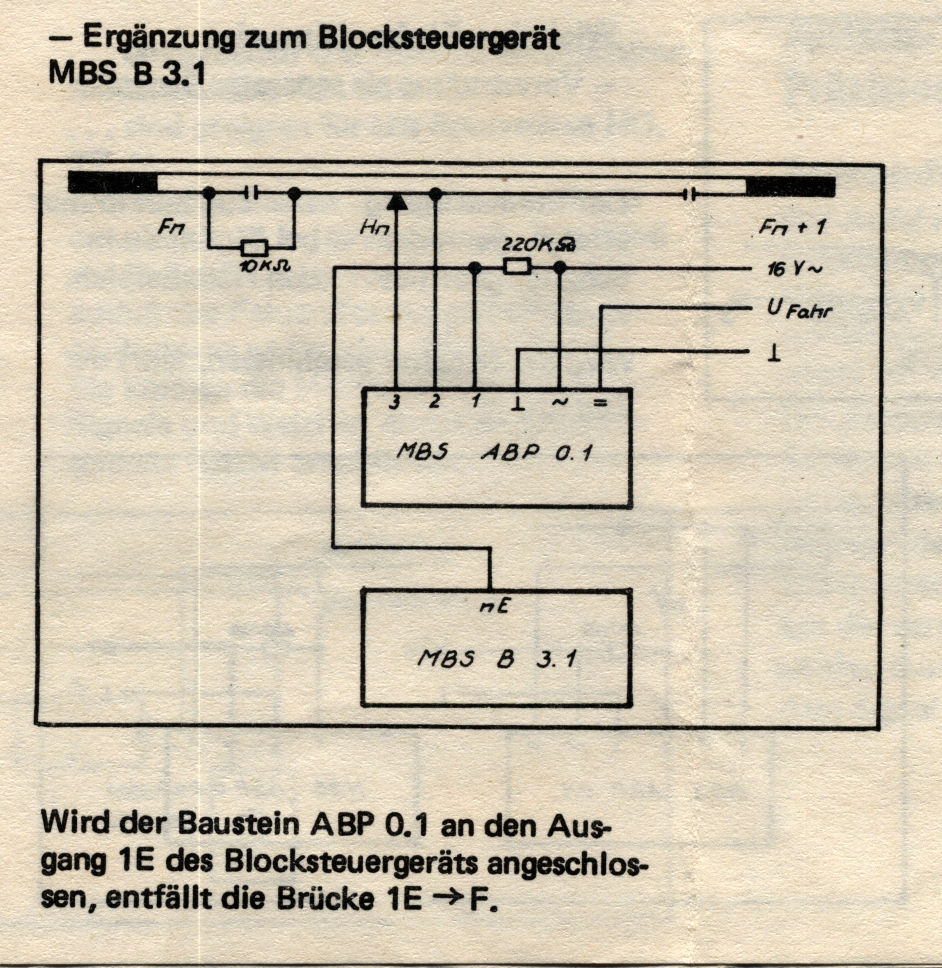 Bild 10 von 12 - MBS Block-, Anfahr- und Bremsbaustein mit Päzisionsstopp incl. Beschreibung
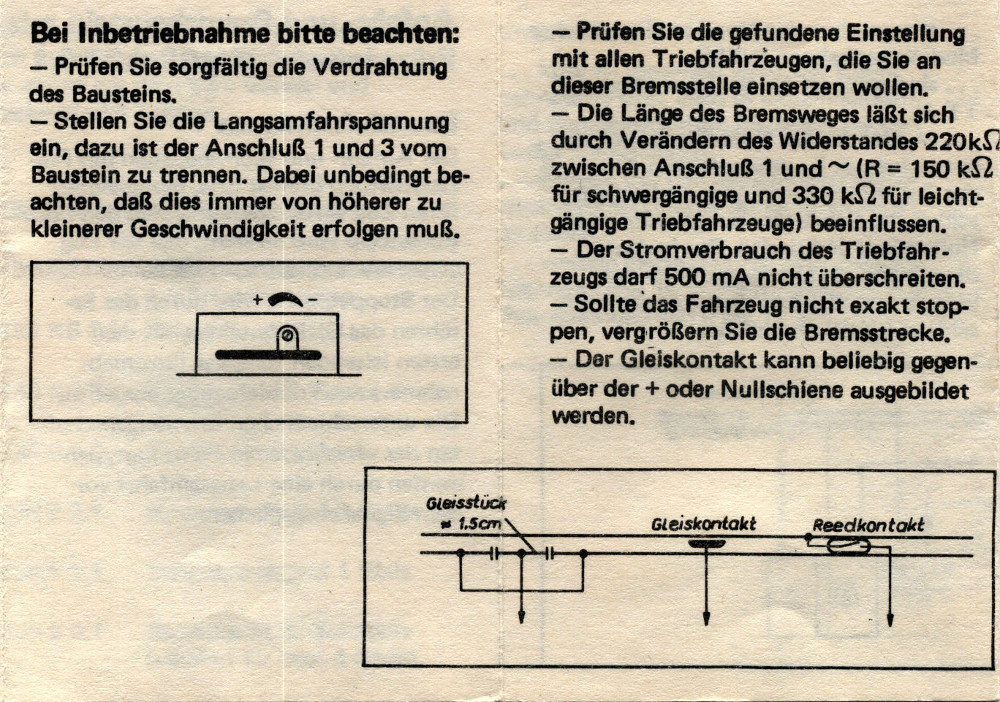 Bild 11 von 12 - MBS Block-, Anfahr- und Bremsbaustein mit Päzisionsstopp incl. Beschreibung
 Bild 12 von 12 - MBS Block-, Anfahr- und Bremsbaustein mit Päzisionsstopp incl. Beschreibung
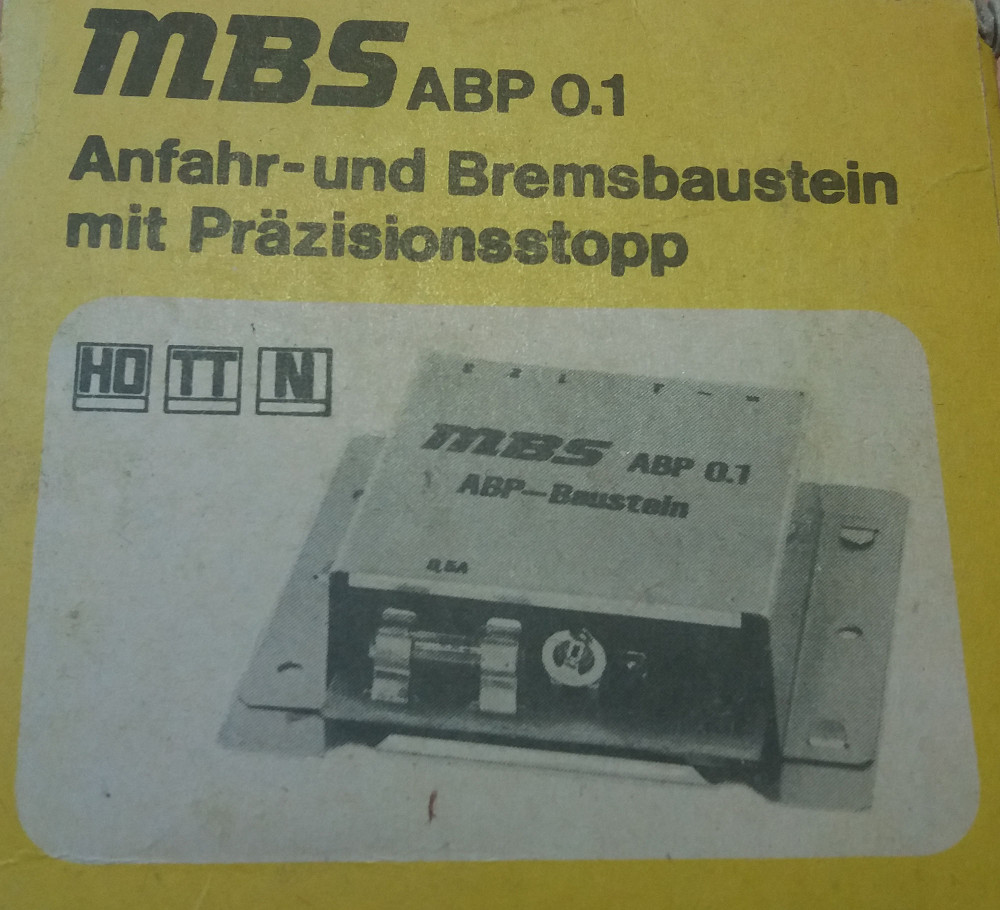
MBS ABP 0.1 Block-,Anfahr- und
Bremsbaustein mit Päzisionsstopp
incl. Bedienungsanleitung und Anschlussplan
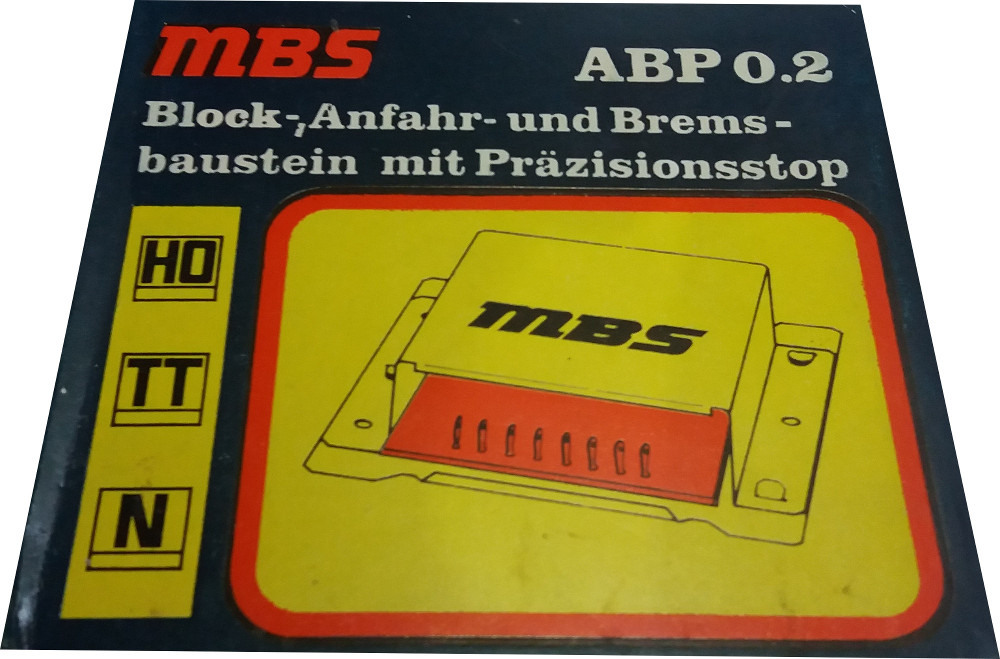
14 Bilder zu:
Bild 1 von 14 - MBS Block-, Anfahr- und Bremsbaustein mit Päzisionsstopp incl. Beschreibung
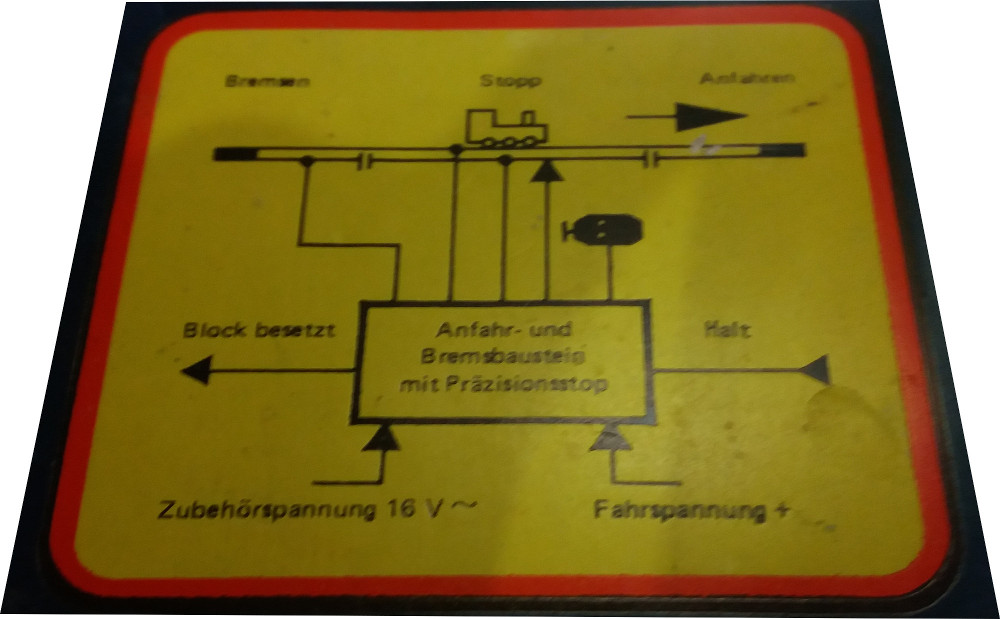 Bild 2 von 14 - MBS Block-, Anfahr- und Bremsbaustein mit Päzisionsstopp incl. Beschreibung
 Bild 3 von 14 - MBS Block-, Anfahr- und Bremsbaustein mit Päzisionsstopp incl. Beschreibung
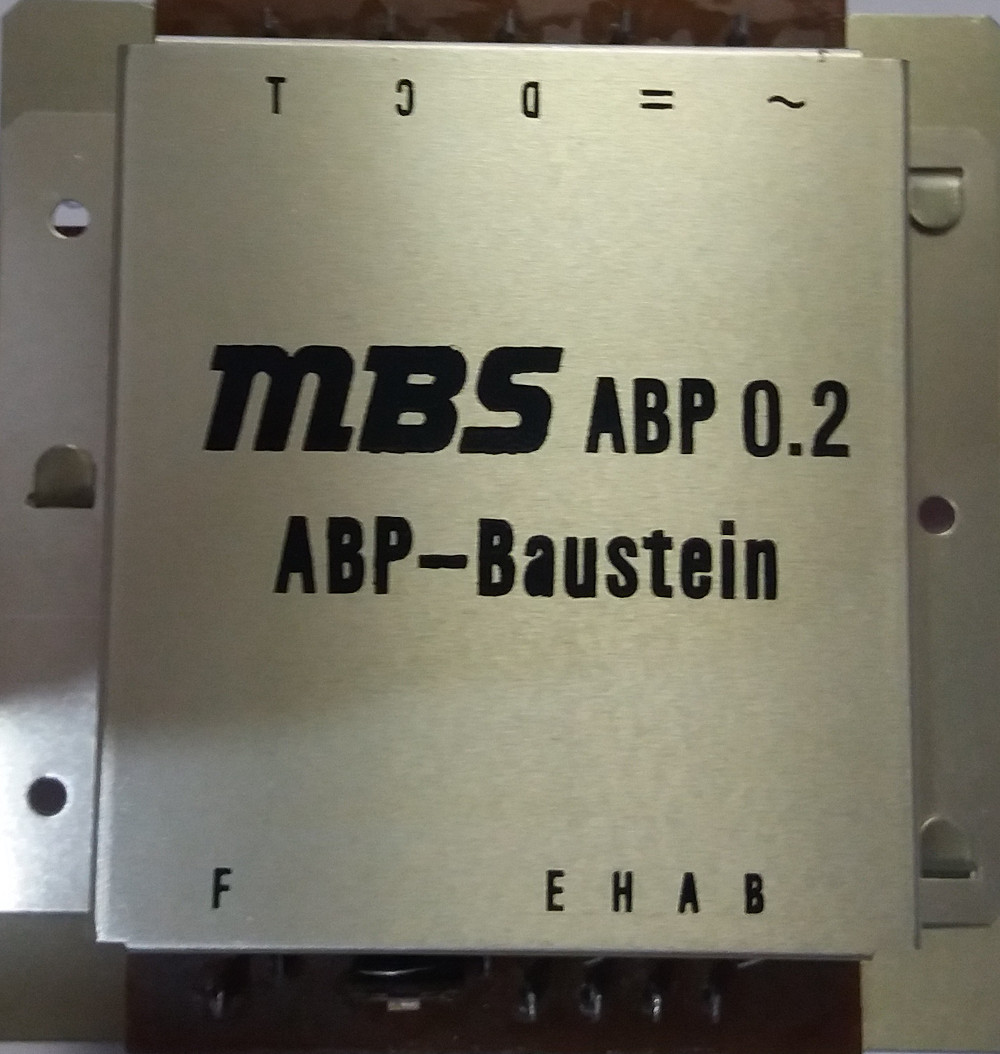 Bild 4 von 14 - MBS Block-, Anfahr- und Bremsbaustein mit Päzisionsstopp incl. Beschreibung
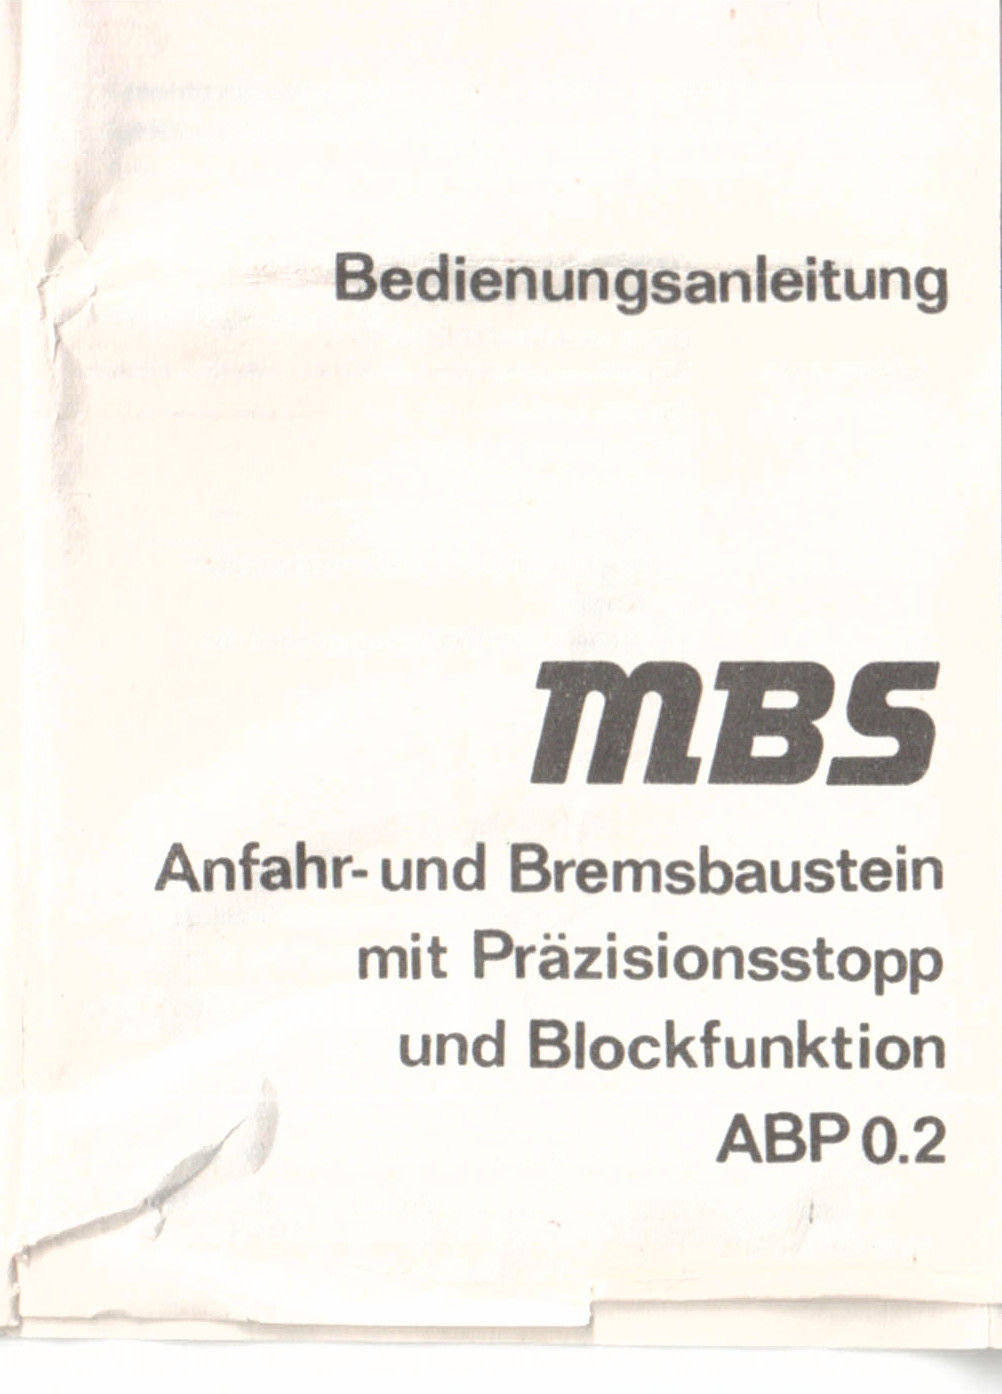 Bild 5 von 14 - MBS Block-, Anfahr- und Bremsbaustein mit Päzisionsstopp incl. Beschreibung
 Bild 6 von 14 - MBS Block-, Anfahr- und Bremsbaustein mit Päzisionsstopp incl. Beschreibung
 Bild 7 von 14 - MBS Block-, Anfahr- und Bremsbaustein mit Päzisionsstopp incl. Beschreibung
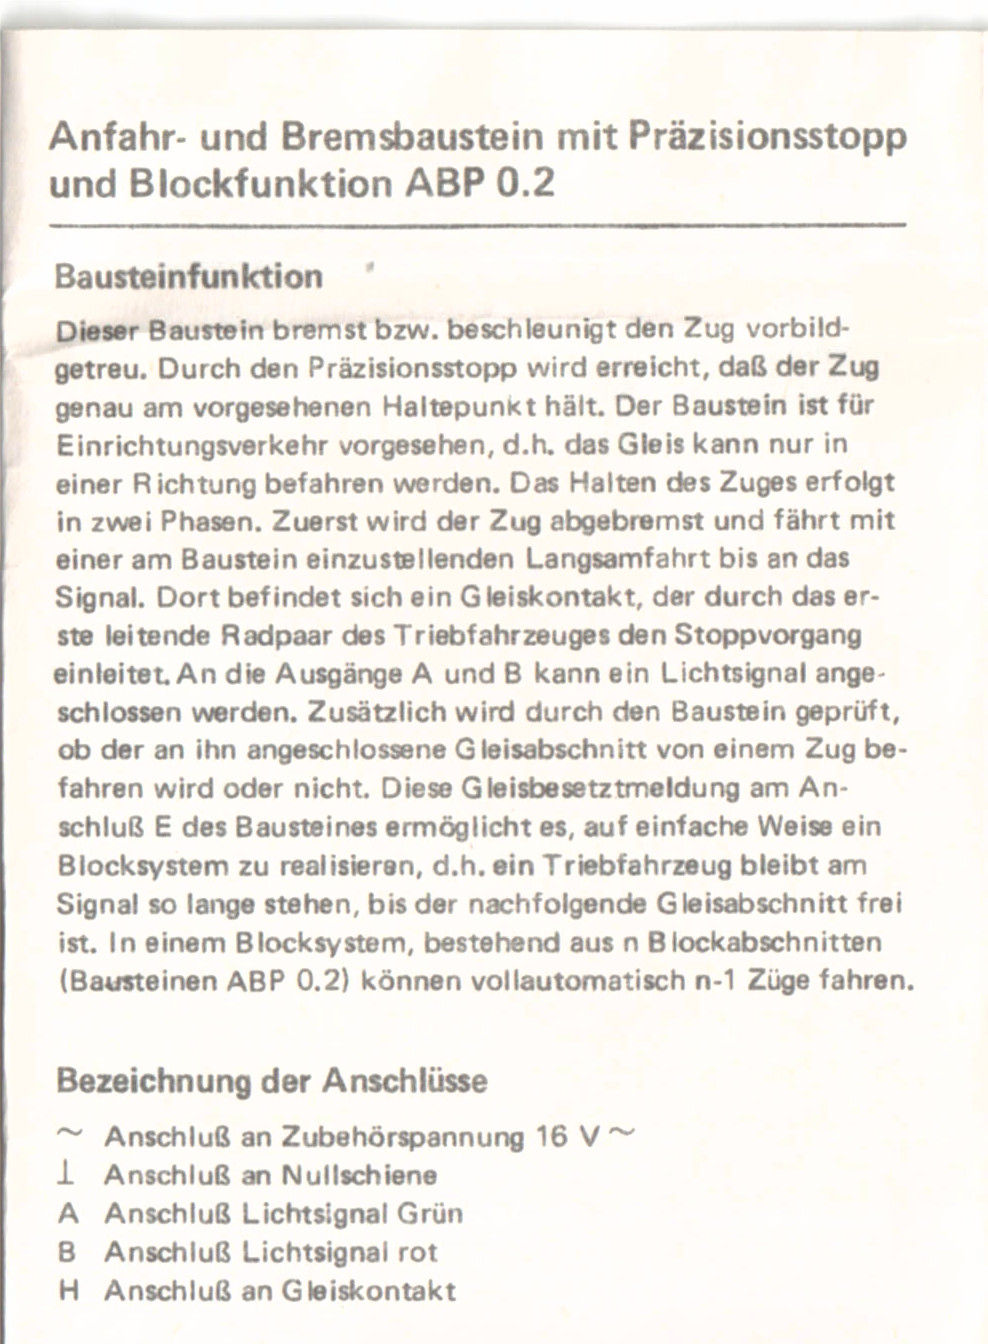 Bild 8 von 14 - MBS Block-, Anfahr- und Bremsbaustein mit Päzisionsstopp incl. Beschreibung
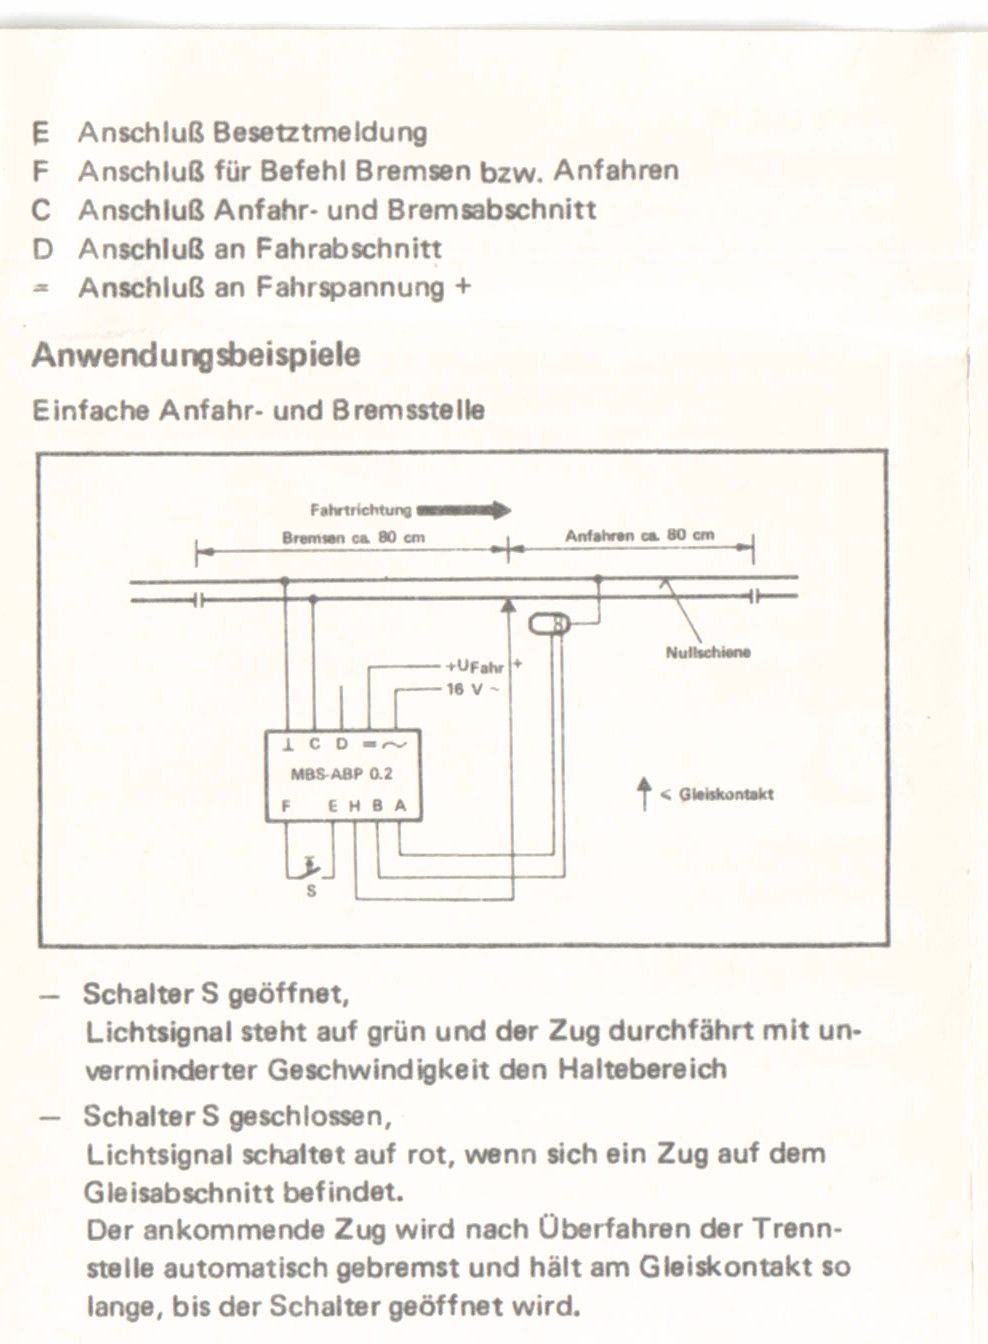 Bild 9 von 14 - MBS Block-, Anfahr- und Bremsbaustein mit Päzisionsstopp incl. Beschreibung
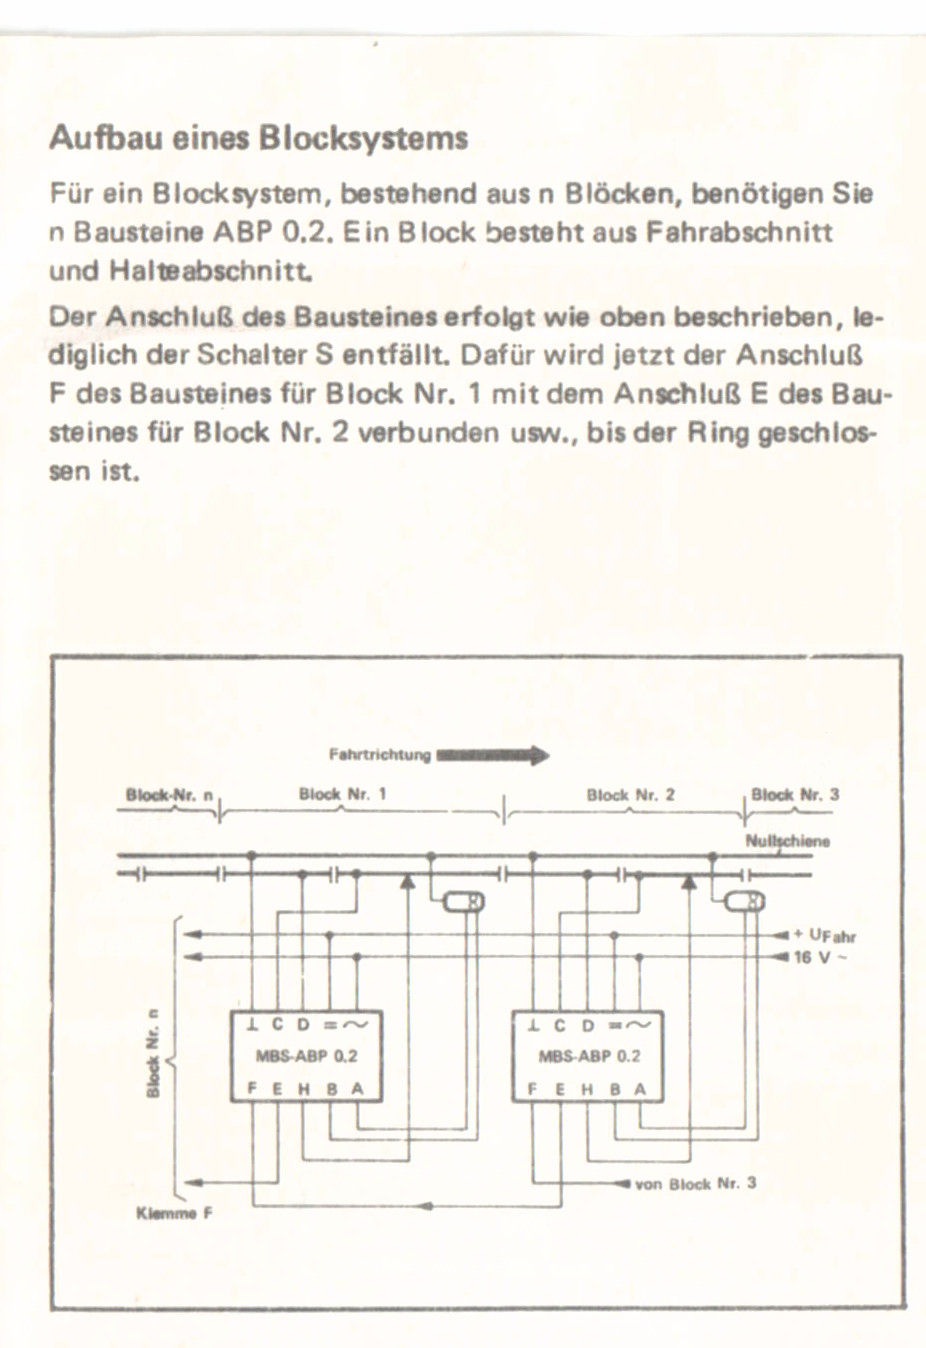 Bild 10 von 14 - MBS Block-, Anfahr- und Bremsbaustein mit Päzisionsstopp incl. Beschreibung
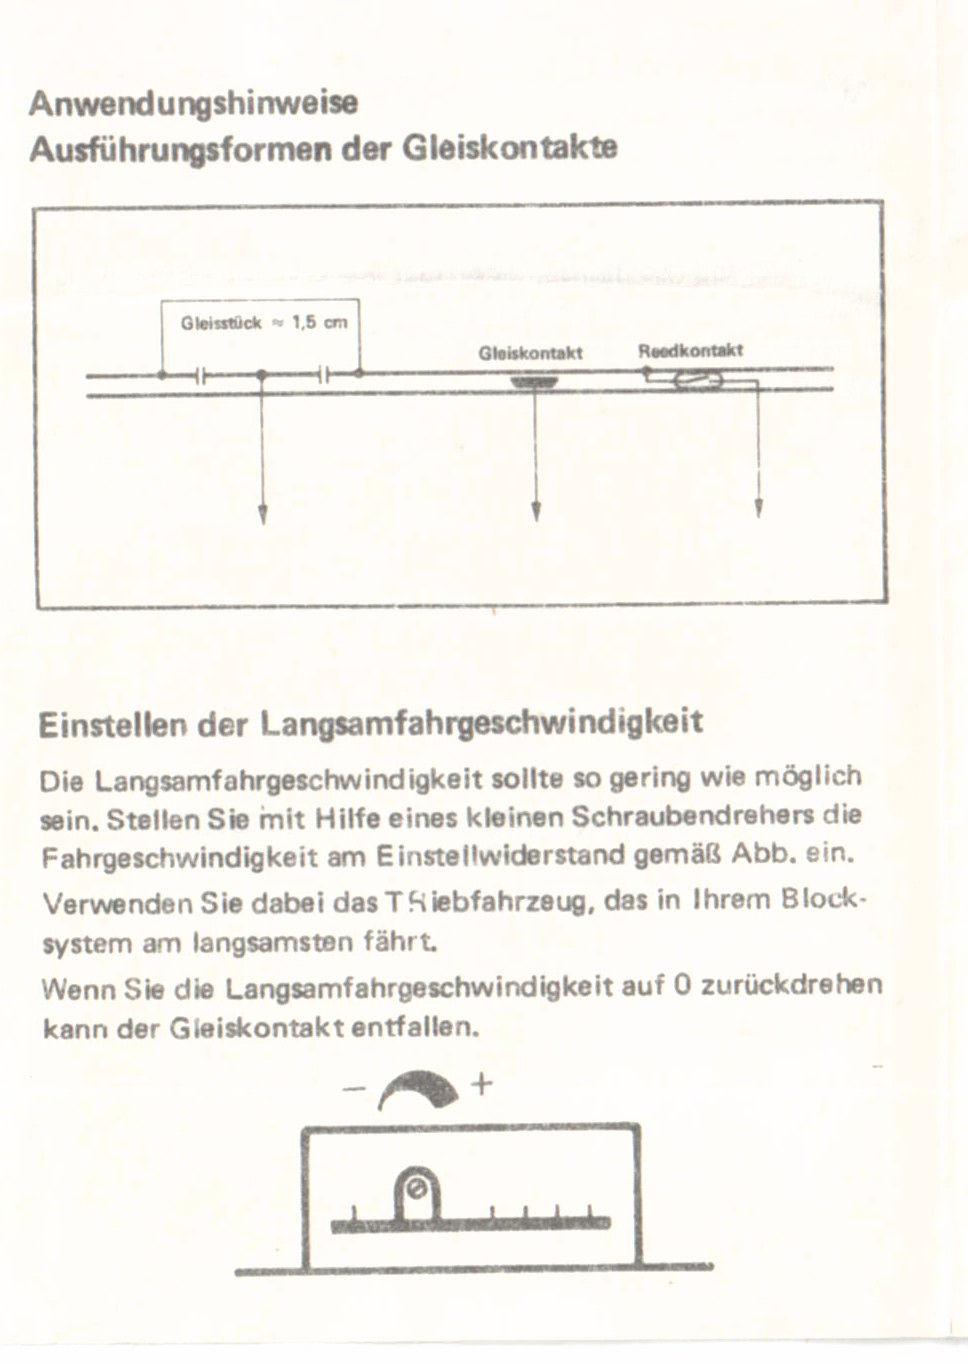 Bild 11 von 14 - MBS Block-, Anfahr- und Bremsbaustein mit Päzisionsstopp incl. Beschreibung
 Bild 12 von 14 - MBS Block-, Anfahr- und Bremsbaustein mit Päzisionsstopp incl. Beschreibung
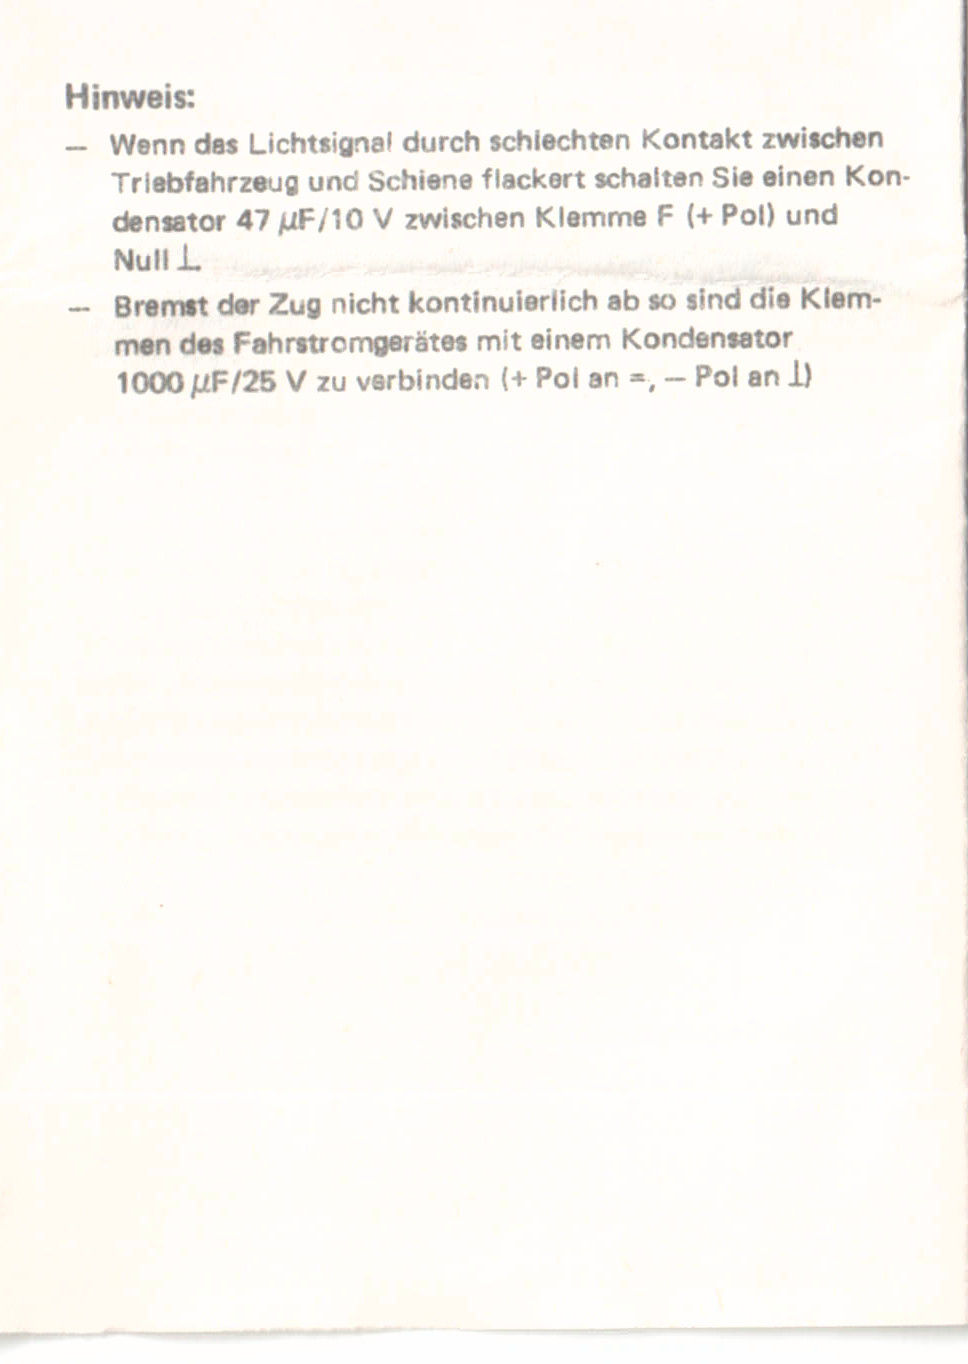 Bild 13 von 14 - MBS Block-, Anfahr- und Bremsbaustein mit Päzisionsstopp incl. Beschreibung
 Bild 14 von 14 - MBS Block-, Anfahr- und Bremsbaustein mit Päzisionsstopp incl. Beschreibung
MBS ABP 0.2 Block-,Anfahr- und
Bremsbaustein mit Päzisionsstopp
incl. Bedienungsanleitung und Anschlussplan
12 Bilder zu:
Bild 1 von 12 - MBS Blocksteuerung B3.1 incl. Beschreibung
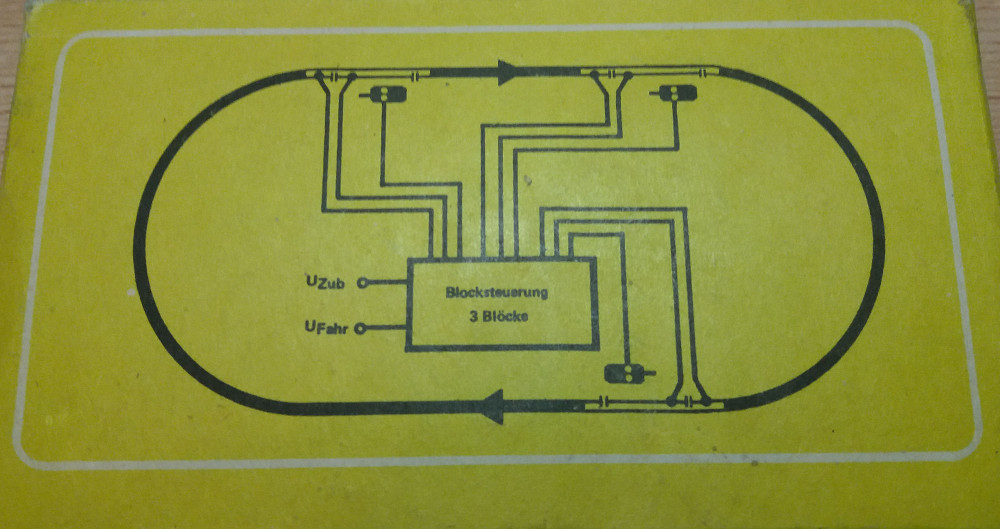 Bild 2 von 12 - MBS Blocksteuerung B3.1 incl. Beschreibung
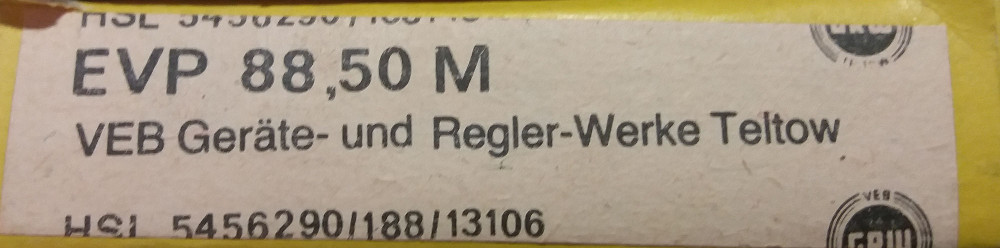 Bild 3 von 12 - MBS Blocksteuerung B3.1 incl. Beschreibung
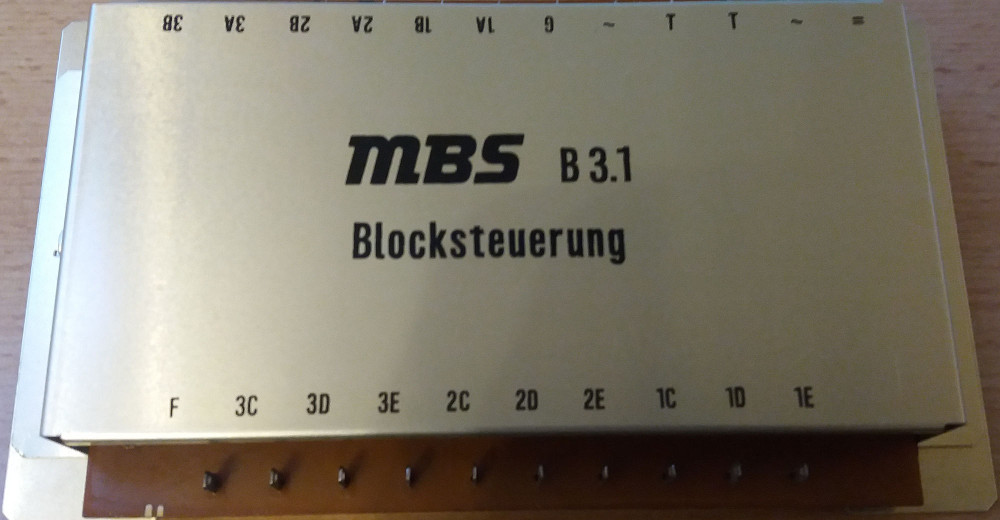 Bild 4 von 12 - MBS Blocksteuerung B3.1 incl. Beschreibung
 Bild 5 von 12 - MBS Blocksteuerung B3.1 incl. Beschreibung
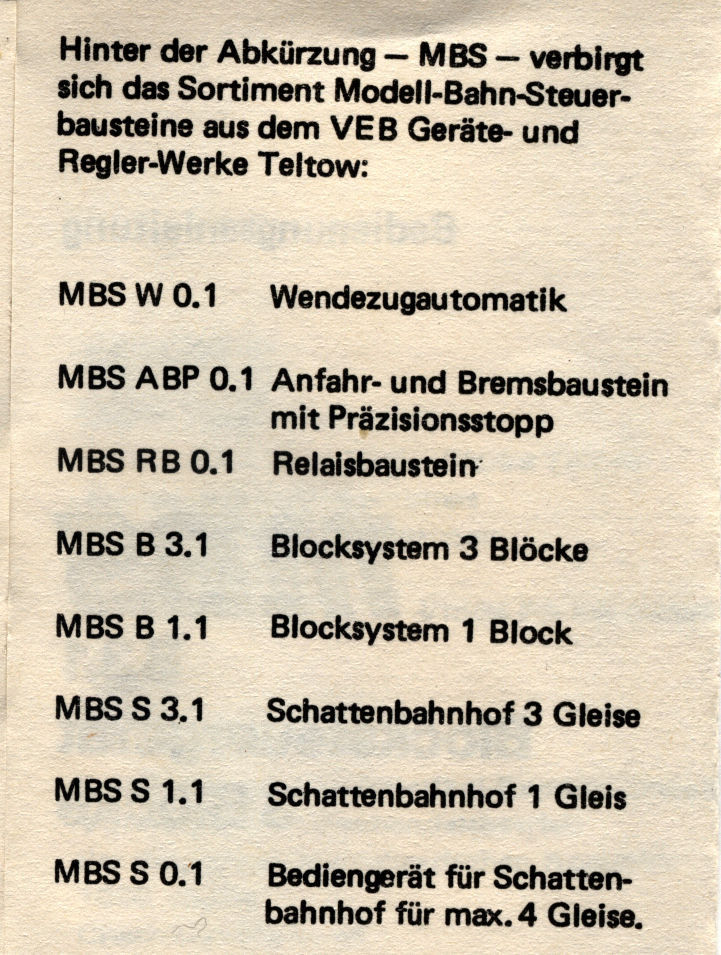 Bild 6 von 12 - MBS Blocksteuerung B3.1 incl. Beschreibung
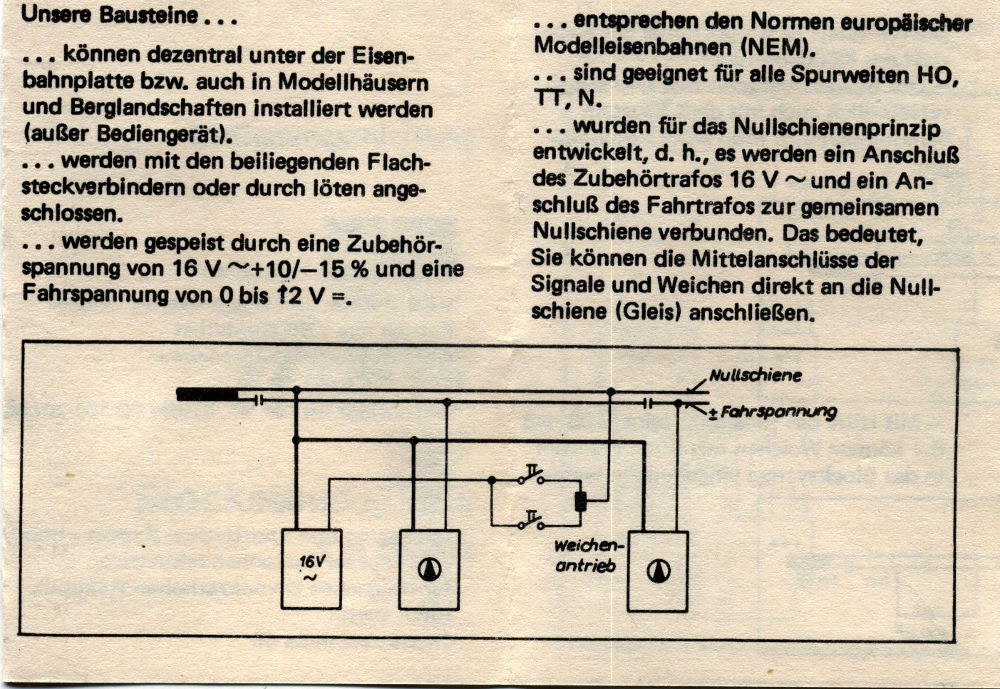 Bild 7 von 12 - MBS Blocksteuerung B3.1 incl. Beschreibung
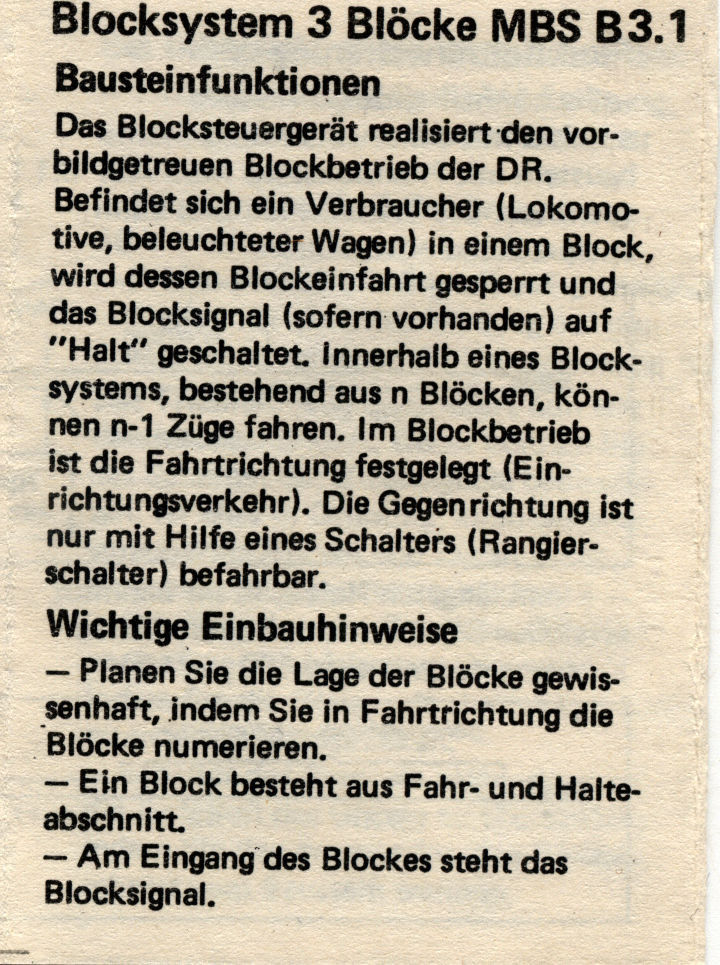 Bild 8 von 12 - MBS Blocksteuerung B3.1 incl. Beschreibung
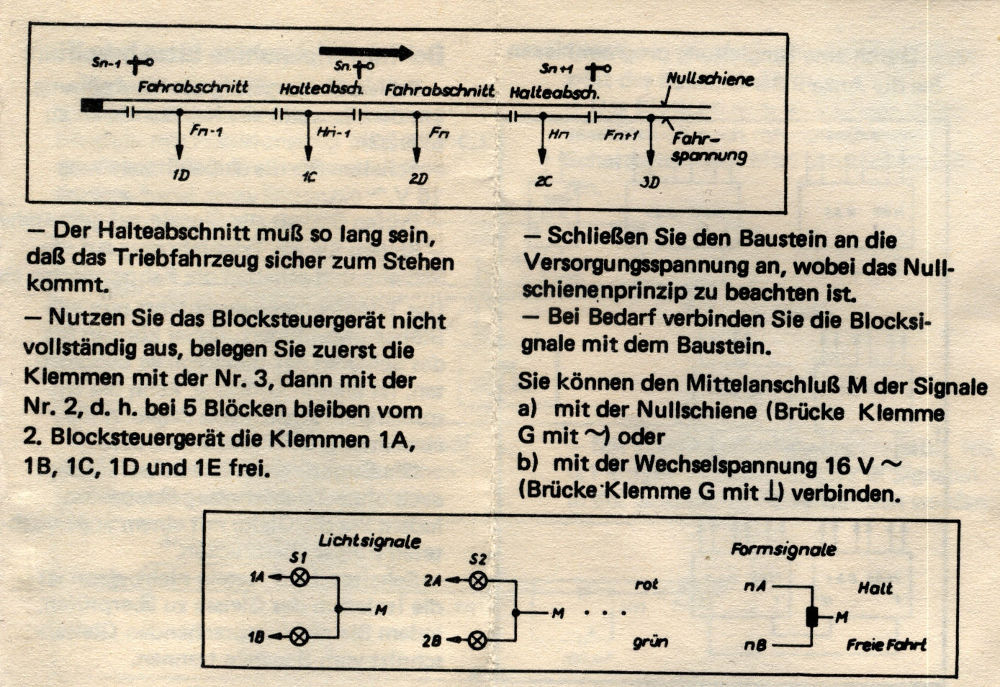 Bild 9 von 12 - MBS Blocksteuerung B3.1 incl. Beschreibung
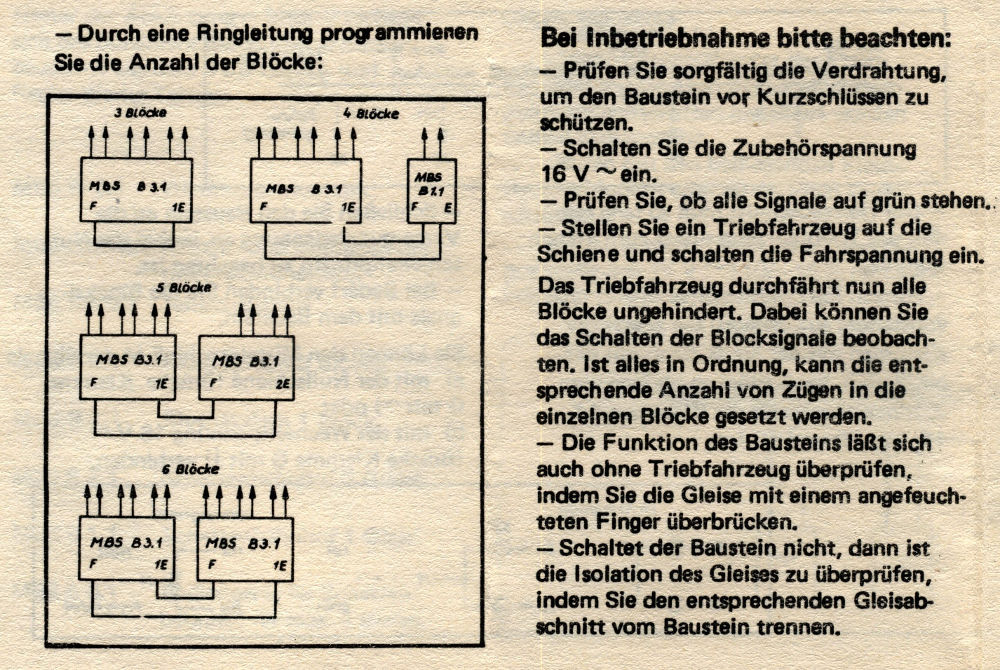 Bild 10 von 12 - MBS Blocksteuerung B3.1 incl. Beschreibung
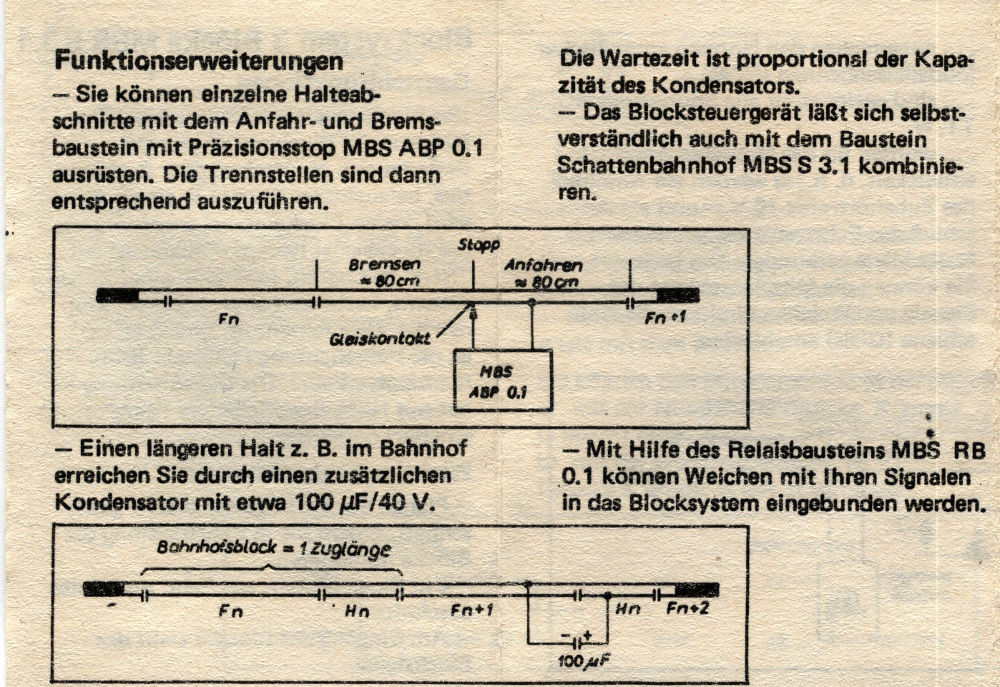 Bild 11 von 12 - MBS Blocksteuerung B3.1 incl. Beschreibung
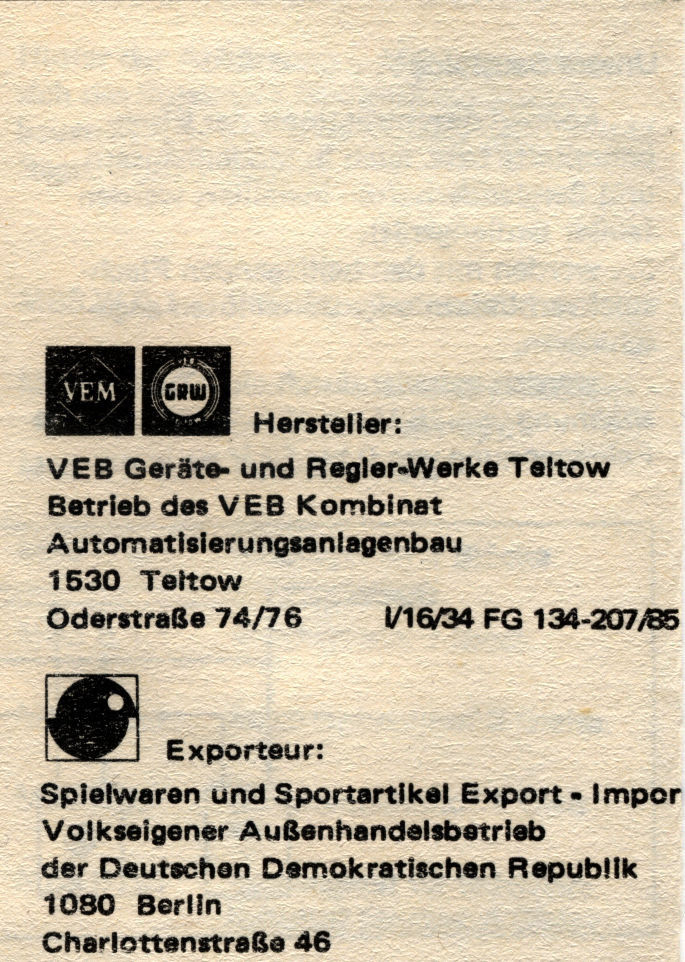 Bild 12 von 12 - MBS Blocksteuerung B3.1 incl. Beschreibung
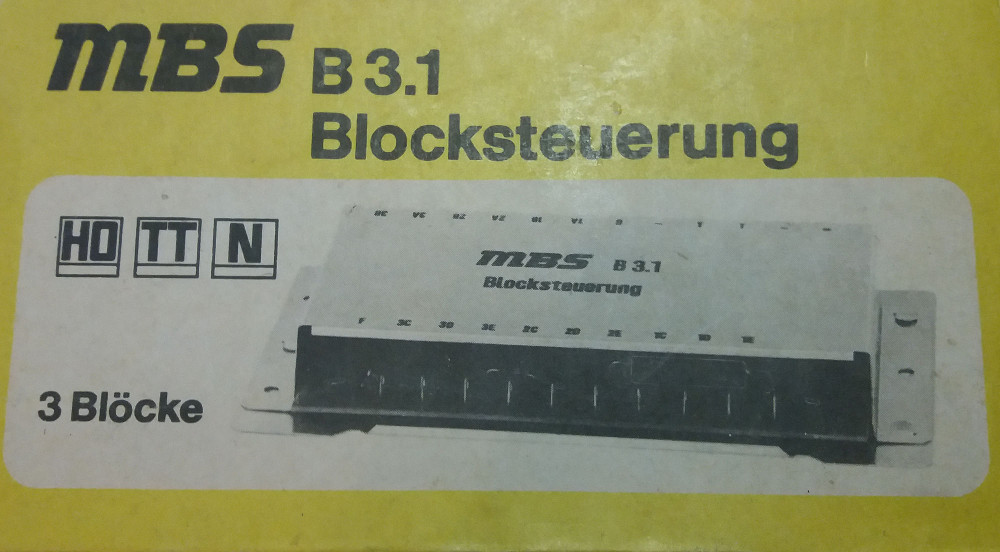
MBS Blocksteuerung B3.1 3 Blöcke
incl. Bedienungsanleitung und Anschlussplan
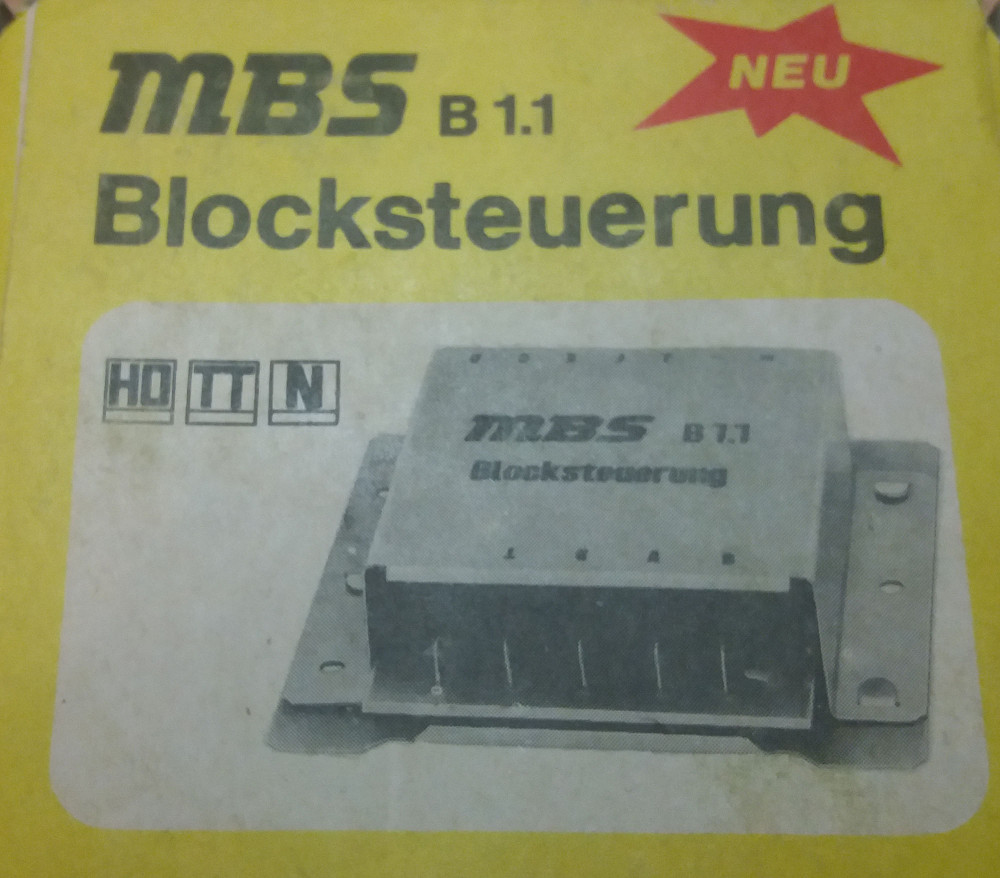
12 Bilder zu:
Bild 1 von 12 - MBS Blocksteuerung B1.1 incl. Beschreibung
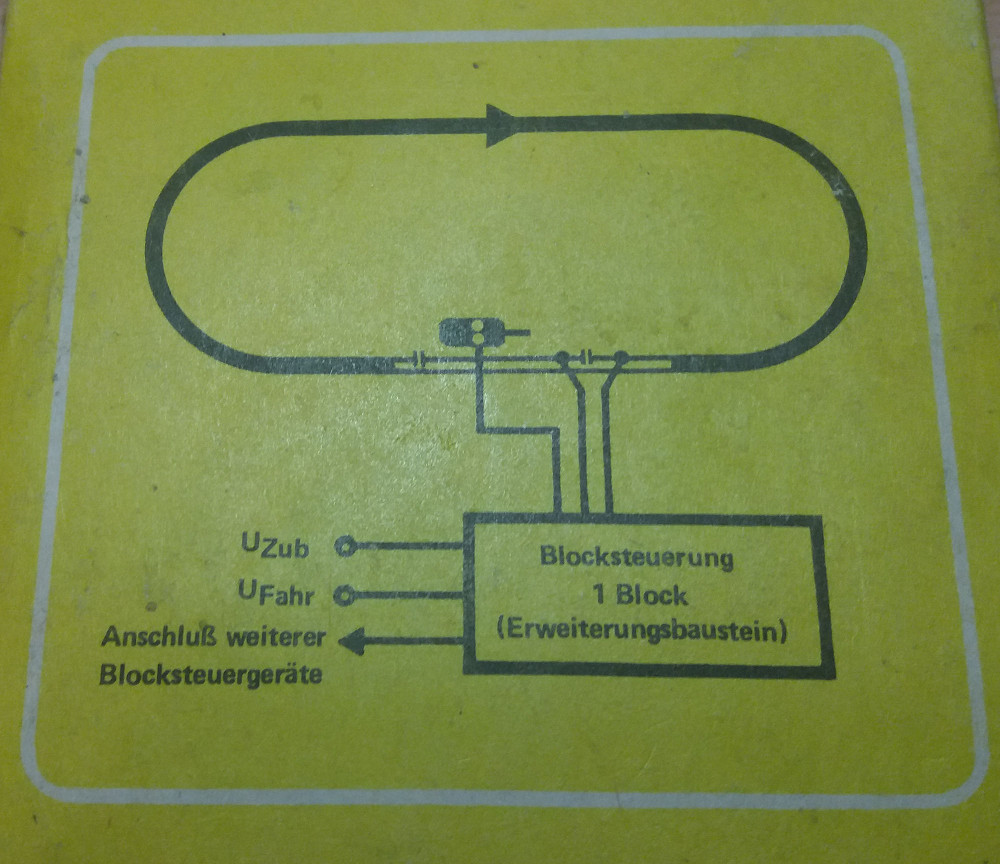 Bild 2 von 12 - MBS Blocksteuerung B1.1 incl. Beschreibung
 Bild 3 von 12 - MBS Blocksteuerung B1.1 incl. Beschreibung
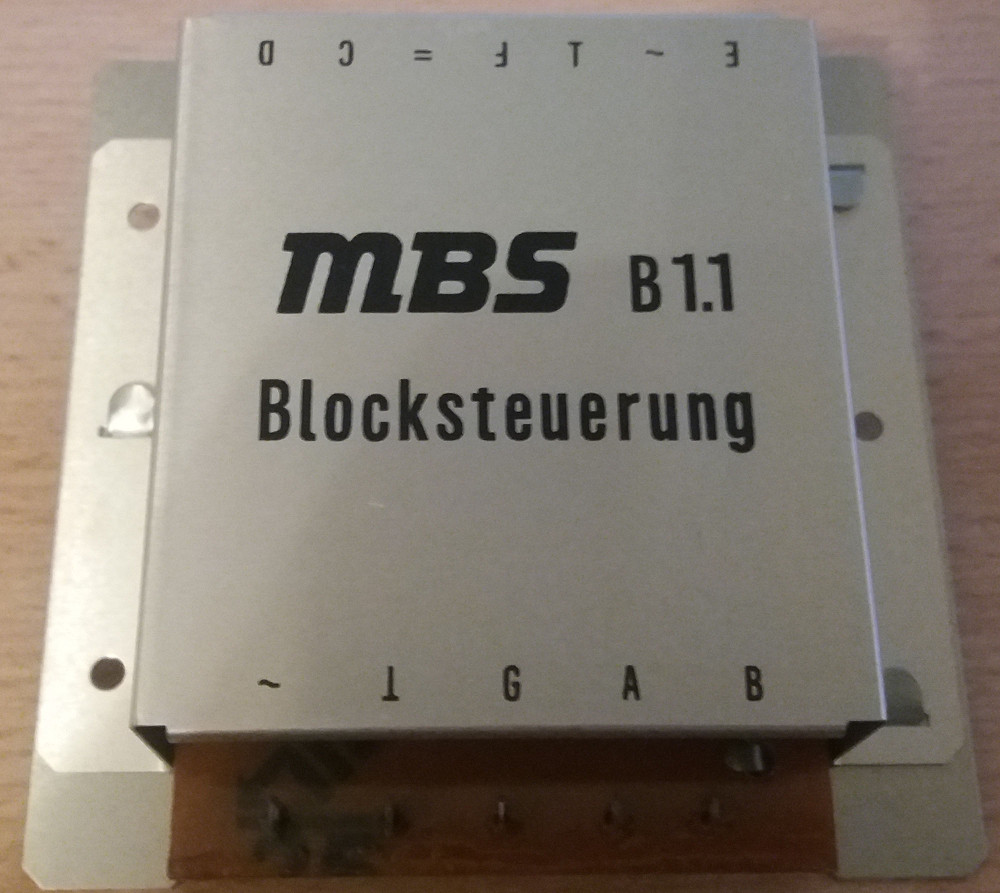 Bild 4 von 12 - MBS Blocksteuerung B1.1 incl. Beschreibung
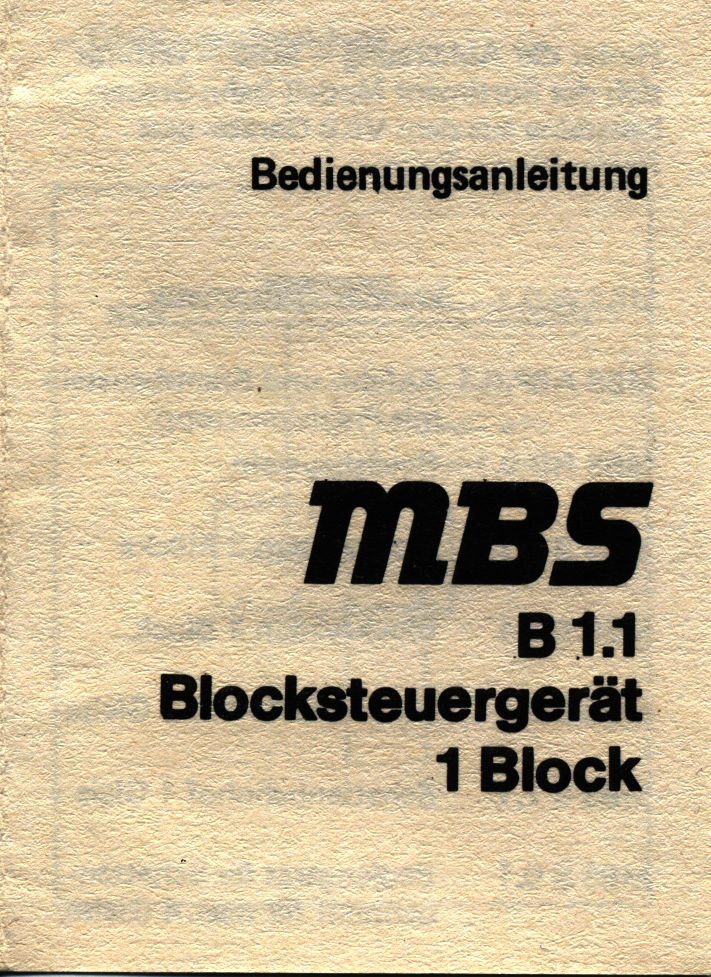 Bild 5 von 12 - MBS Blocksteuerung B1.1 incl. Beschreibung
 Bild 6 von 12 - MBS Blocksteuerung B1.1 incl. Beschreibung
 Bild 7 von 12 - MBS Blocksteuerung B1.1 incl. Beschreibung
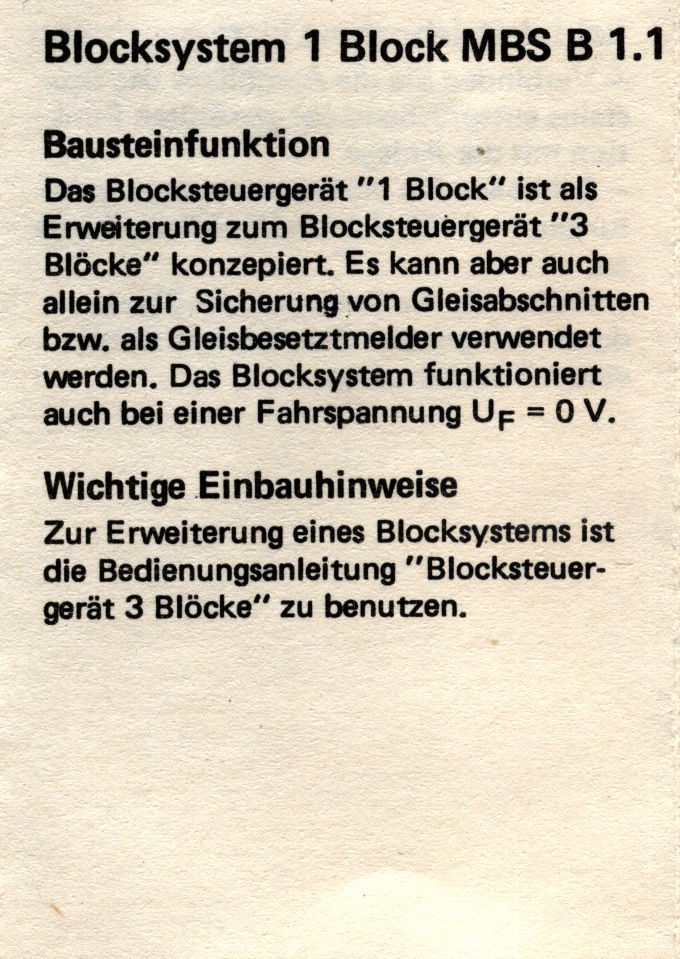 Bild 8 von 12 - MBS Blocksteuerung B1.1 incl. Beschreibung
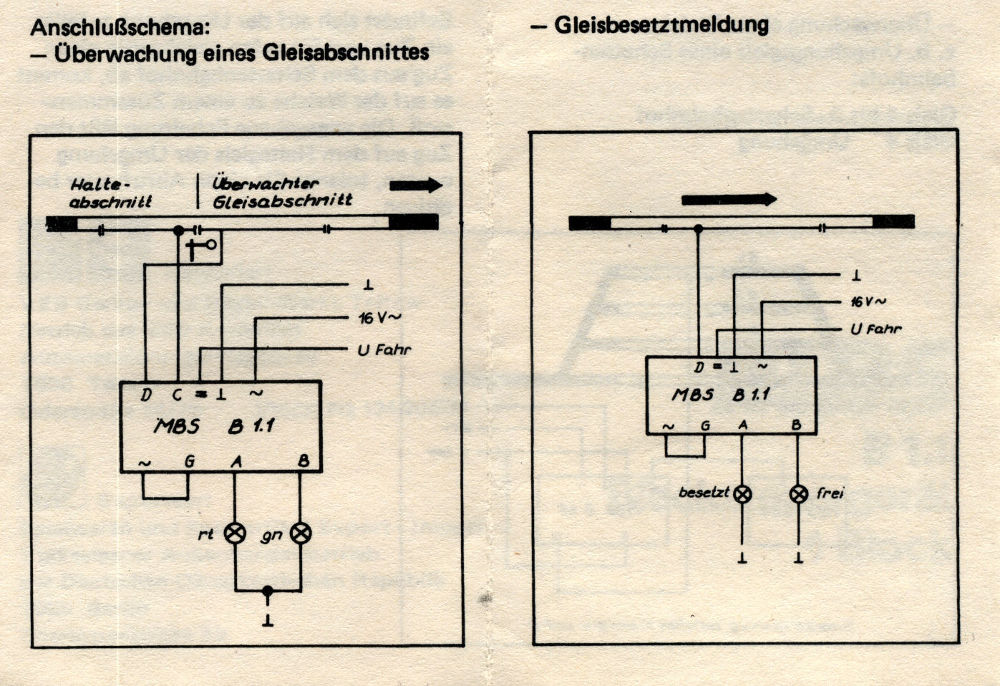 Bild 9 von 12 - MBS Blocksteuerung B1.1 incl. Beschreibung
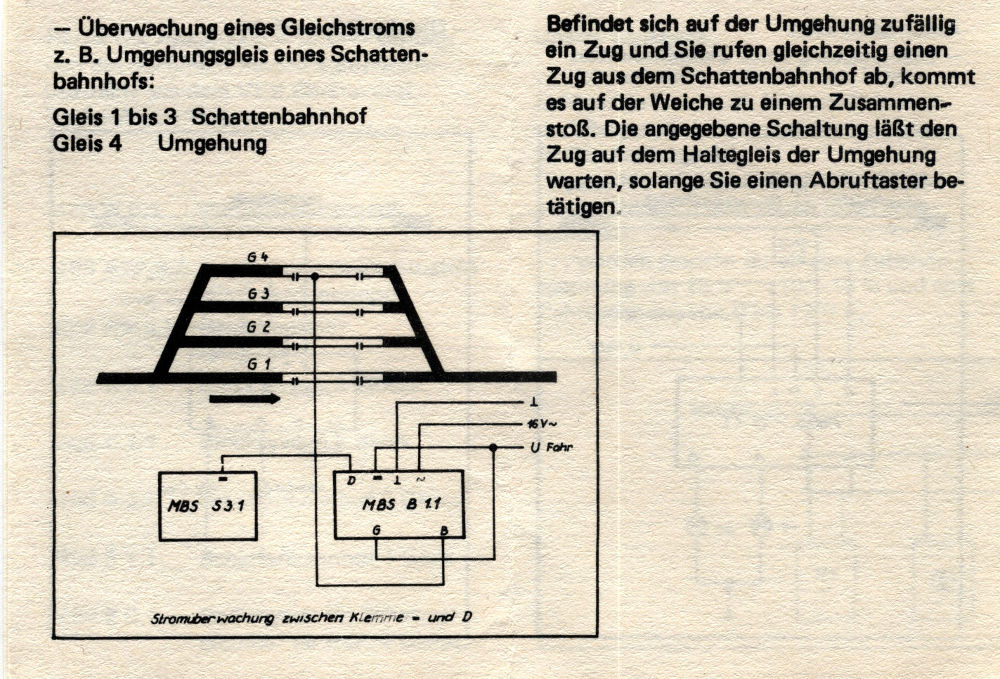 Bild 10 von 12 - MBS Blocksteuerung B1.1 incl. Beschreibung
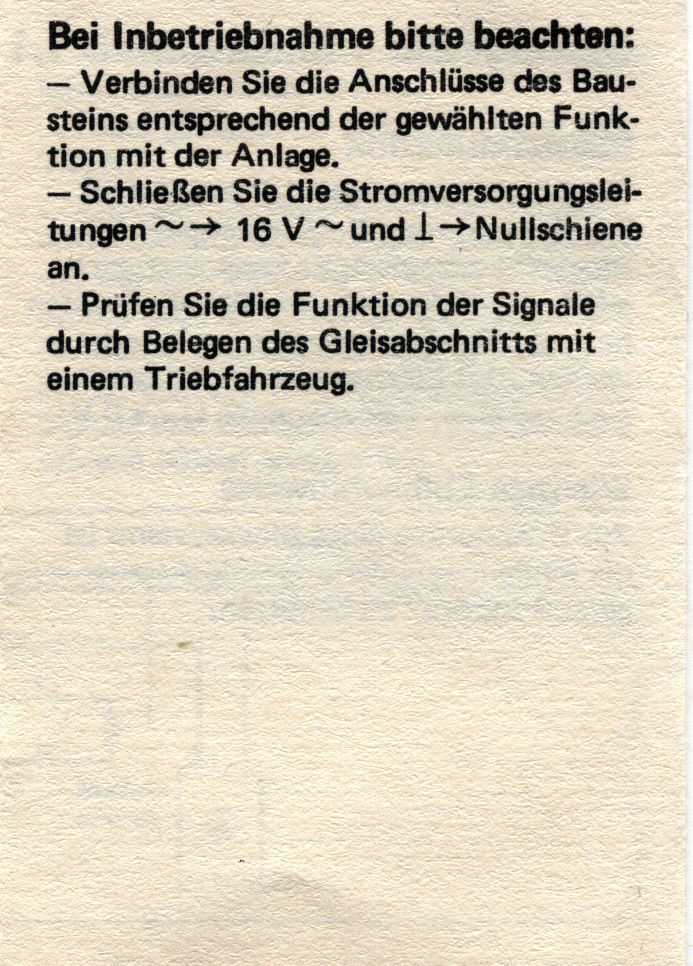 Bild 11 von 12 - MBS Blocksteuerung B1.1 incl. Beschreibung
 Bild 12 von 12 - MBS Blocksteuerung B1.1 incl. Beschreibung
MBS Blocksteureung B1.1 1 Block
Erweiterungsbaustein
incl. Bedienungsanleitung und Anschlussplan
14 Bilder zu:
Bild 1 von 14 - MBS Schattenbahnhof S1.2 - 1 Gleis
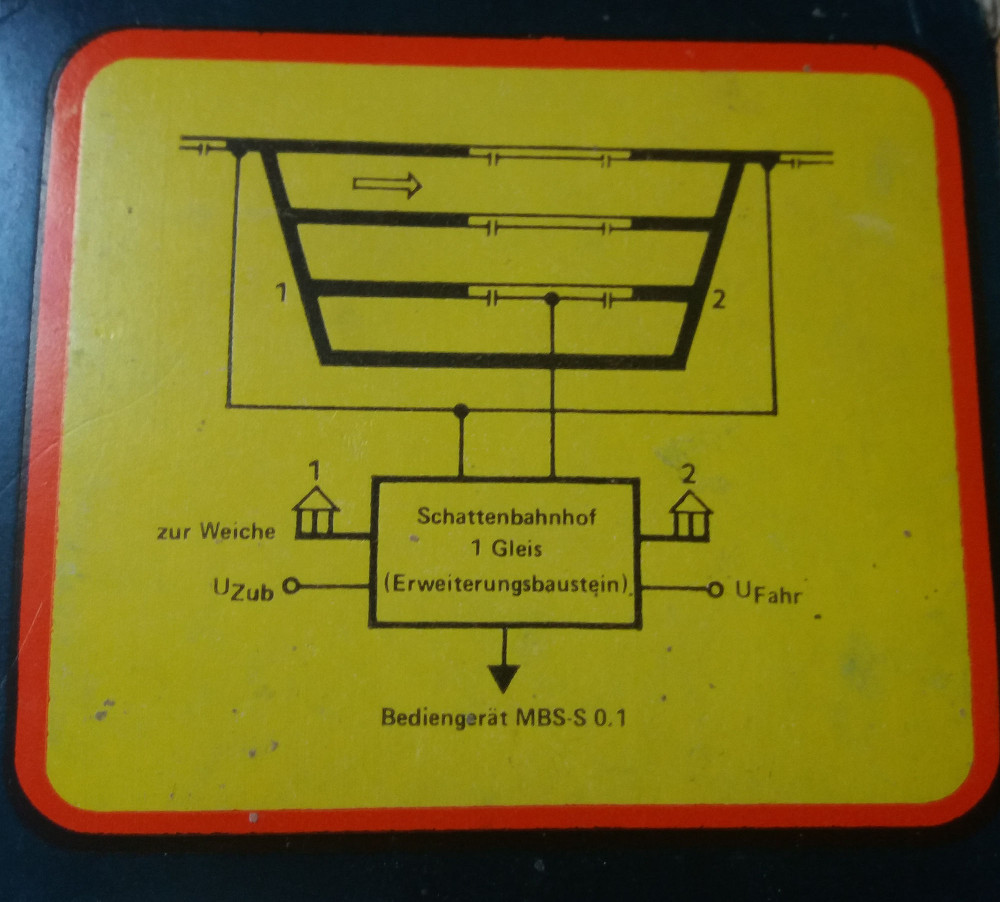 Bild 2 von 14 - MBS Schattenbahnhof S1.2 - 1 Gleis
 Bild 3 von 14 - MBS Schattenbahnhof S1.2 - 1 Gleis
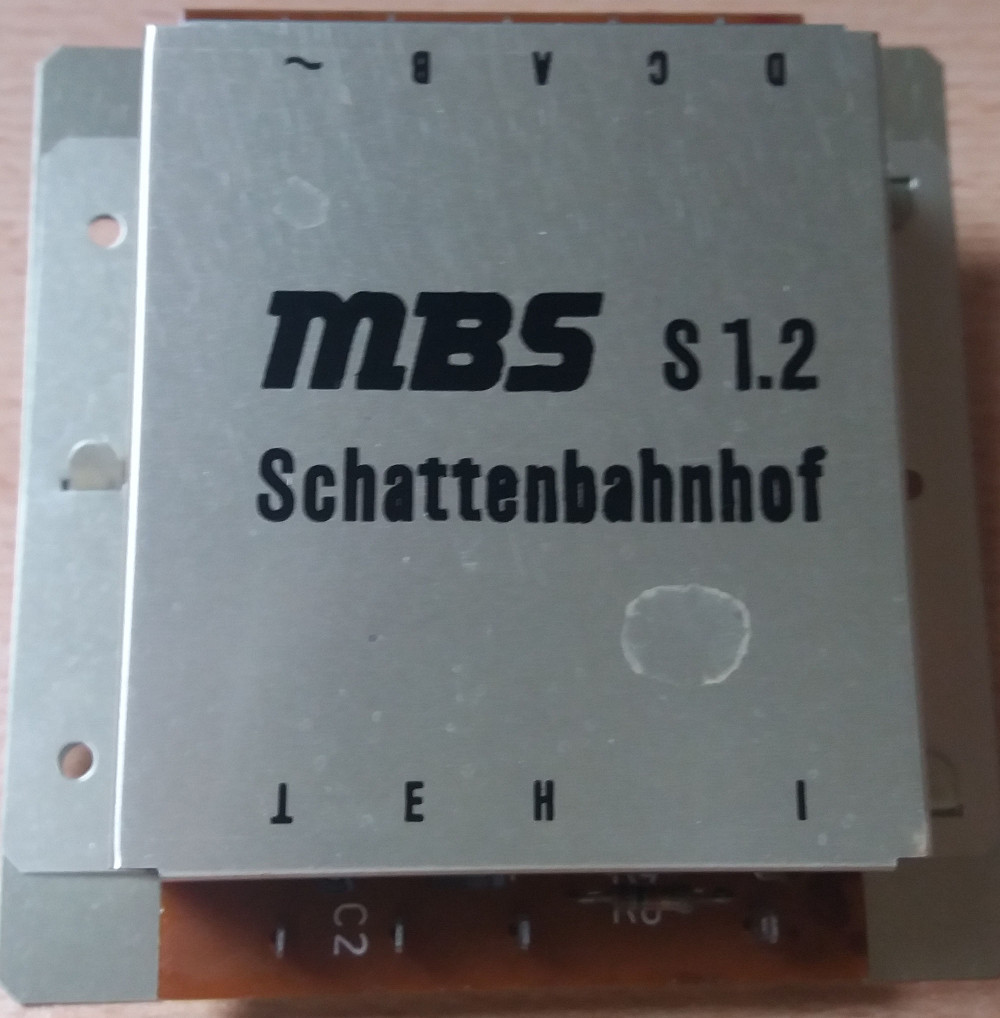 Bild 4 von 14 - MBS Schattenbahnhof S1.2 - 1 Gleis
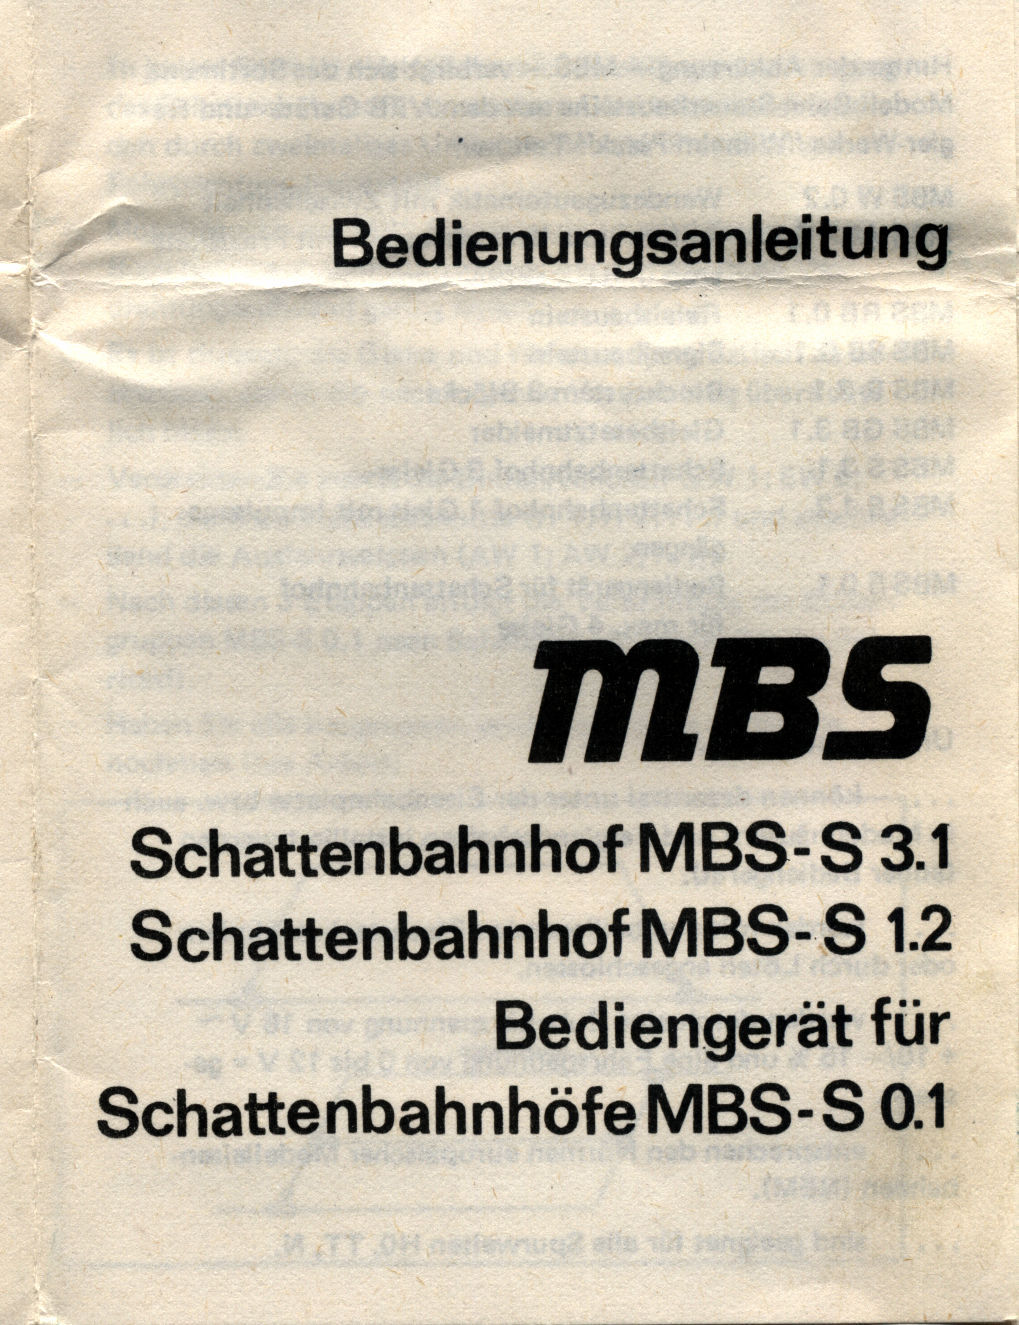 Bild 5 von 14 - MBS Schattenbahnhof S1.2 - 1 Gleis
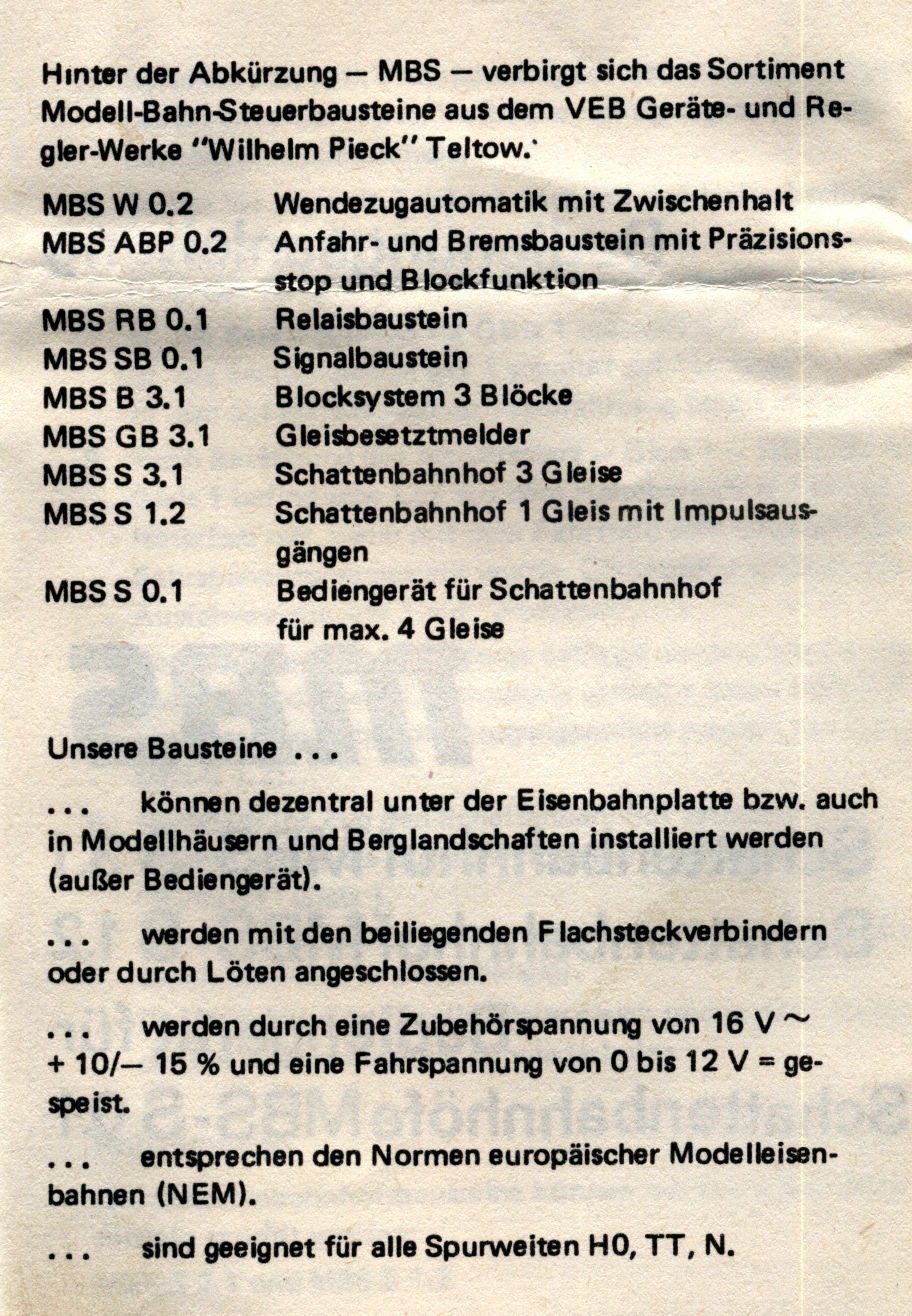 Bild 6 von 14 - MBS Schattenbahnhof S1.2 - 1 Gleis
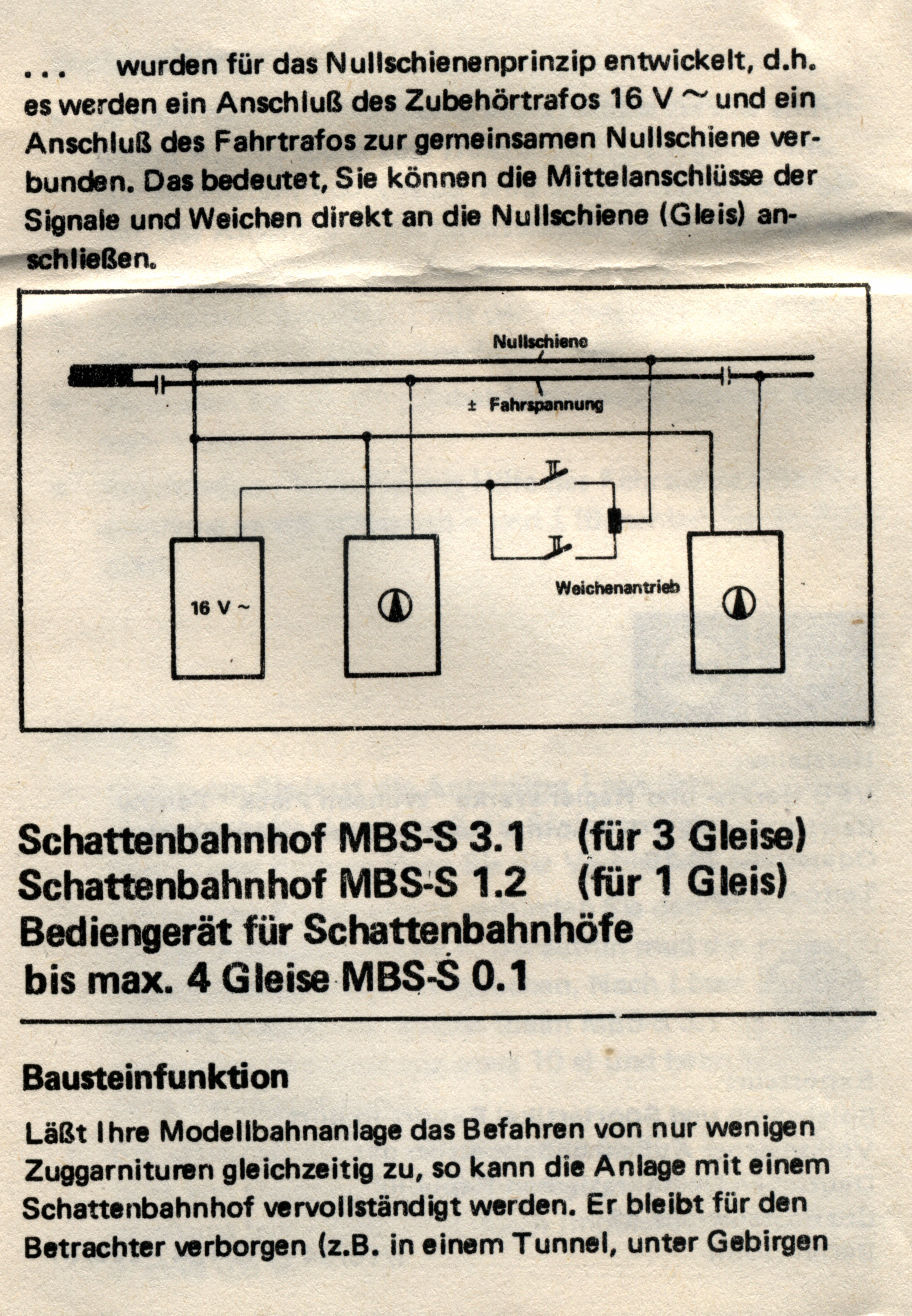 Bild 7 von 14 - MBS Schattenbahnhof S1.2 - 1 Gleis
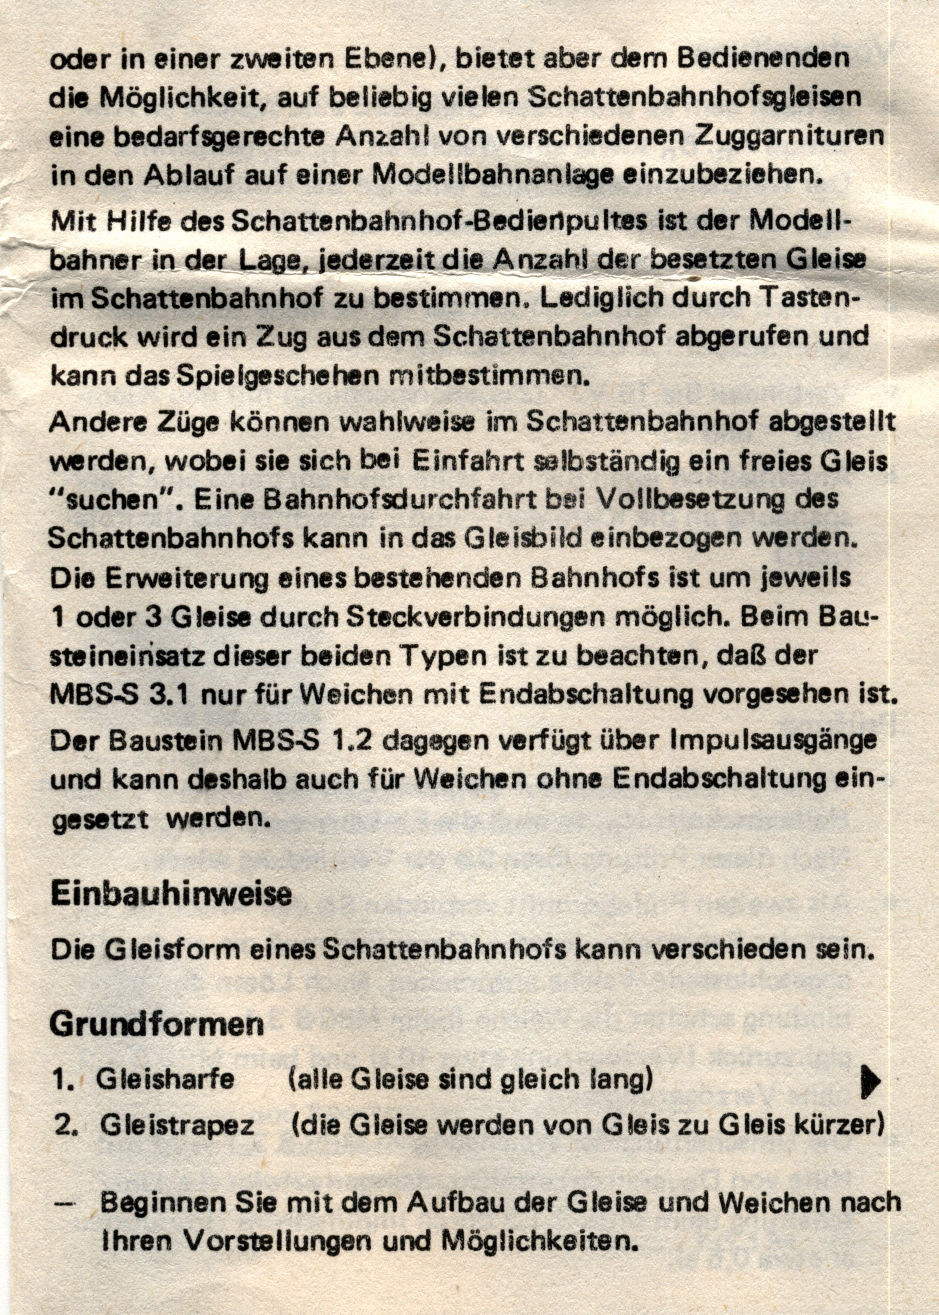 Bild 8 von 14 - MBS Schattenbahnhof S1.2 - 1 Gleis
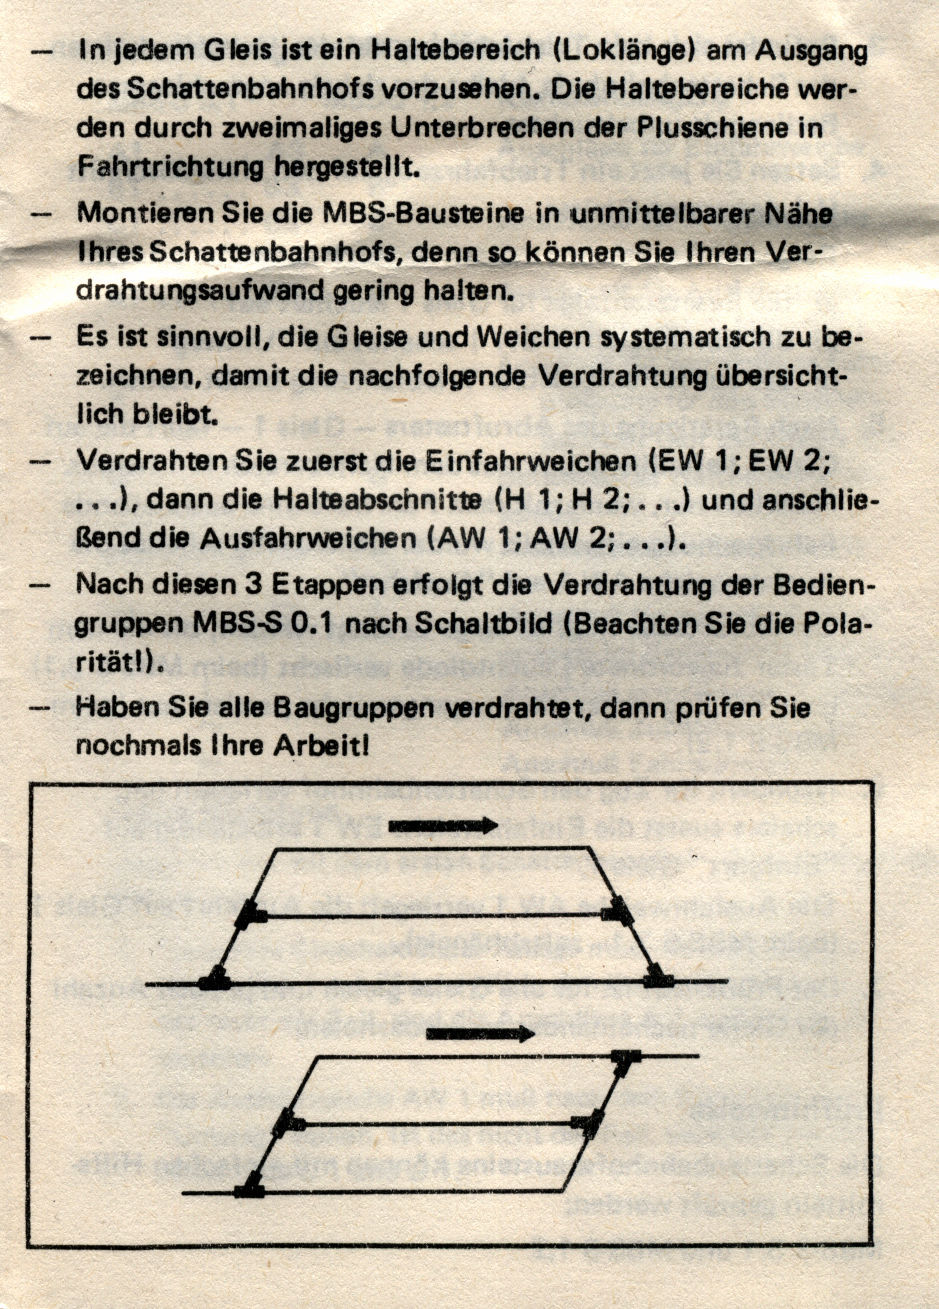 Bild 9 von 14 - MBS Schattenbahnhof S1.2 - 1 Gleis
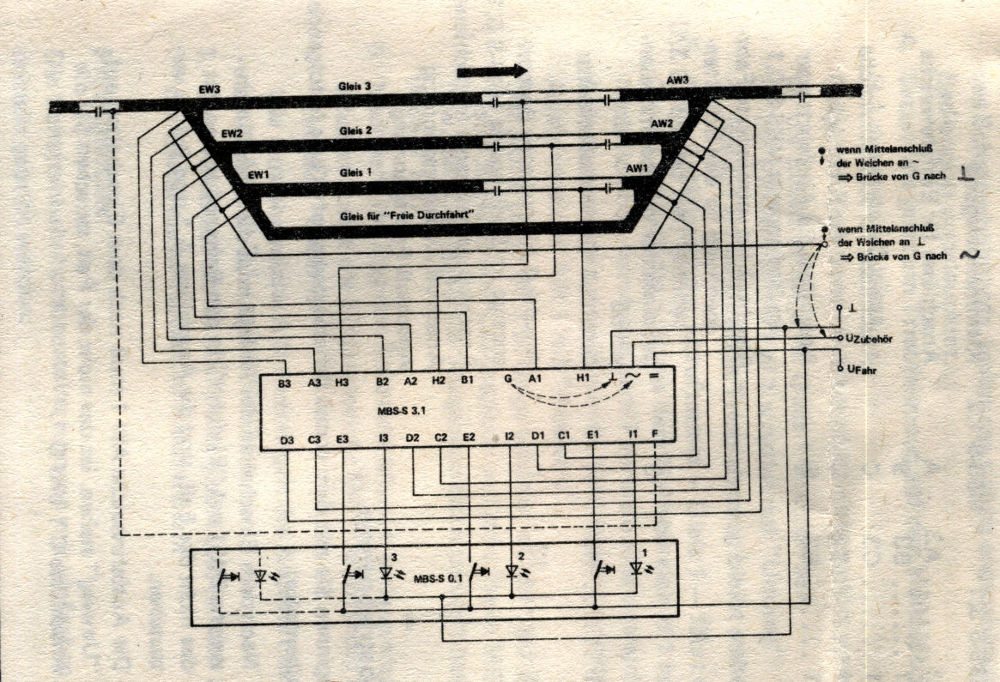 Bild 10 von 14 - MBS Schattenbahnhof S1.2 - 1 Gleis
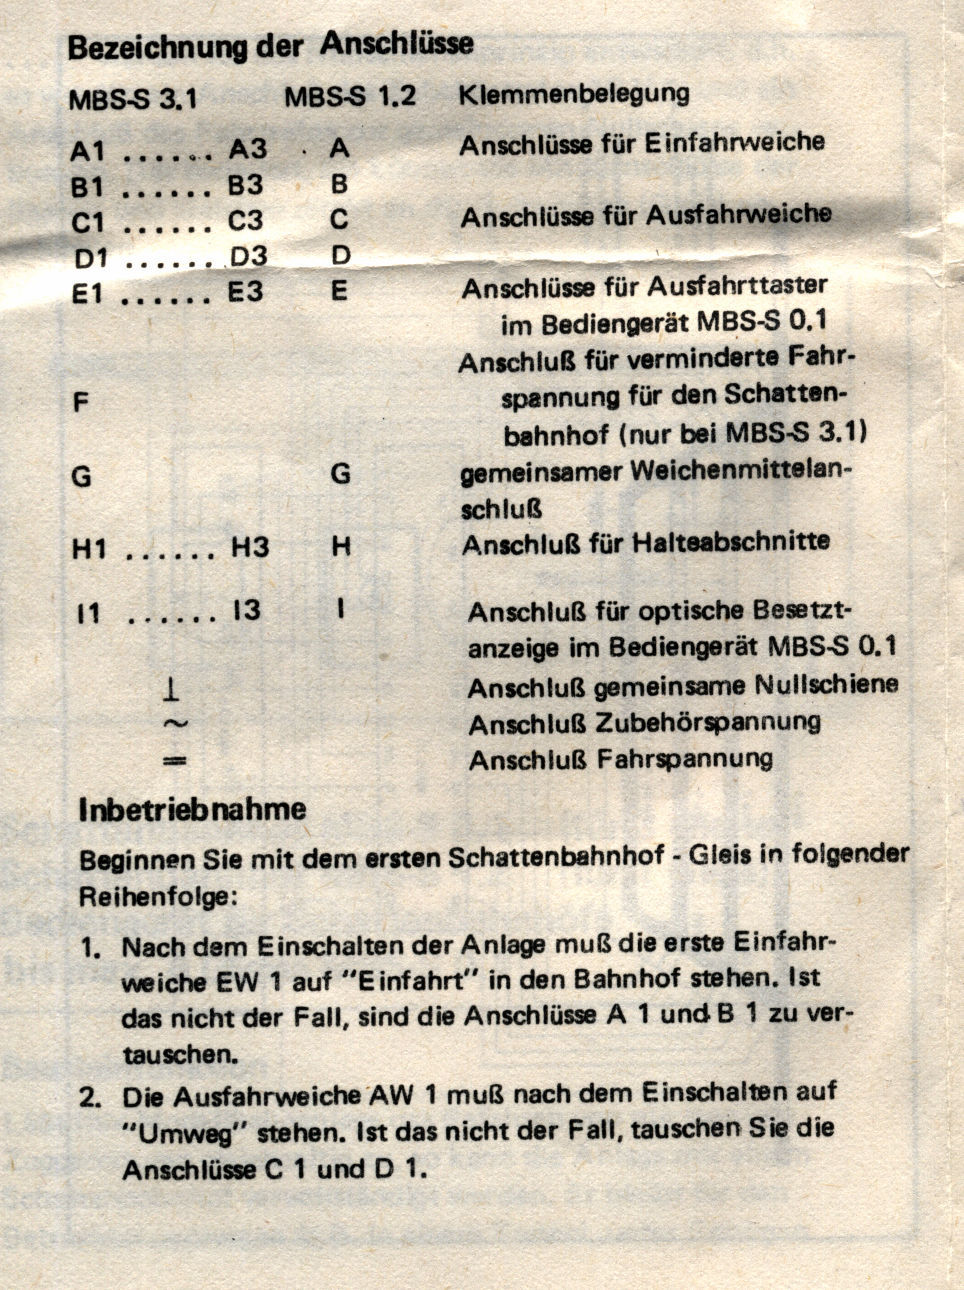 Bild 11 von 14 - MBS Schattenbahnhof S1.2 - 1 Gleis
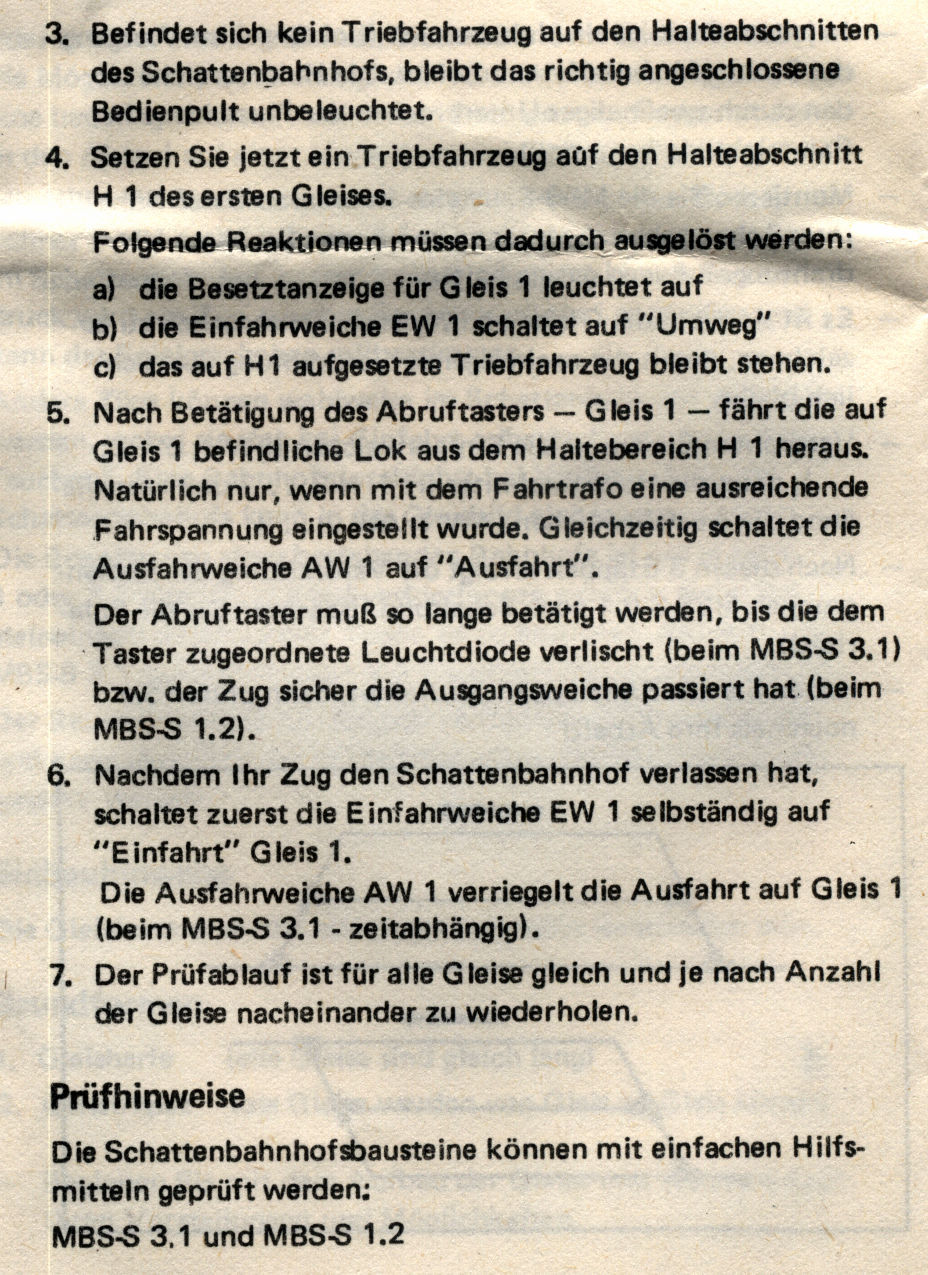 Bild 12 von 14 - MBS Schattenbahnhof S1.2 - 1 Gleis
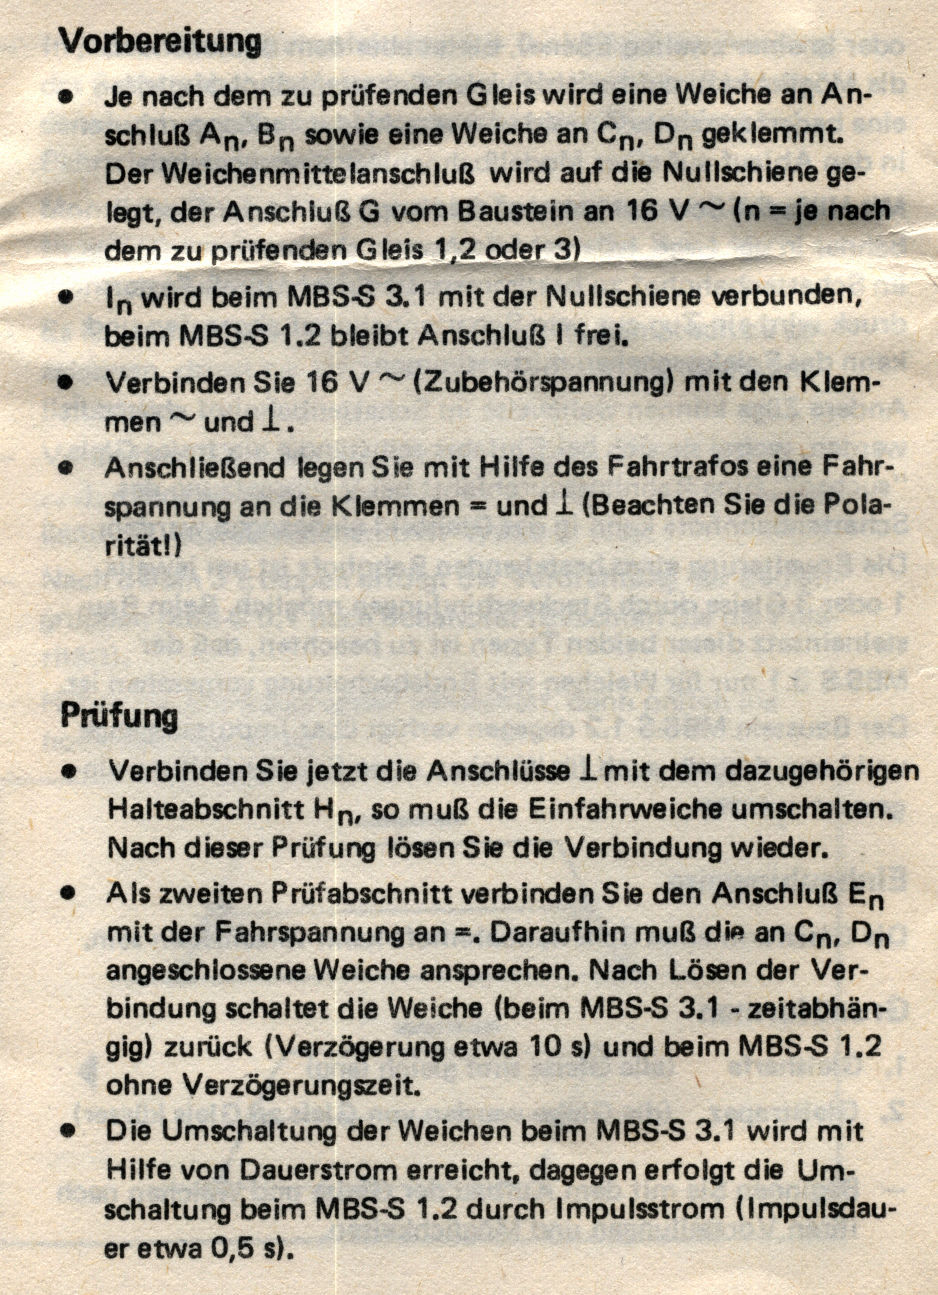 Bild 13 von 14 - MBS Schattenbahnhof S1.2 - 1 Gleis
 Bild 14 von 14 - MBS Schattenbahnhof S1.2 - 1 Gleis
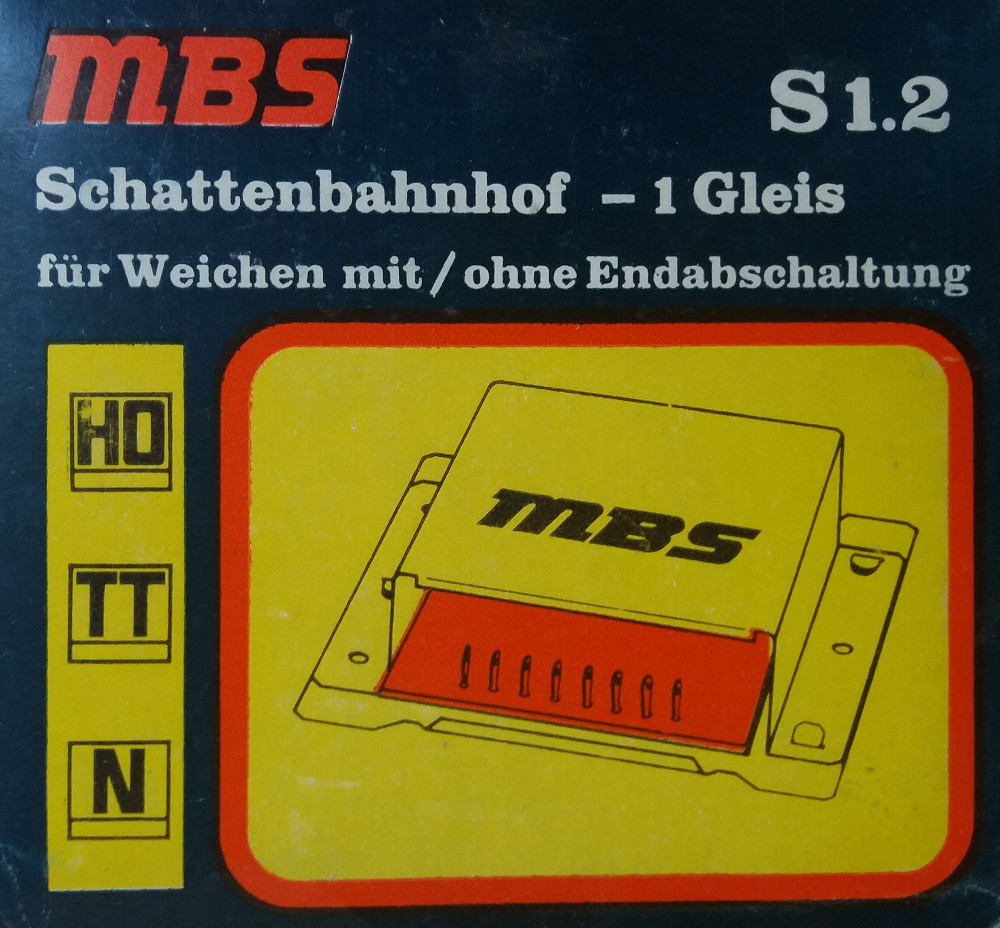
MBS Schattenbahnhof S1.2 - 1 Gleis
für Weichen mit/ohne Endabschaltung
incl. Bedienungsanleitung und Anschlussplan
11 Bilder zu:
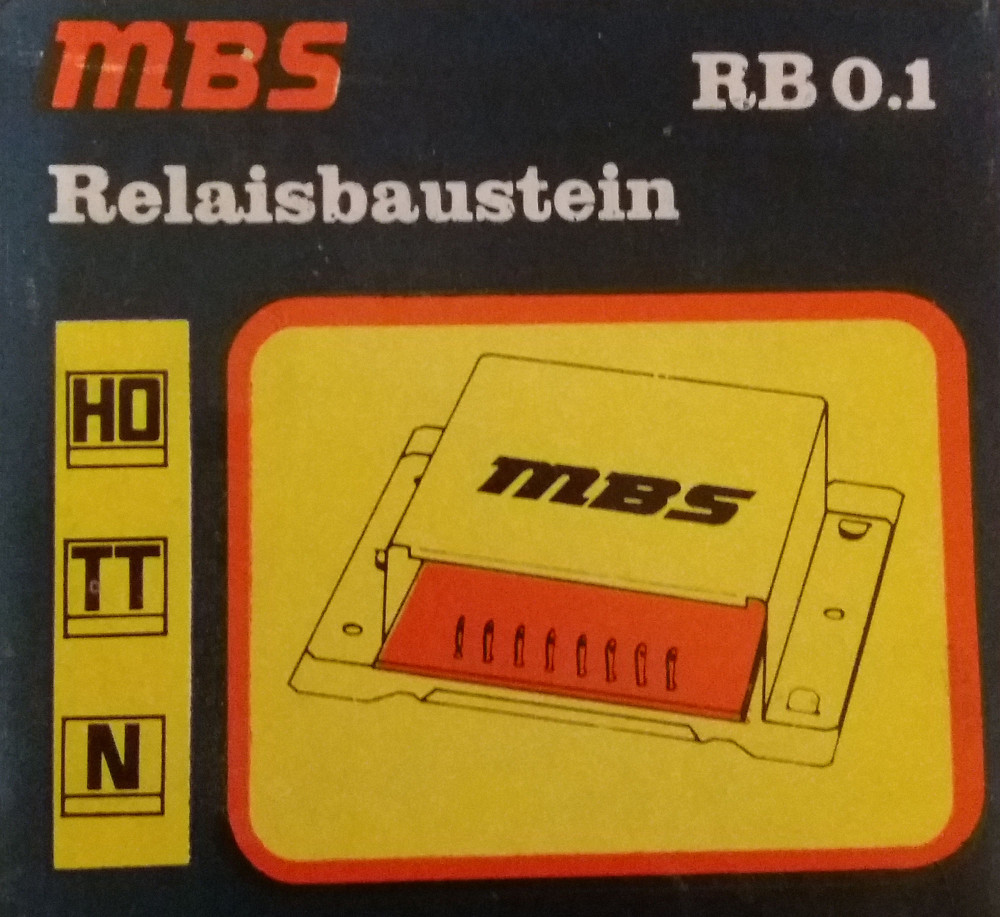
Bild 1 von 11 - MBS Relaisbaustein RB0.1
 Bild 2 von 11 - MBS Relaisbaustein RB0.1
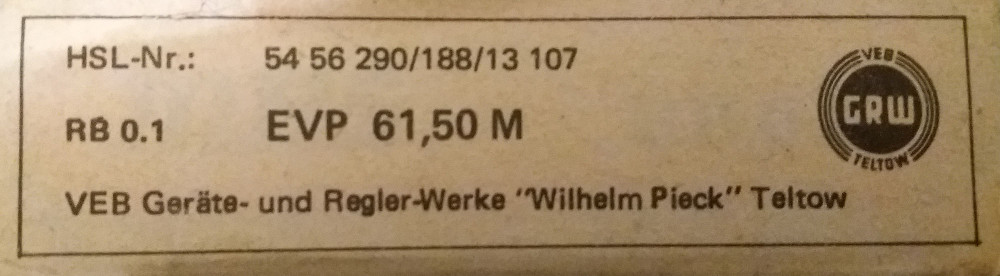 Bild 3 von 11 - MBS Relaisbaustein RB0.1
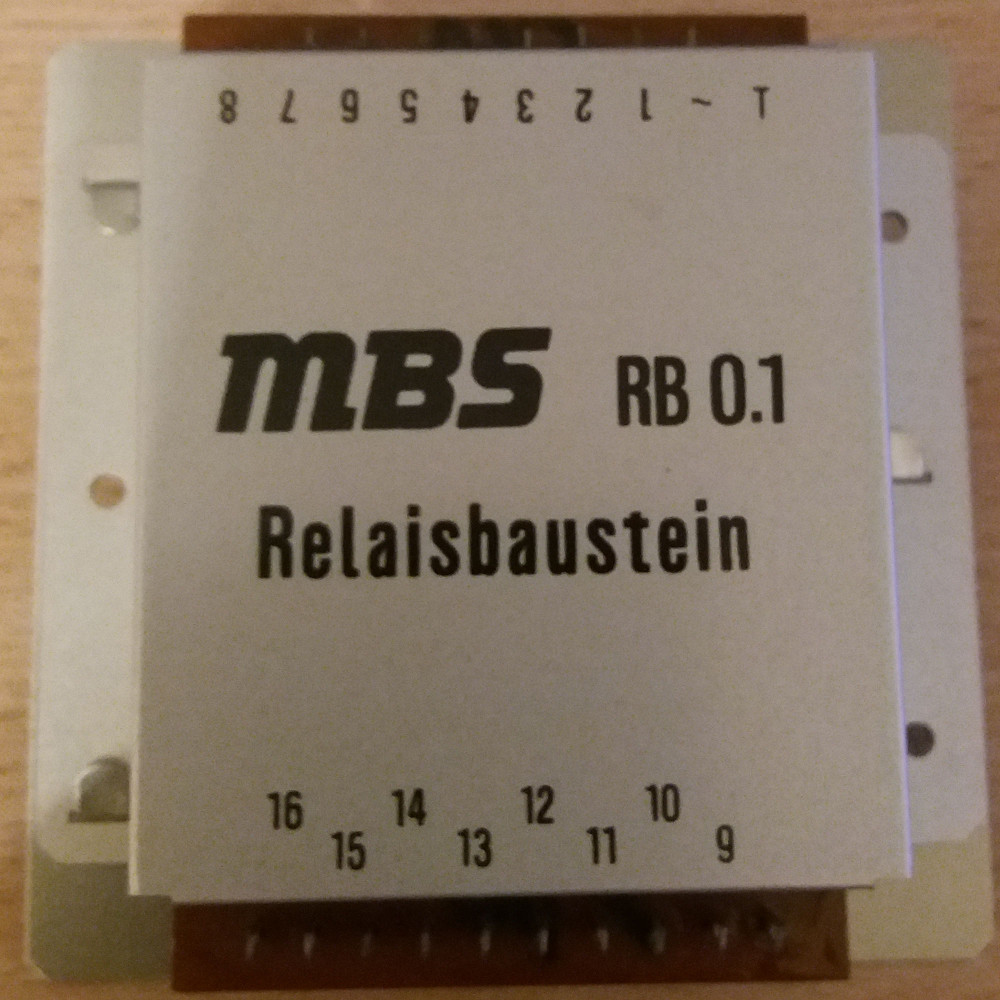 Bild 4 von 11 - MBS Relaisbaustein RB0.1
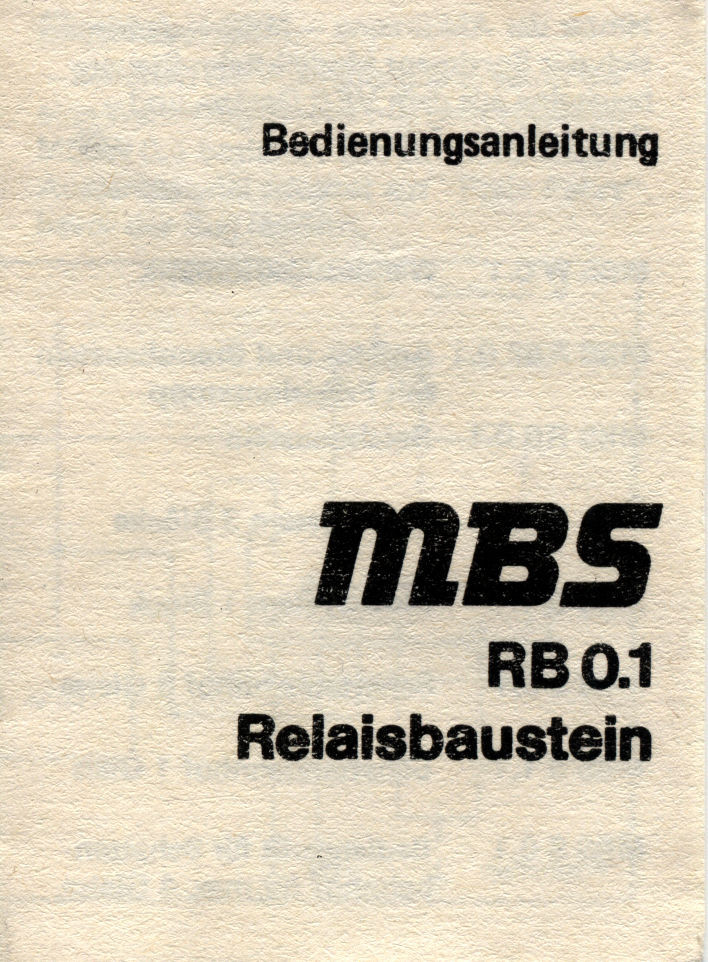 Bild 5 von 11 - MBS Relaisbaustein RB0.1
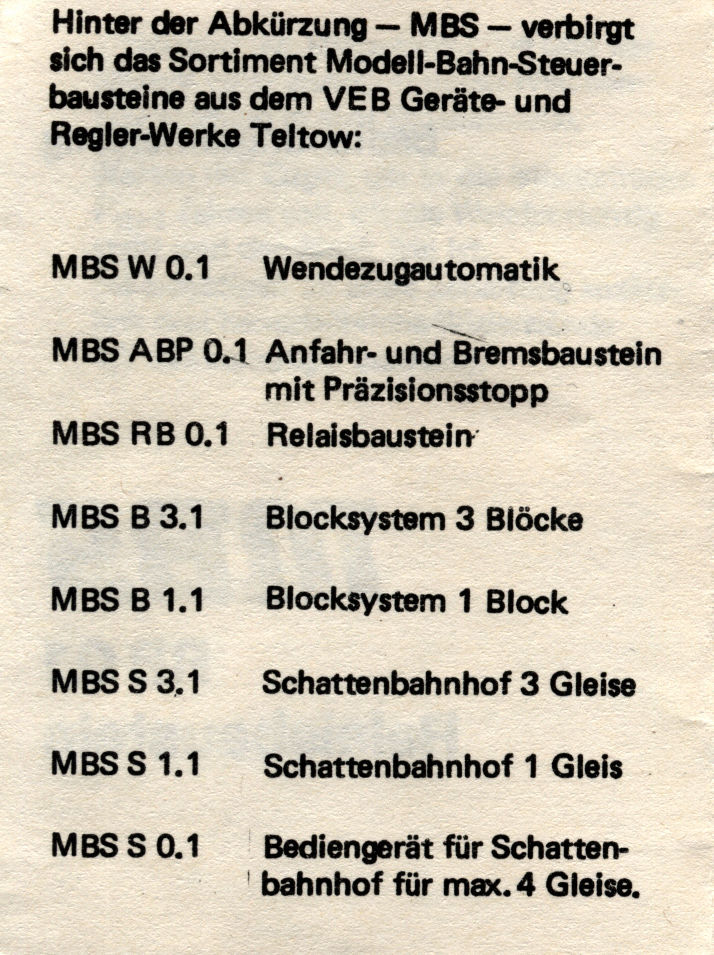 Bild 6 von 11 - MBS Relaisbaustein RB0.1
 Bild 7 von 11 - MBS Relaisbaustein RB0.1
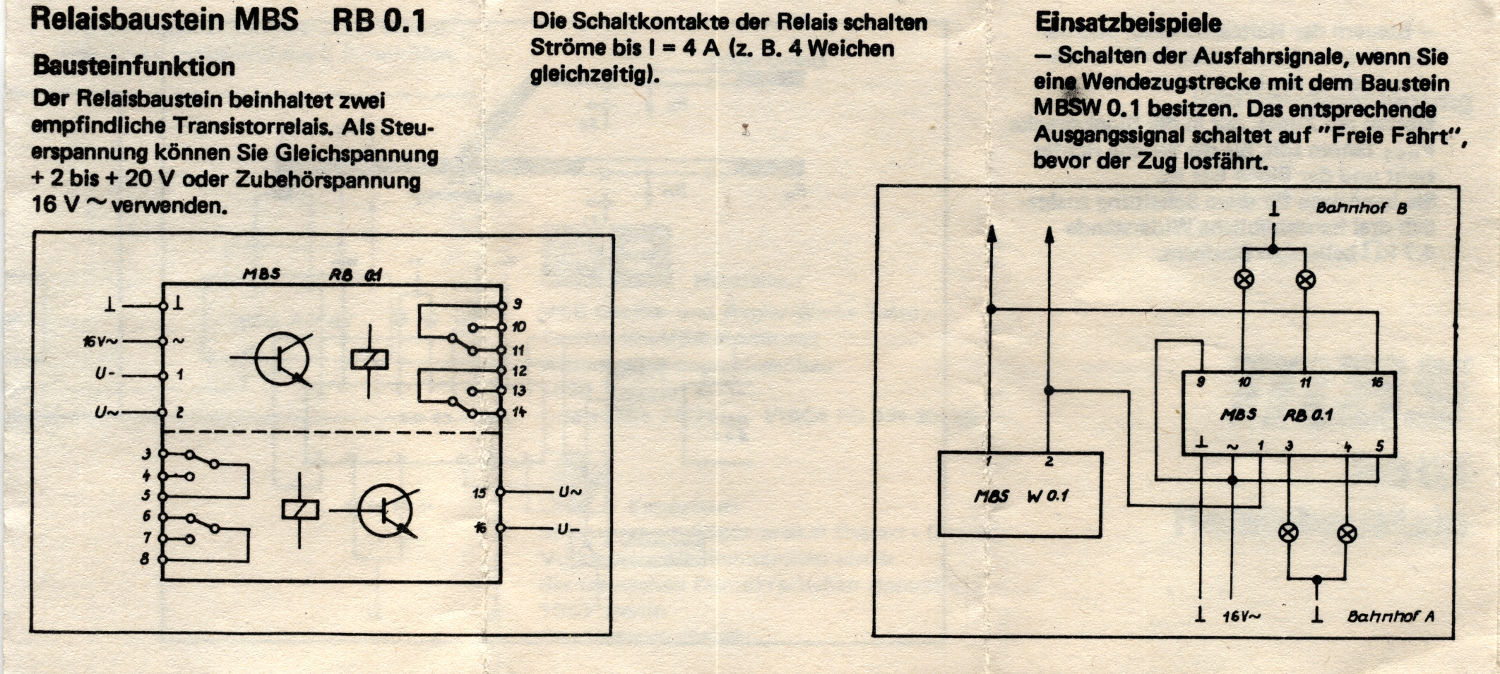 Bild 8 von 11 - MBS Relaisbaustein RB0.1
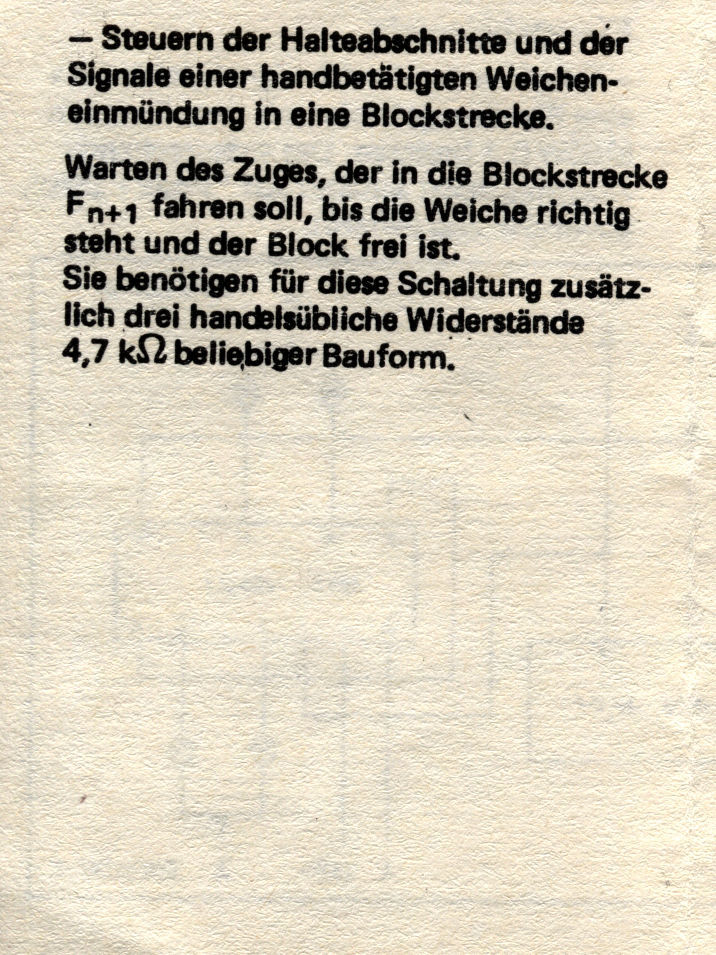 Bild 9 von 11 - MBS Relaisbaustein RB0.1
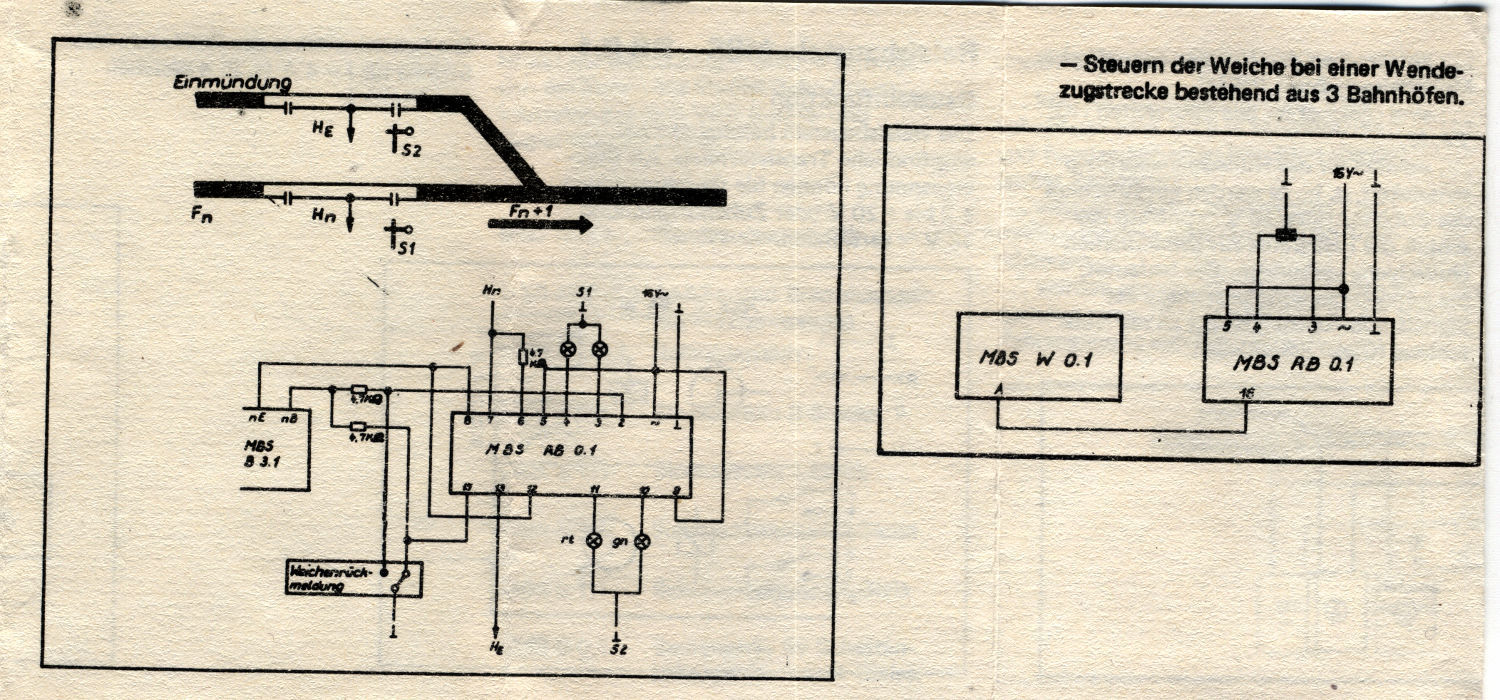 Bild 10 von 11 - MBS Relaisbaustein RB0.1
 Bild 11 von 11 - MBS Relaisbaustein RB0.1
MBS Relaisbaustein RB0.1
incl. Bedienungsanleitung und Anschlussplan
5 Bilder zu:
Bild 1 von 5 - MBS Bediengerät S0.1
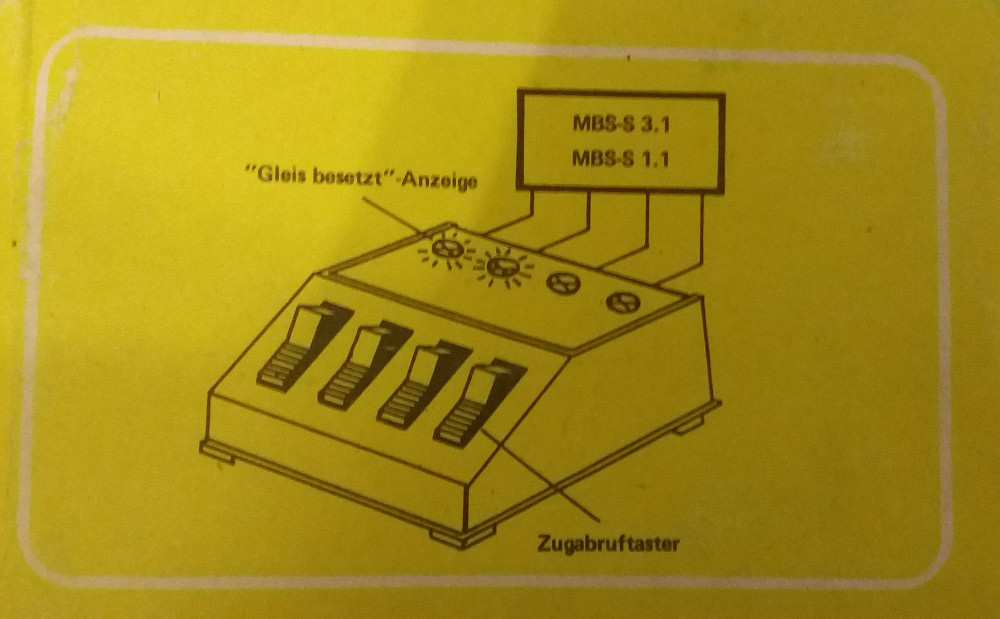 Bild 2 von 5 - MBS Bediengerät S0.1
 Bild 3 von 5 - MBS Bediengerät S0.1
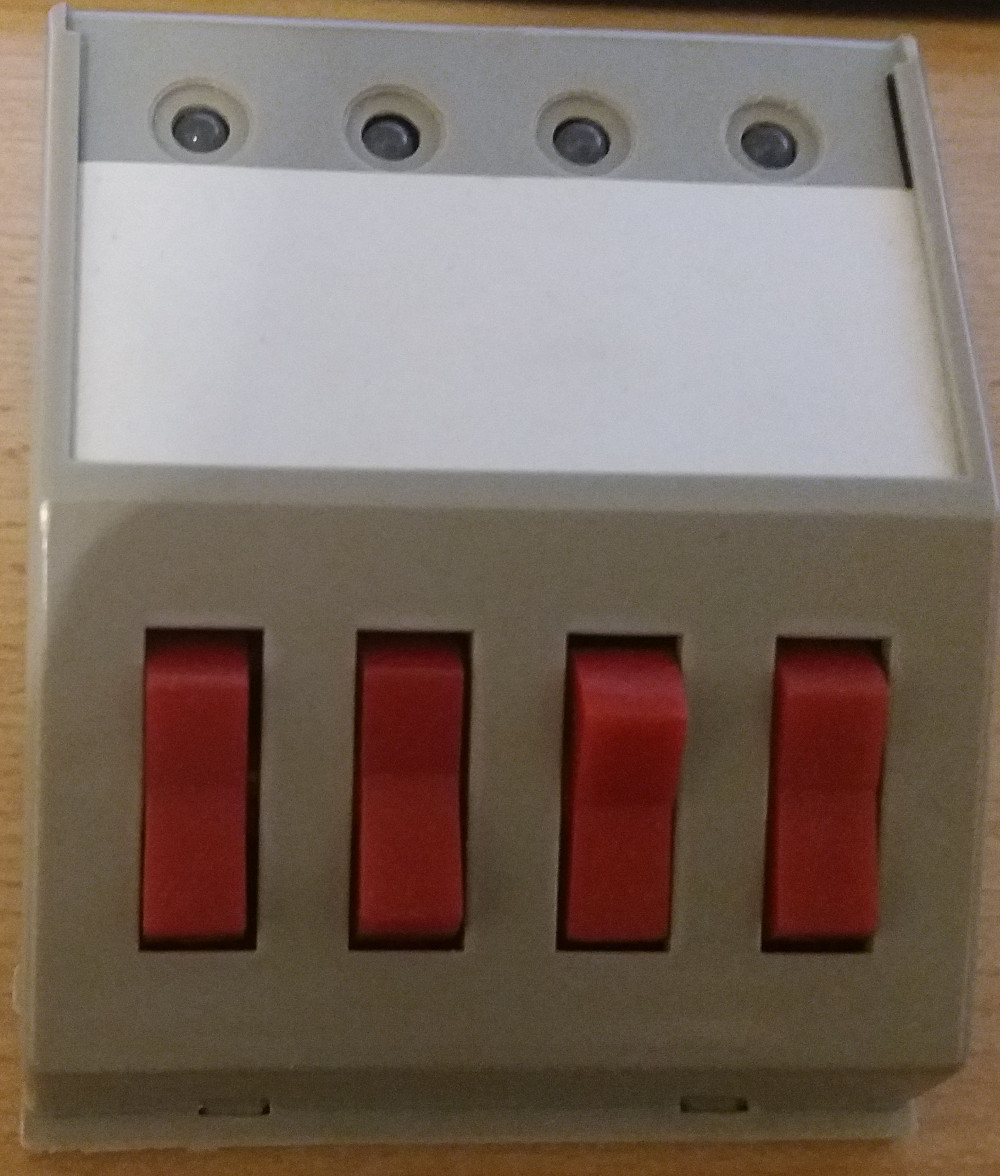 Bild 4 von 5 - MBS Bediengerät S0.1
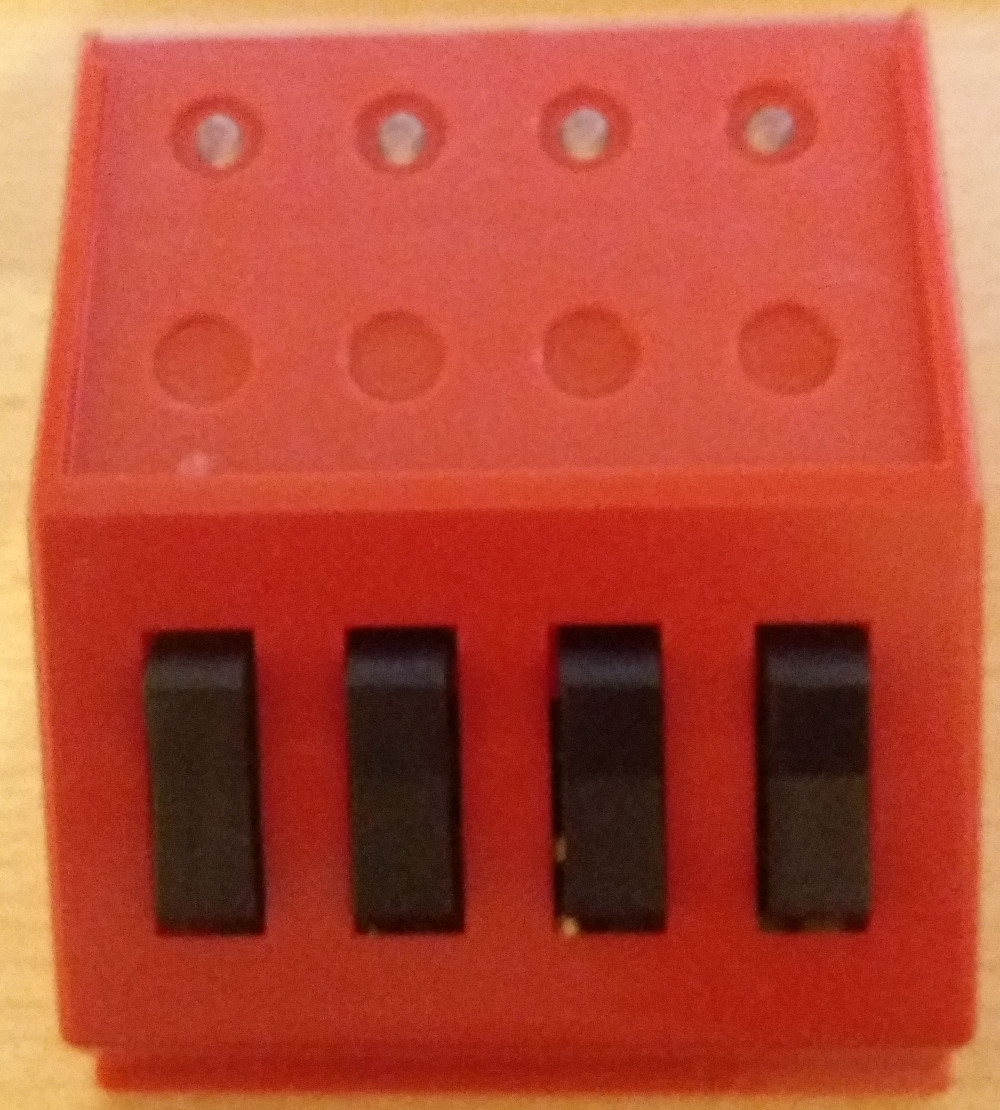 Bild 5 von 5 - MBS Bediengerät S0.1
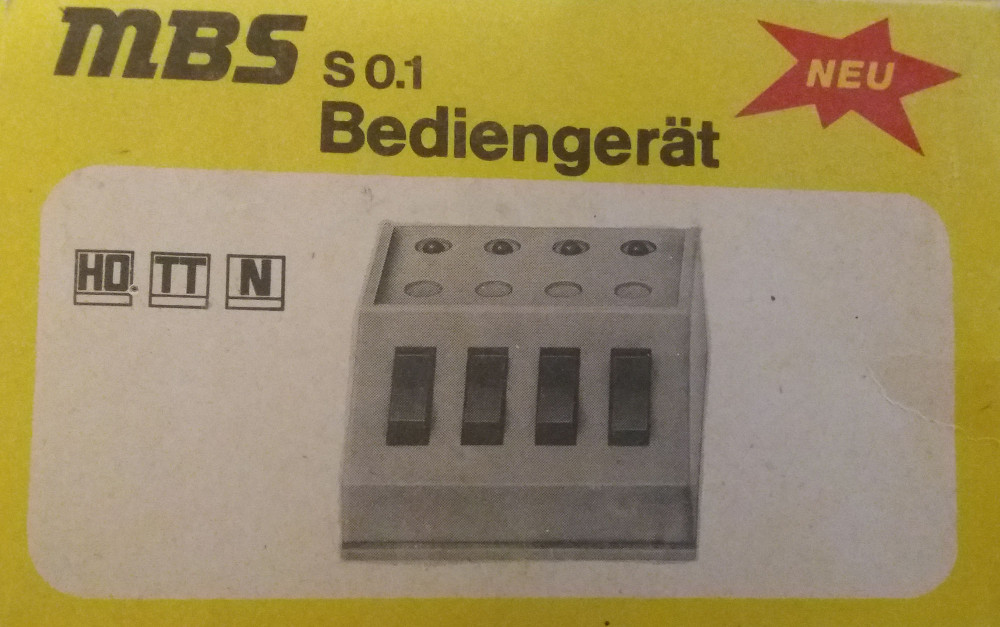
MBS Bediengerät S0.1
zwei verschiedene Ausführungen
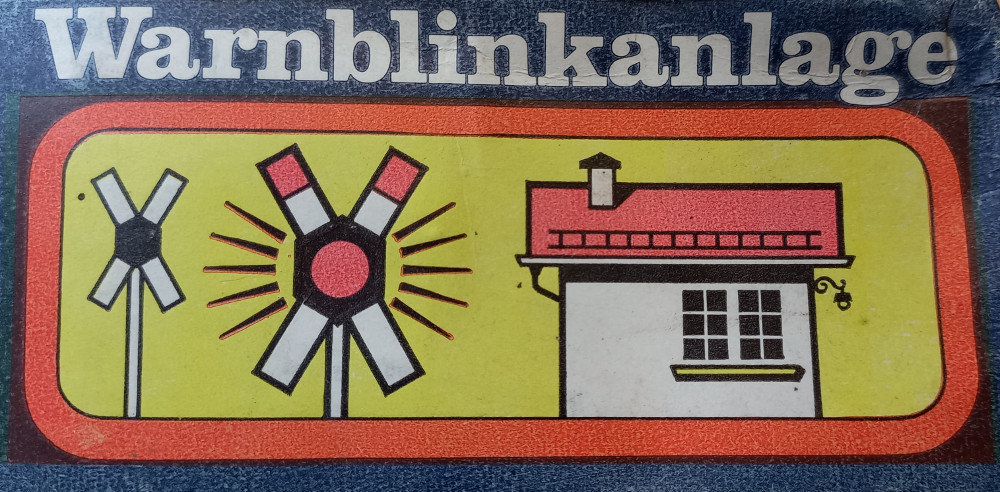
6 Bilder zu:
Bild 1 von 6 - PIKO Warnblinkanlage
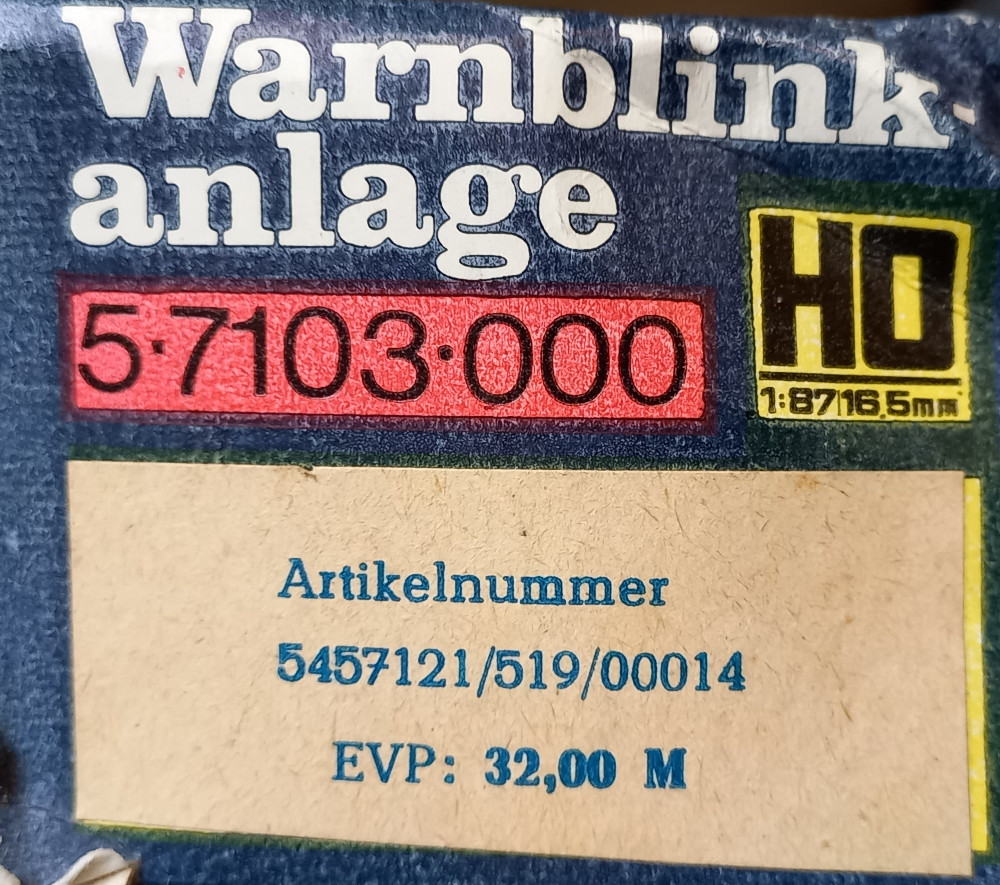 Bild 2 von 6 - PIKO Warnblinkanlage
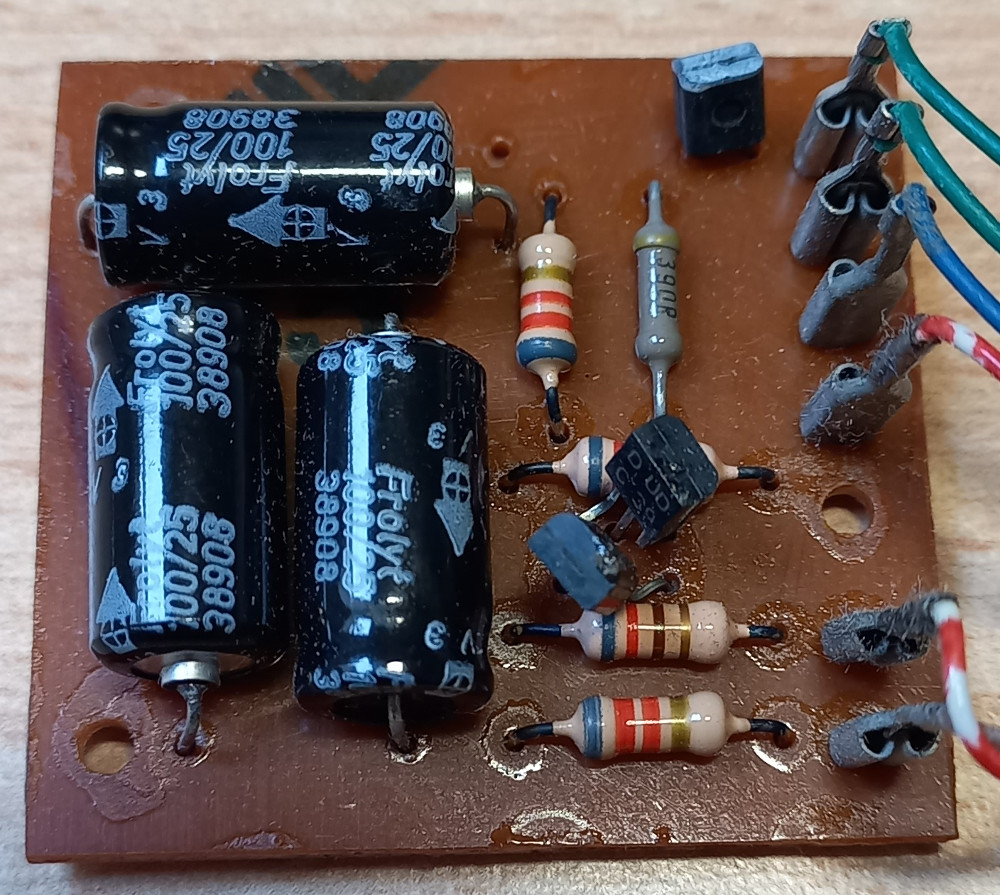 Bild 3 von 6 - PIKO Warnblinkanlage
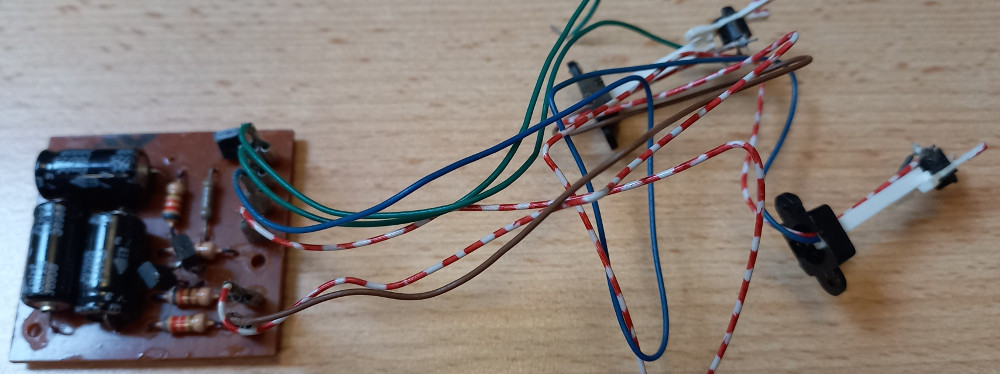 Bild 4 von 6 - PIKO Warnblinkanlage
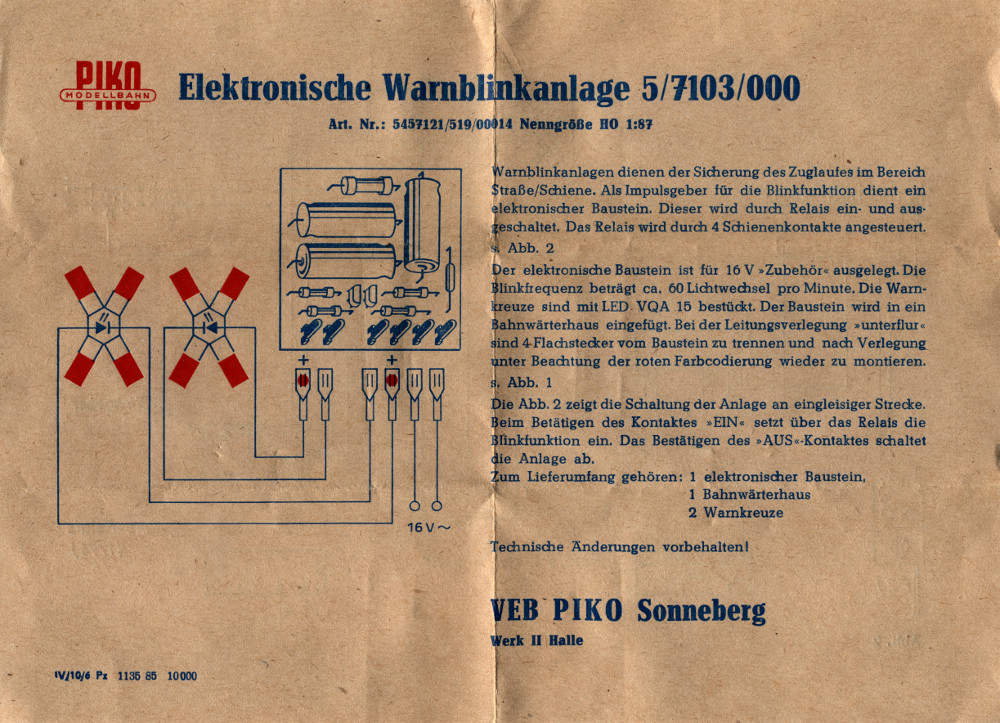 Bild 5 von 6 - PIKO Warnblinkanlage
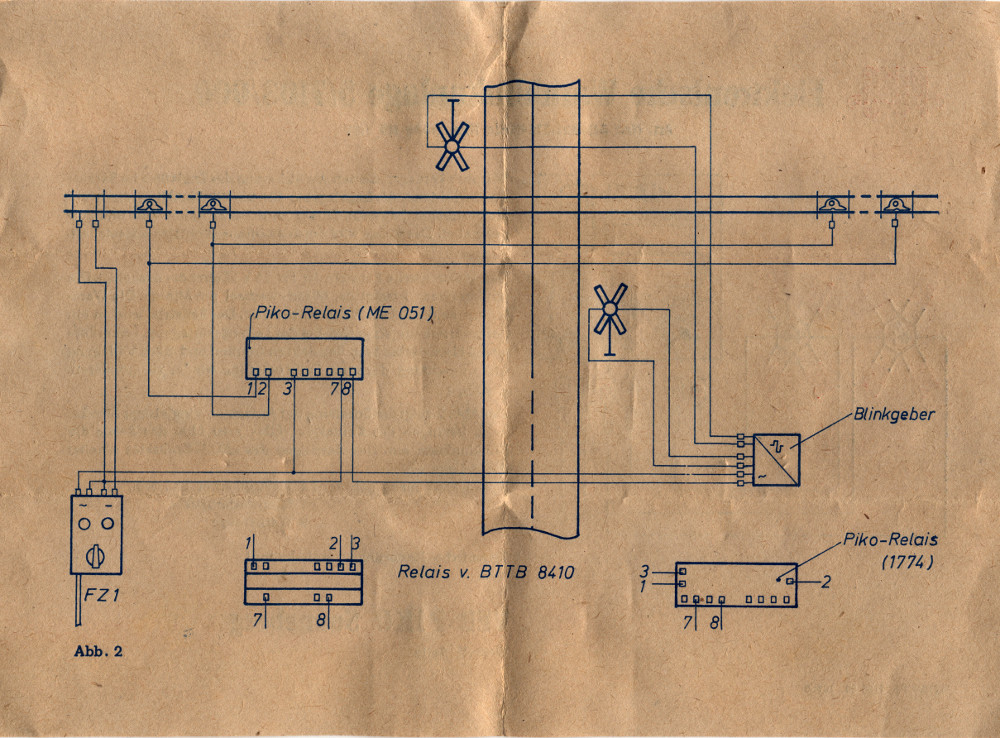 Bild 6 von 6 - PIKO Warnblinkanlage
PIKO Warnblinkanlage
incl. Beschreibung
5 Bilder zu:
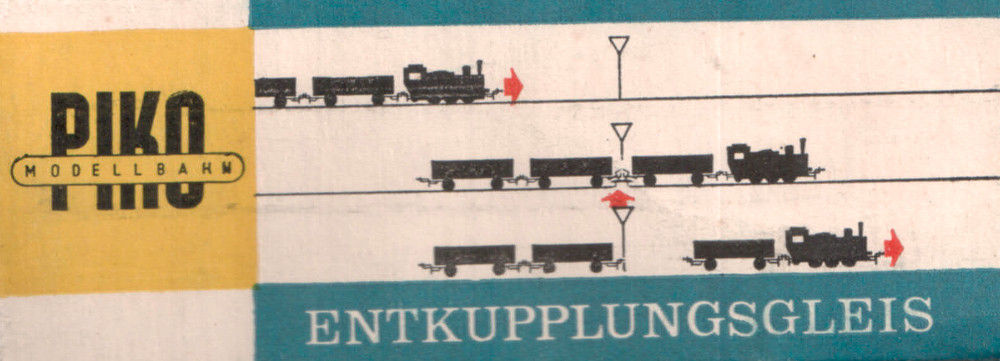
Bild 1 von 5 - Entkupplungsgleis 6827
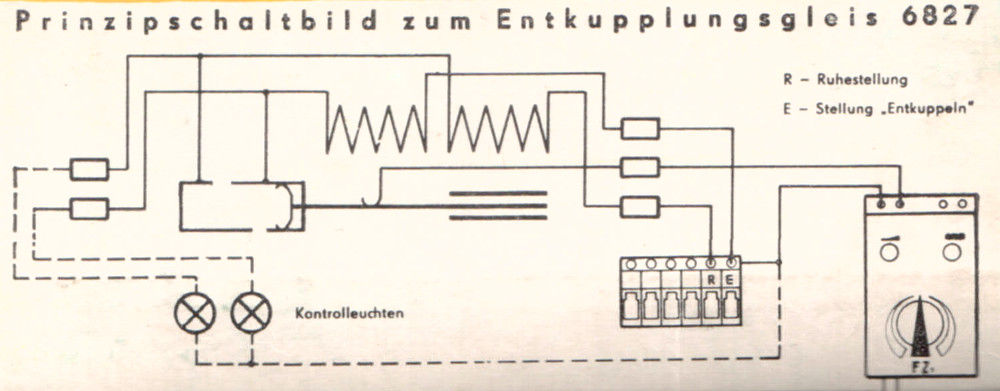 Bild 2 von 5 - Entkupplungsgleis 6827
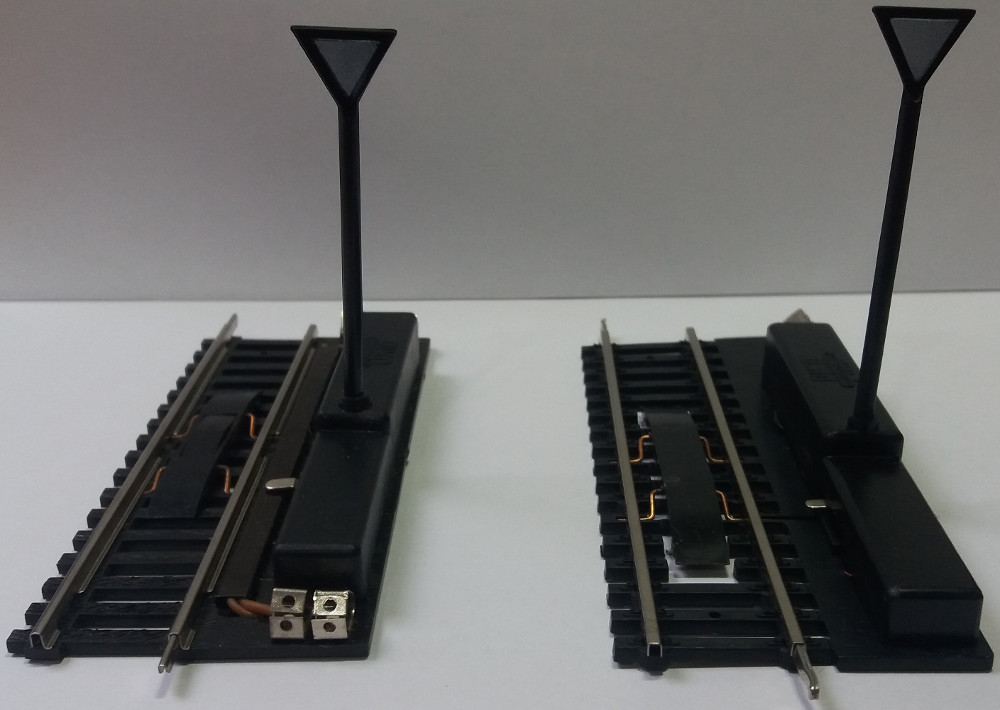 Bild 3 von 5 - Entkupplungsgleis 6827
 Bild 4 von 5 - Entkupplungsgleis 6827
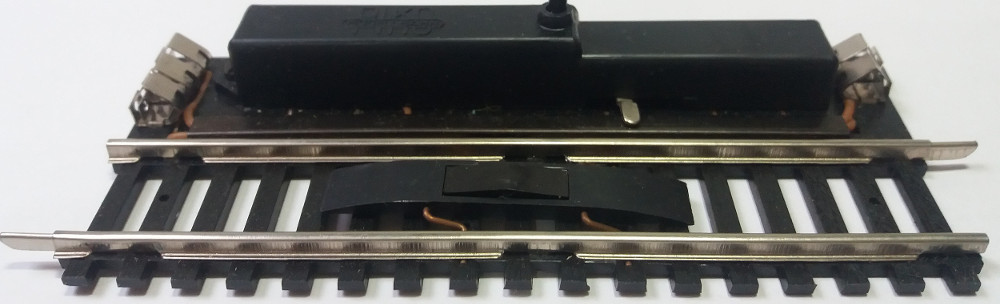 Bild 5 von 5 - Entkupplungsgleis 6827
PIKO Entkupplungsgleis 6827 Hohlprofil
Alte Ausführung mit Rückmeldung
Neue Ausführung ohne Rückmeldung
6 Bilder zu:
Bild 1 von 6 - PERMOT/PIKO Weiche altes Hohlprofil
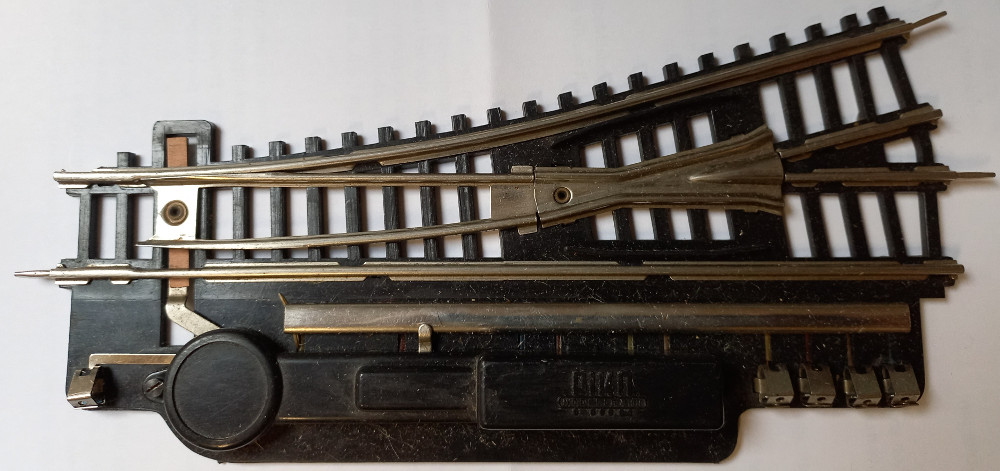 Bild 2 von 6 - PERMOT/PIKO Weiche altes Hohlprofil
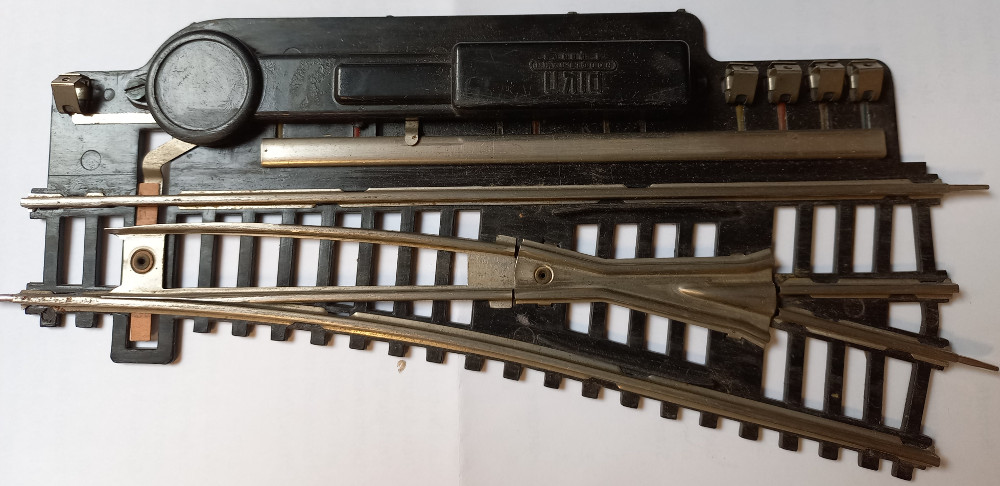 Bild 3 von 6 - PERMOT/PIKO Weiche altes Hohlprofil
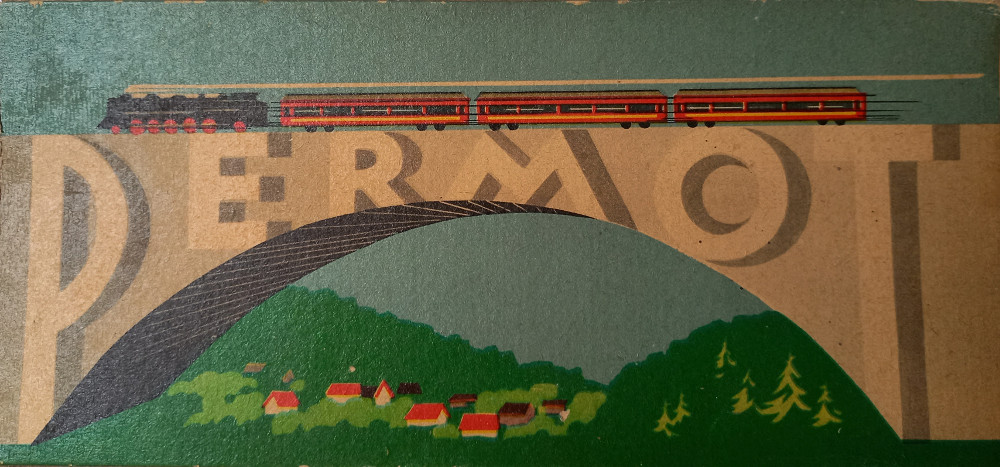 Bild 4 von 6 - PERMOT/PIKO Weiche altes Hohlprofil
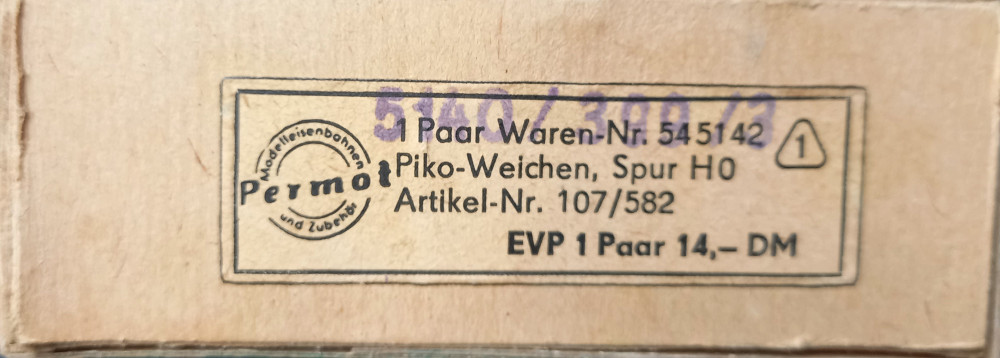 Bild 5 von 6 - PERMOT/PIKO Weiche altes Hohlprofil
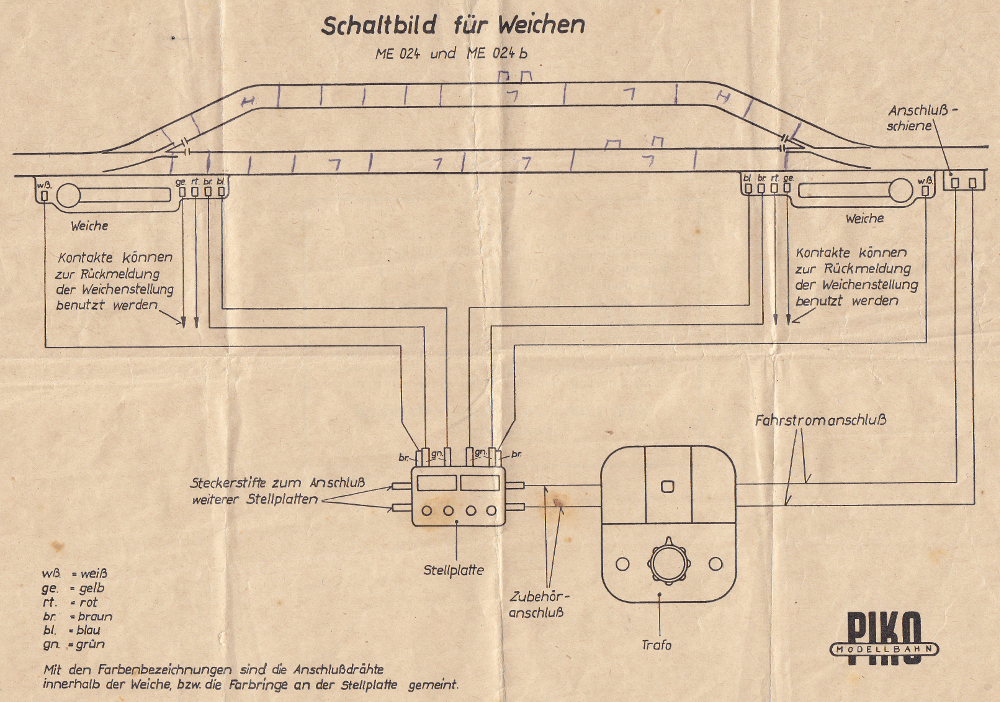 Bild 6 von 6 - PERMOT/PIKO Weiche altes Hohlprofil
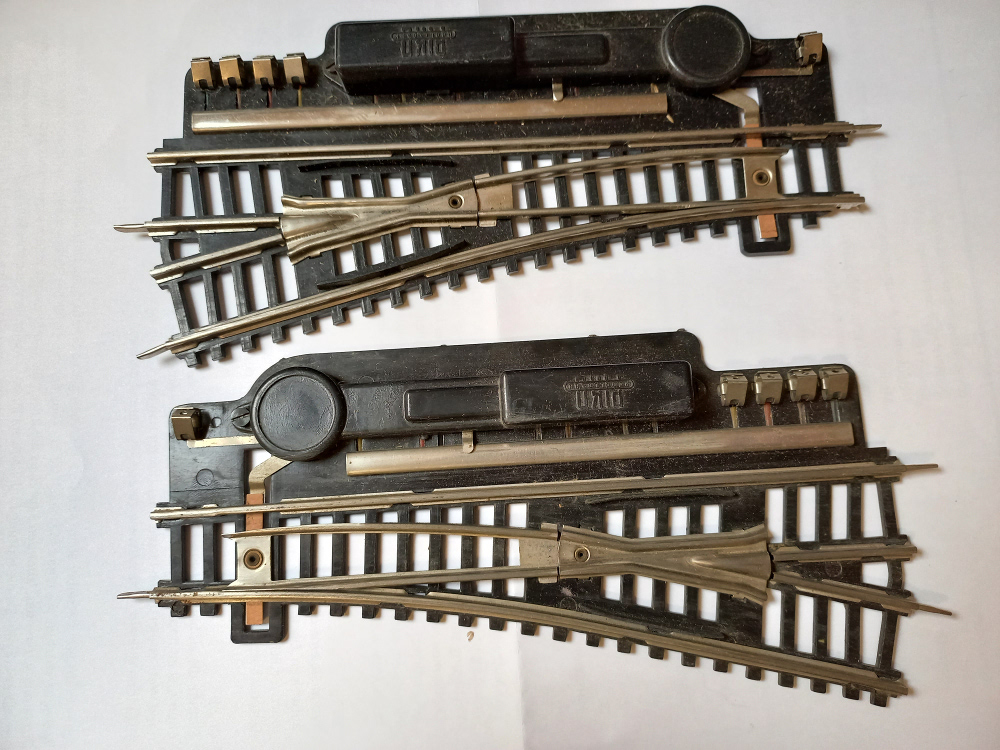
PERMOT/PIKO Weiche rechts / links Hohlprofil
Incl. Endabschaltung und Rückmeldung
alte Ausführung
5 Bilder zu:
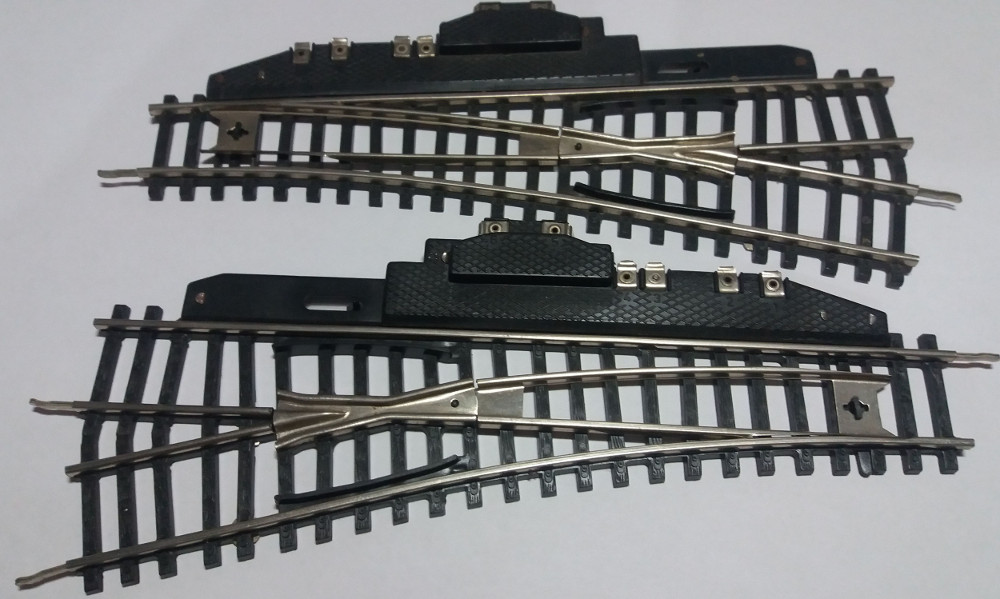
Bild 1 von 5 - Weiche P31r und P31l
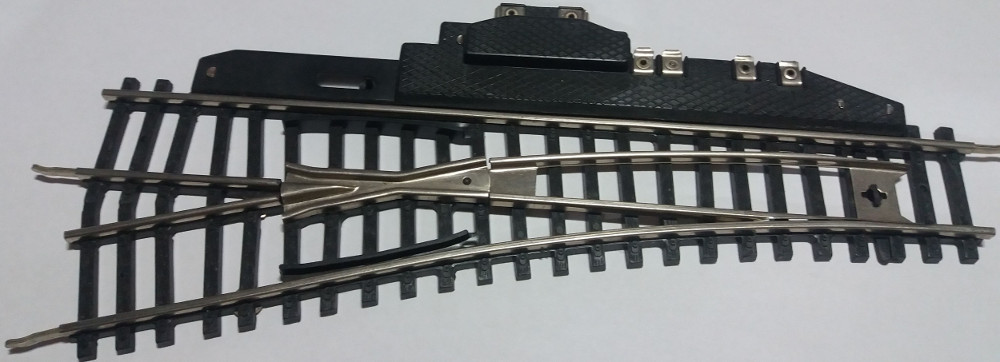 Bild 2 von 5 - Weiche P31r und P31l
 Bild 3 von 5 - Weiche P31r und P31l
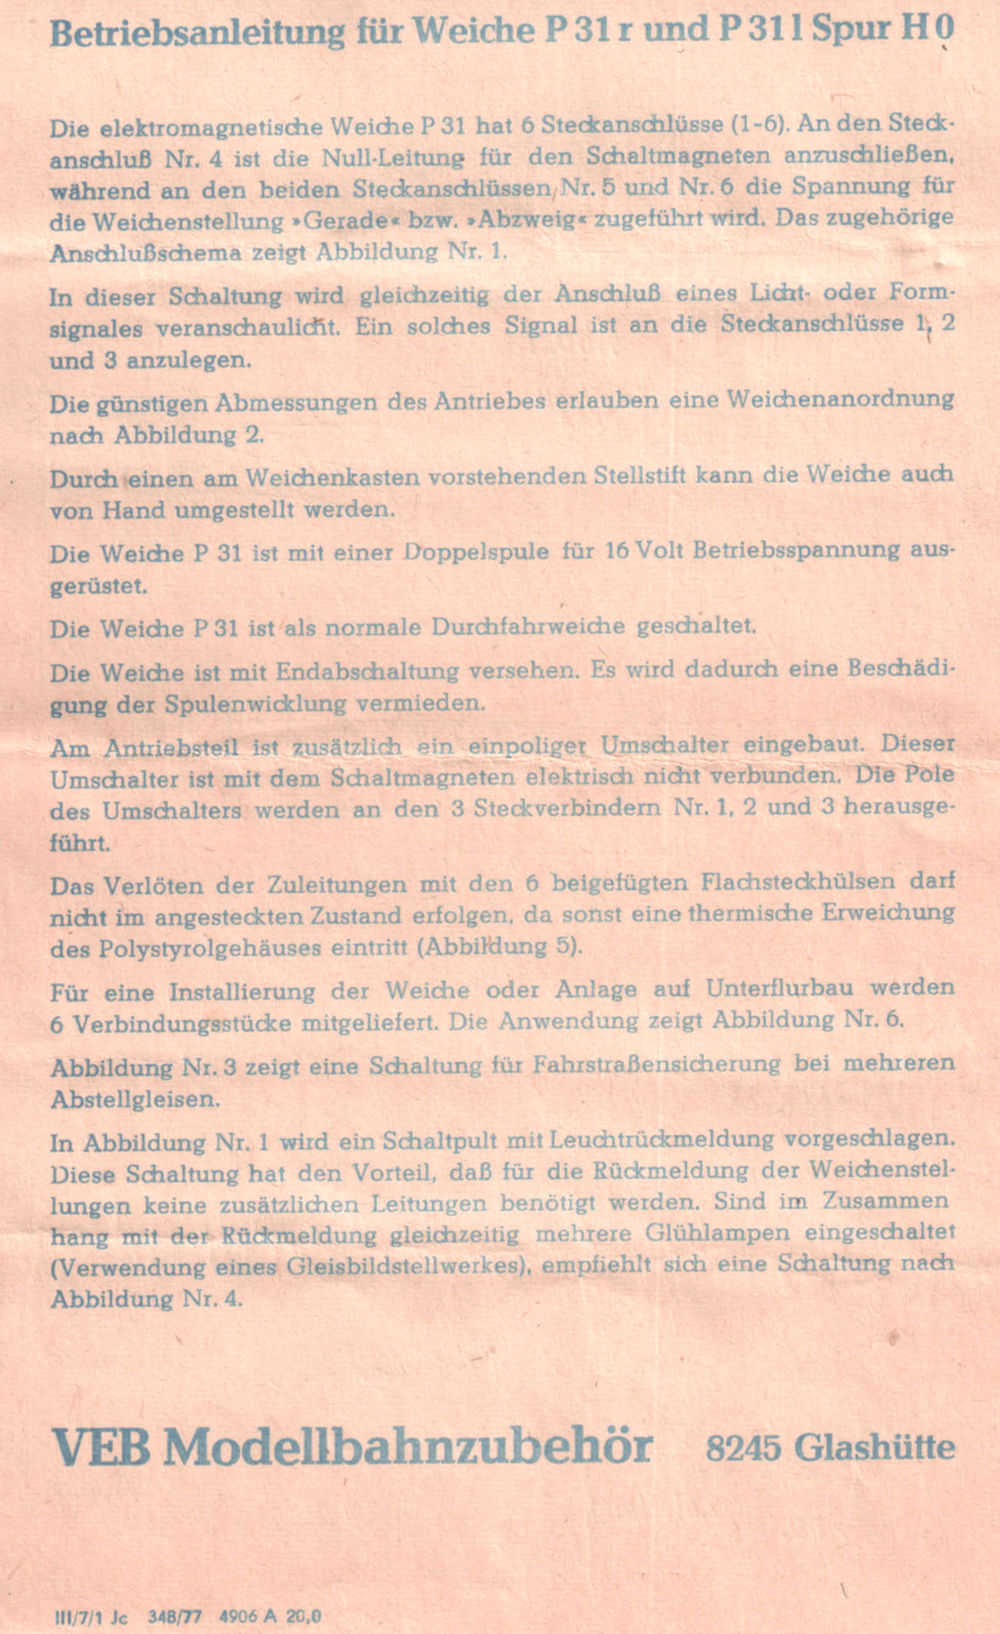 Bild 4 von 5 - Weiche P31r und P31l
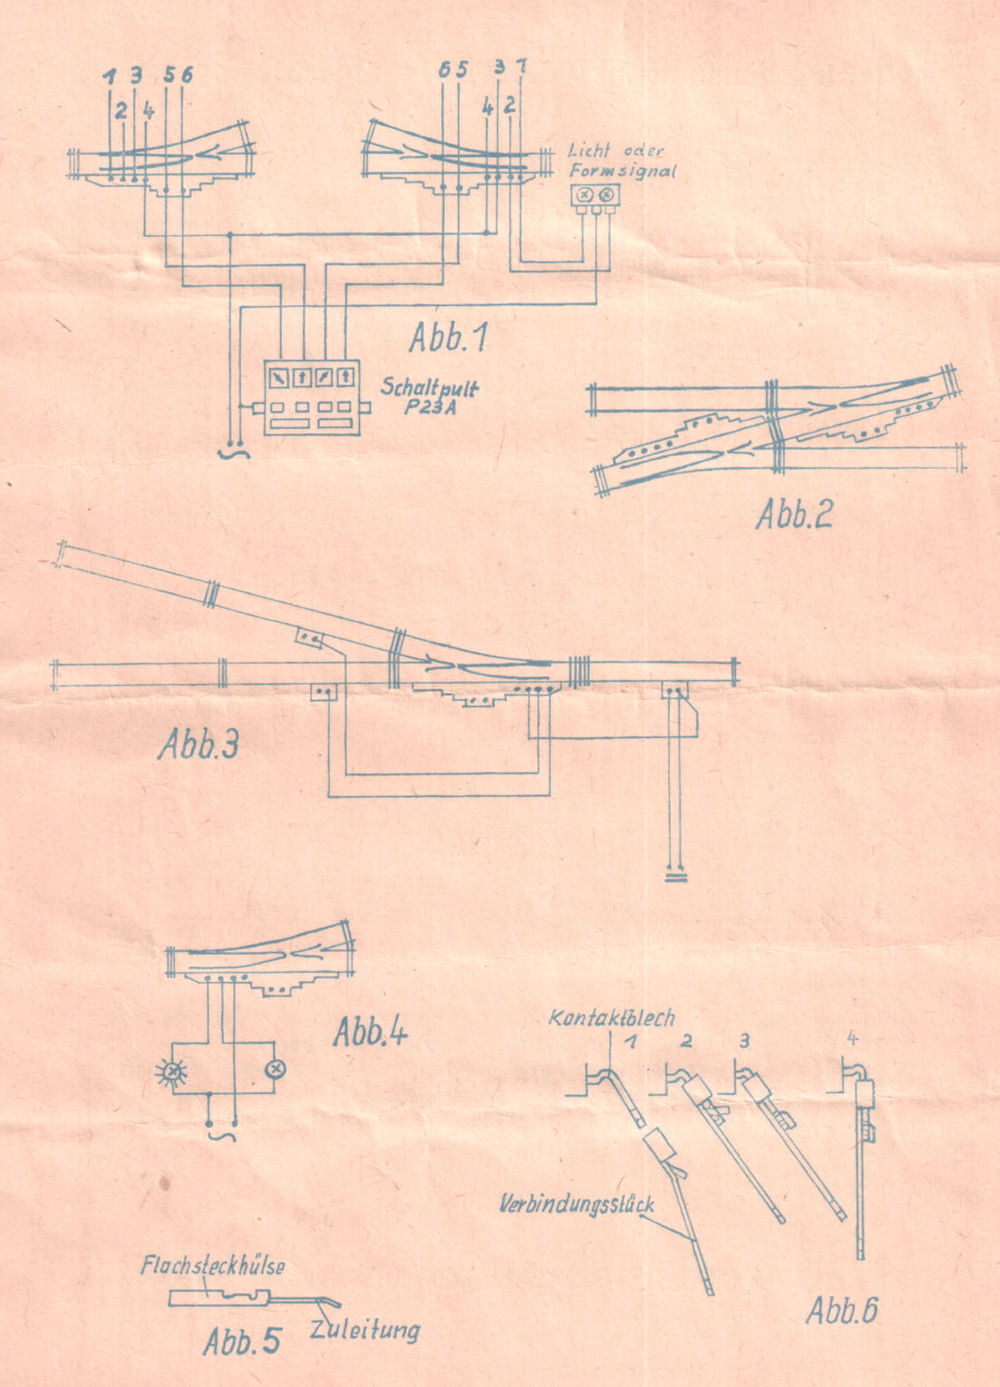 Bild 5 von 5 - Weiche P31r und P31l
PIKO Weiche P31 rechts / links Hohlprofil
Incl. Endabschaltung und Rückmeldung

5 Bilder zu:
Bild 1 von 5 - Doppelkreuzweiche 5/6856
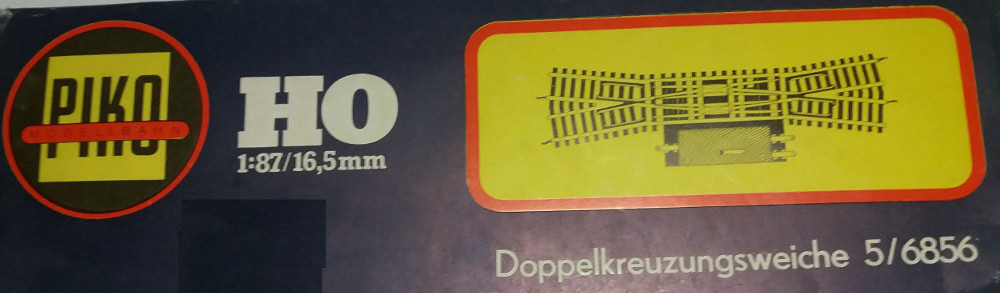 Bild 2 von 5 - Doppelkreuzweiche 5/6856
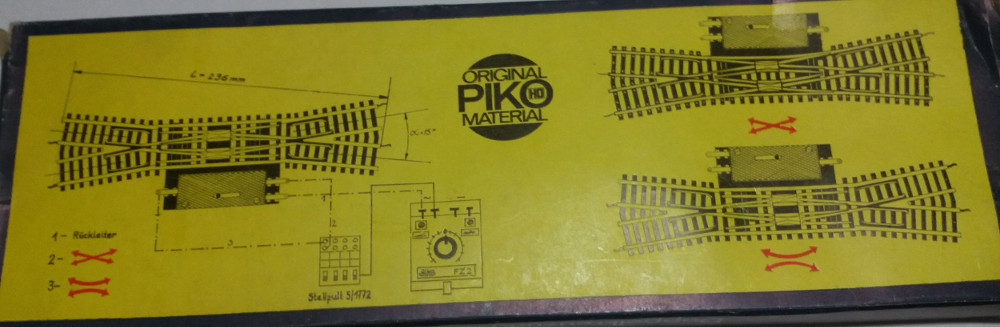 Bild 3 von 5 - Doppelkreuzweiche 5/6856
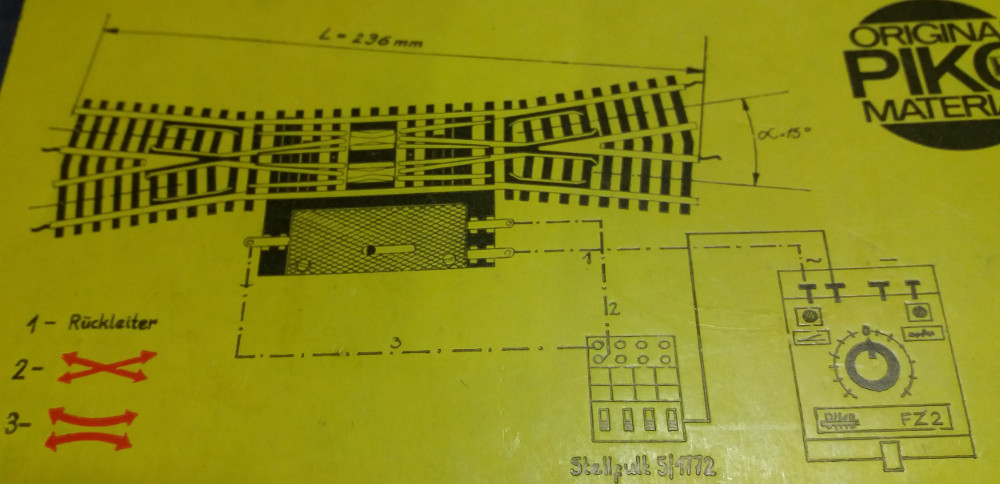 Bild 4 von 5 - Doppelkreuzweiche 5/6856
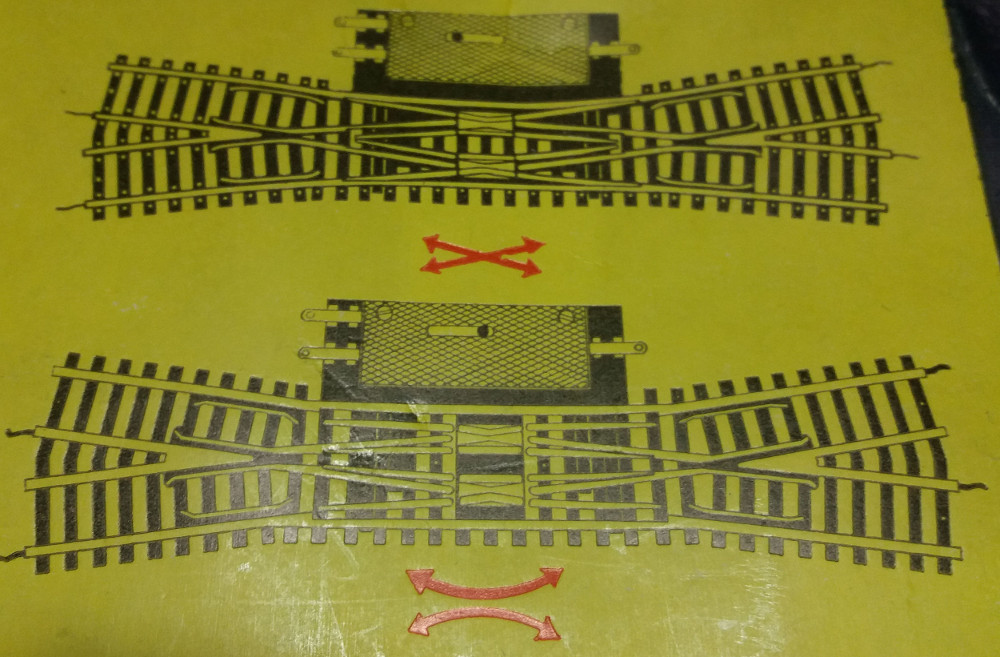 Bild 5 von 5 - Doppelkreuzweiche 5/6856
PIKO Doppelkreuzweiche 5/6856 Hohlprofil
Incl. Endabschaltung ohne Rückmeldung
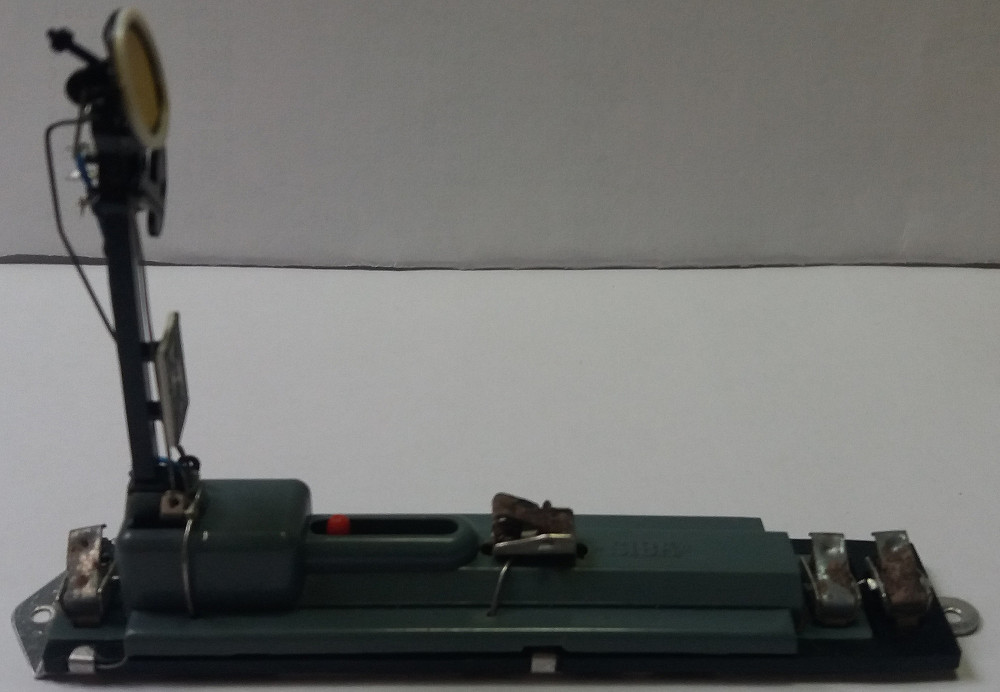
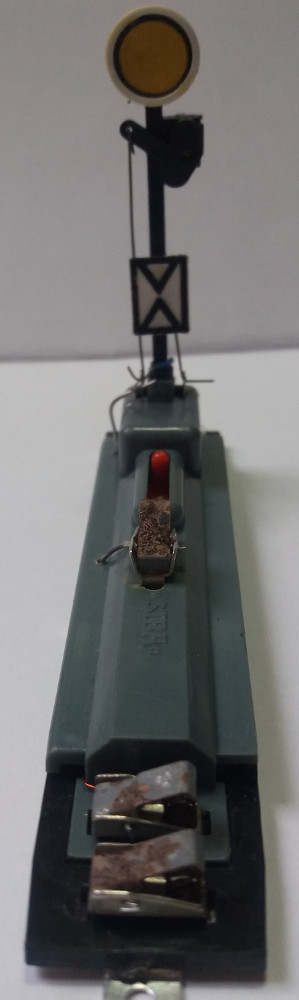
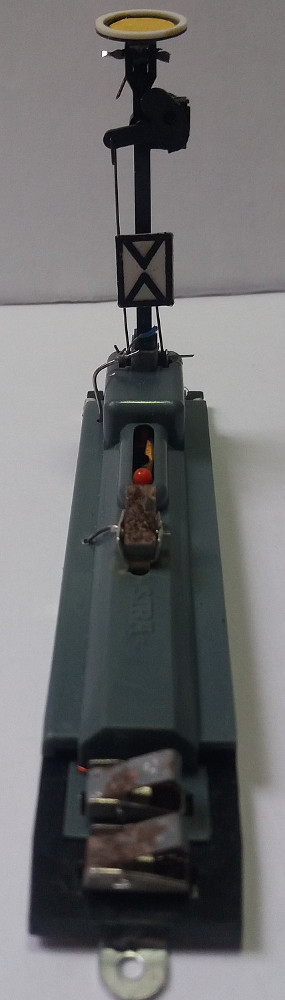
8 Bilder zu:
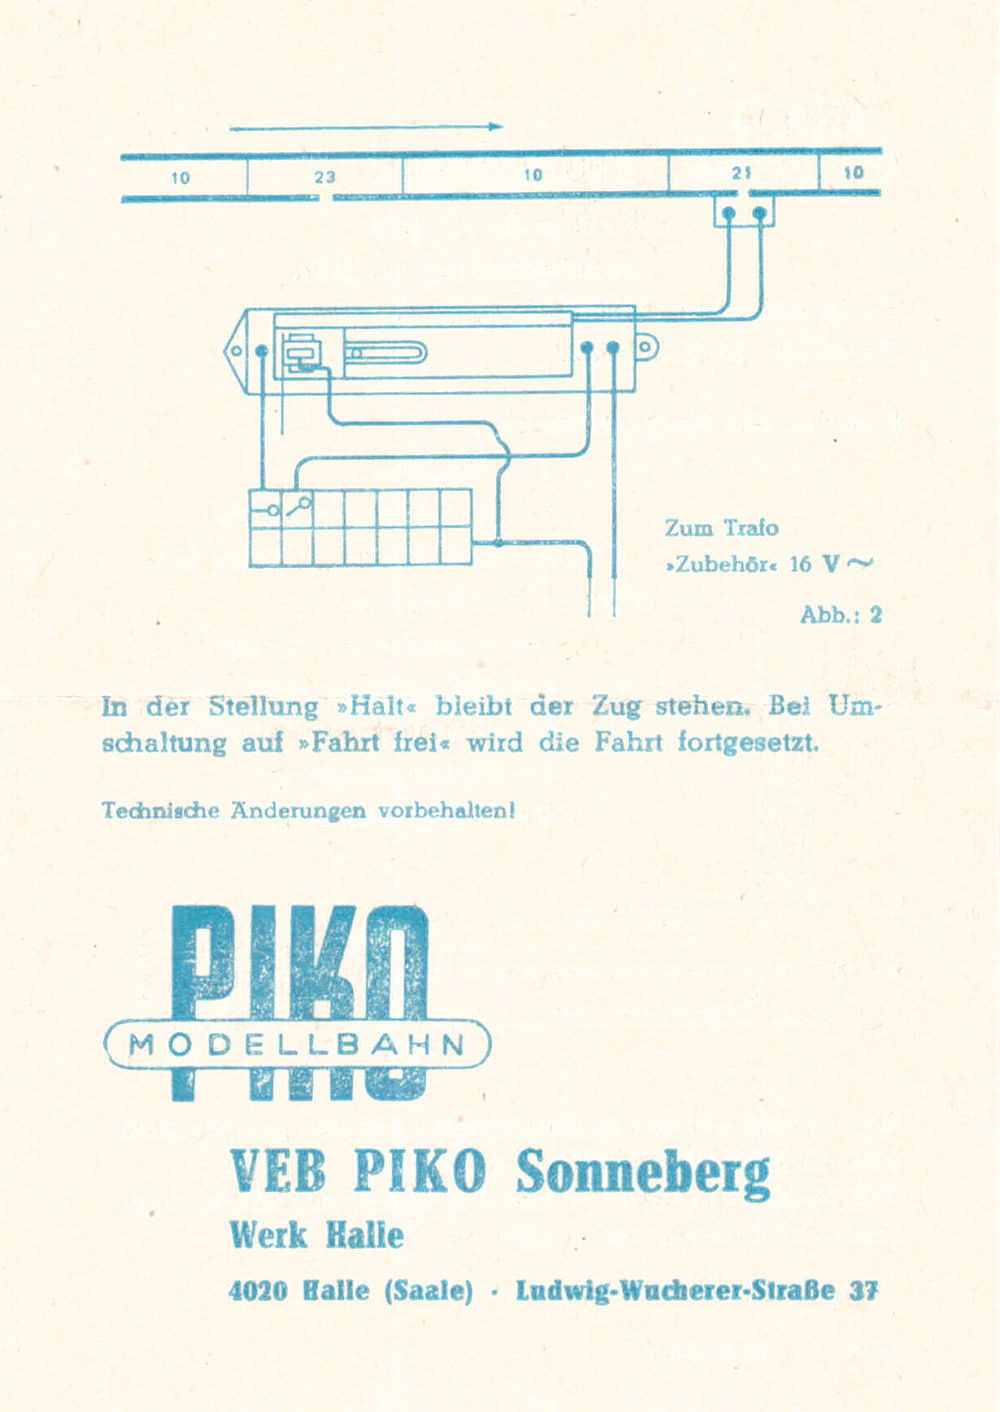
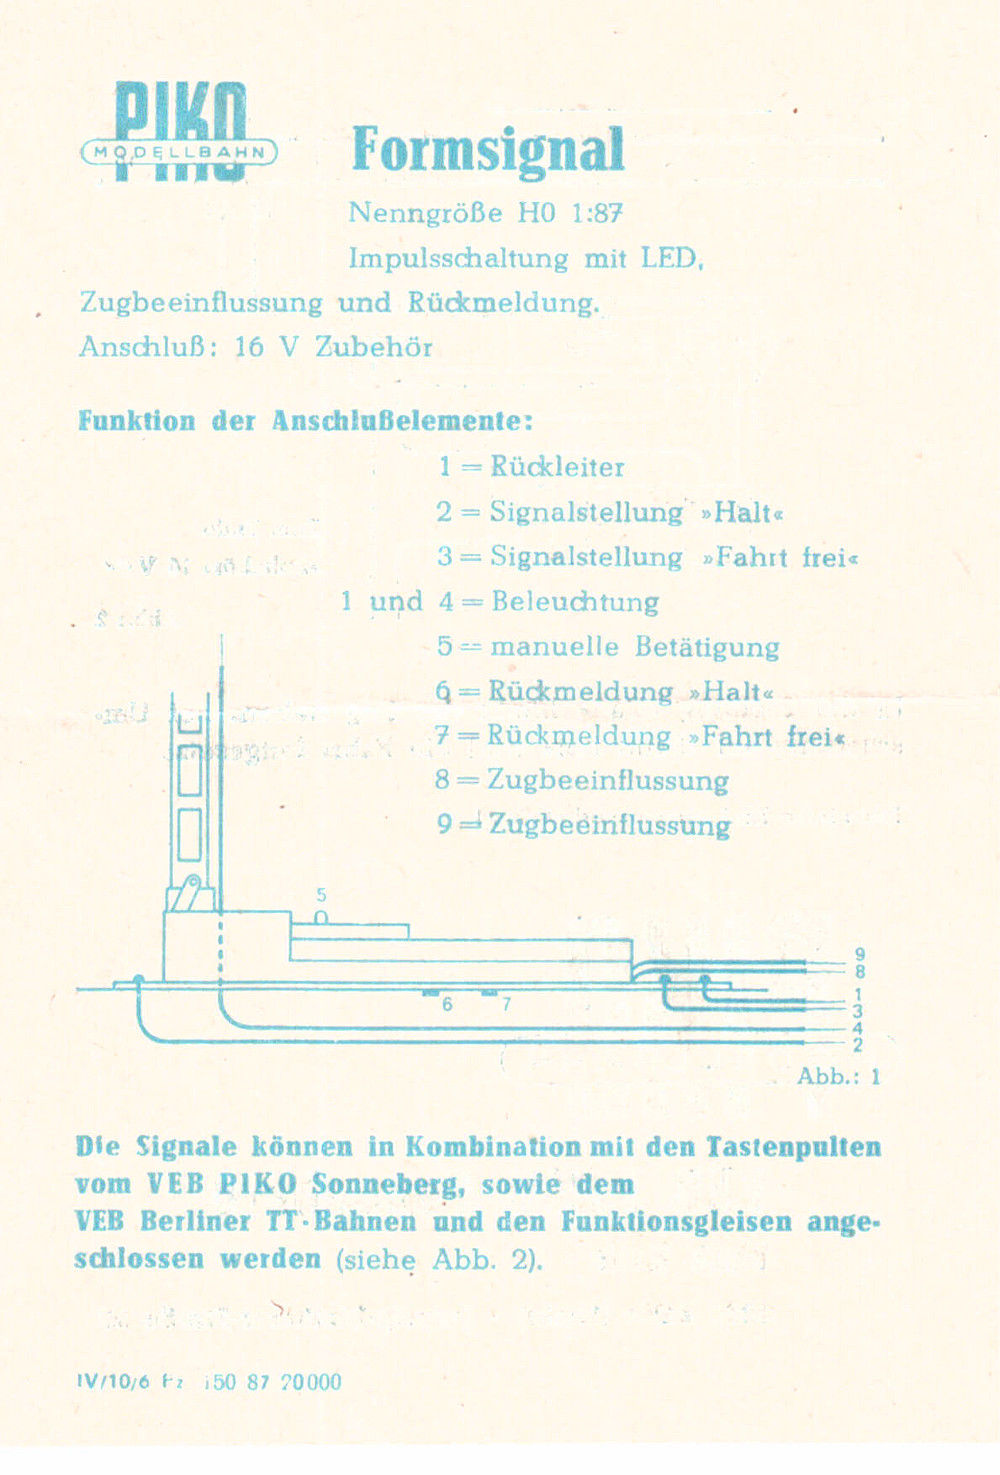
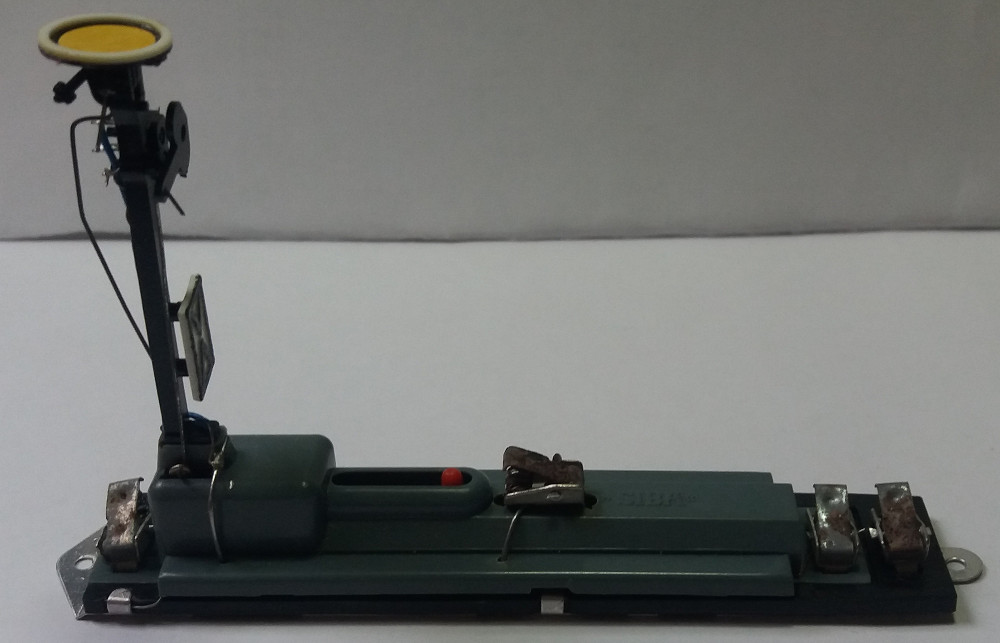
PIKO (SIBA) Form-Vorsignal
Impulsschaltung mit LED
ohne Zugbeeinflussung
5 Bilder zu:
Bild 1 von 5 - Kehrschleifenmodul
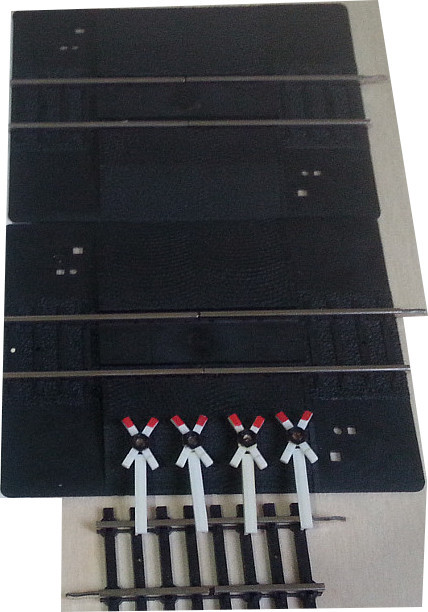 Bild 2 von 5 - Kehrschleifenmodul
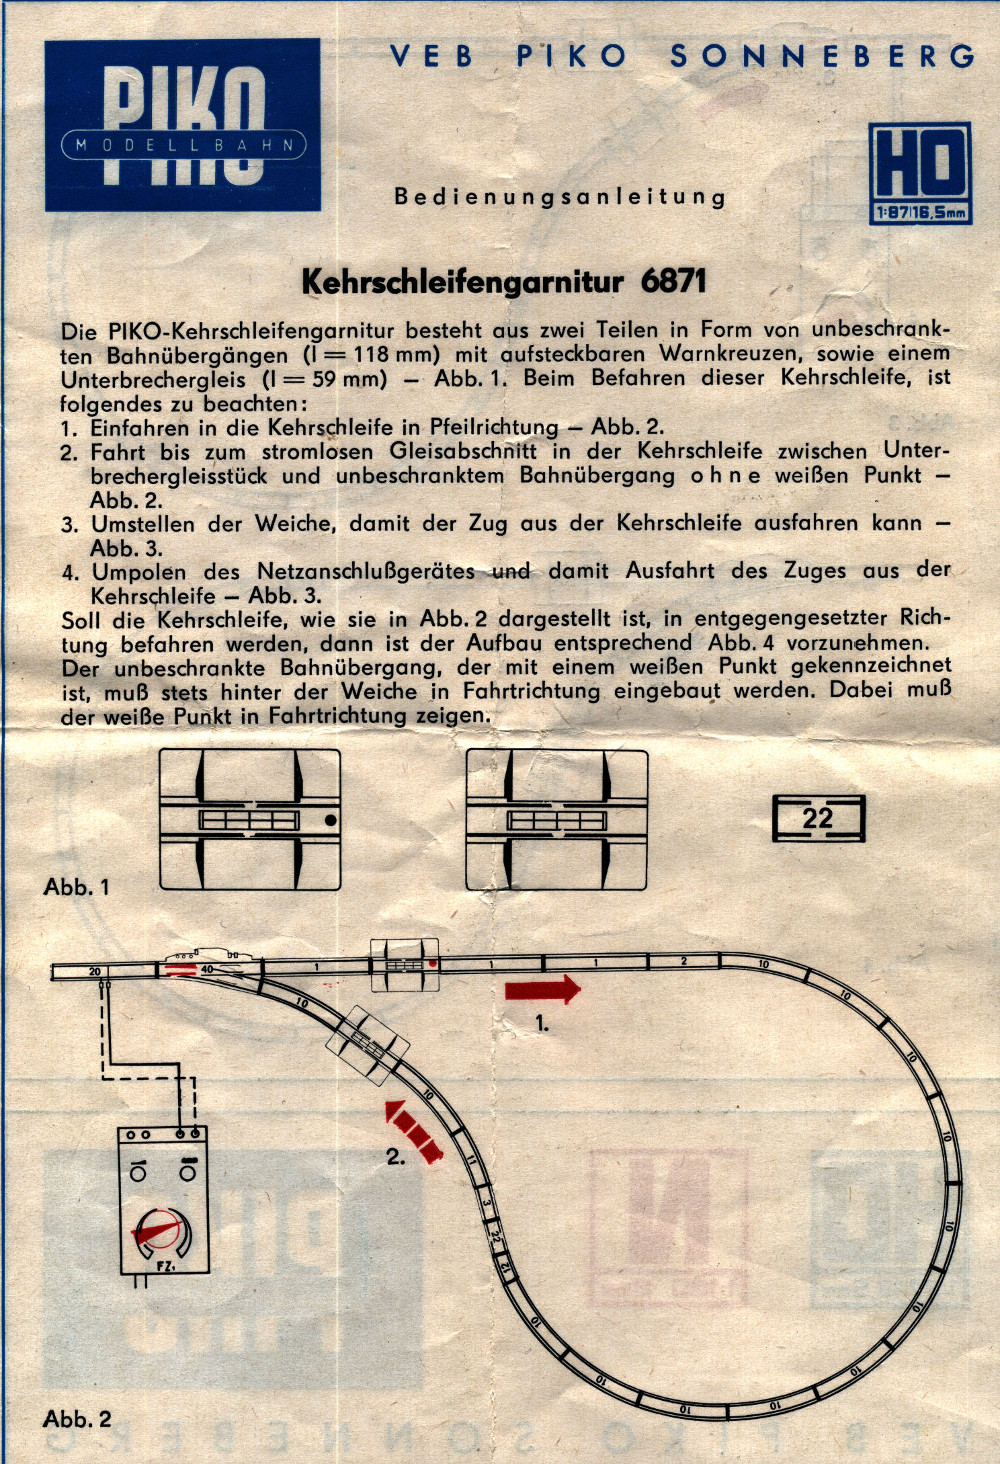 Bild 3 von 5 - Kehrschleifenmodul
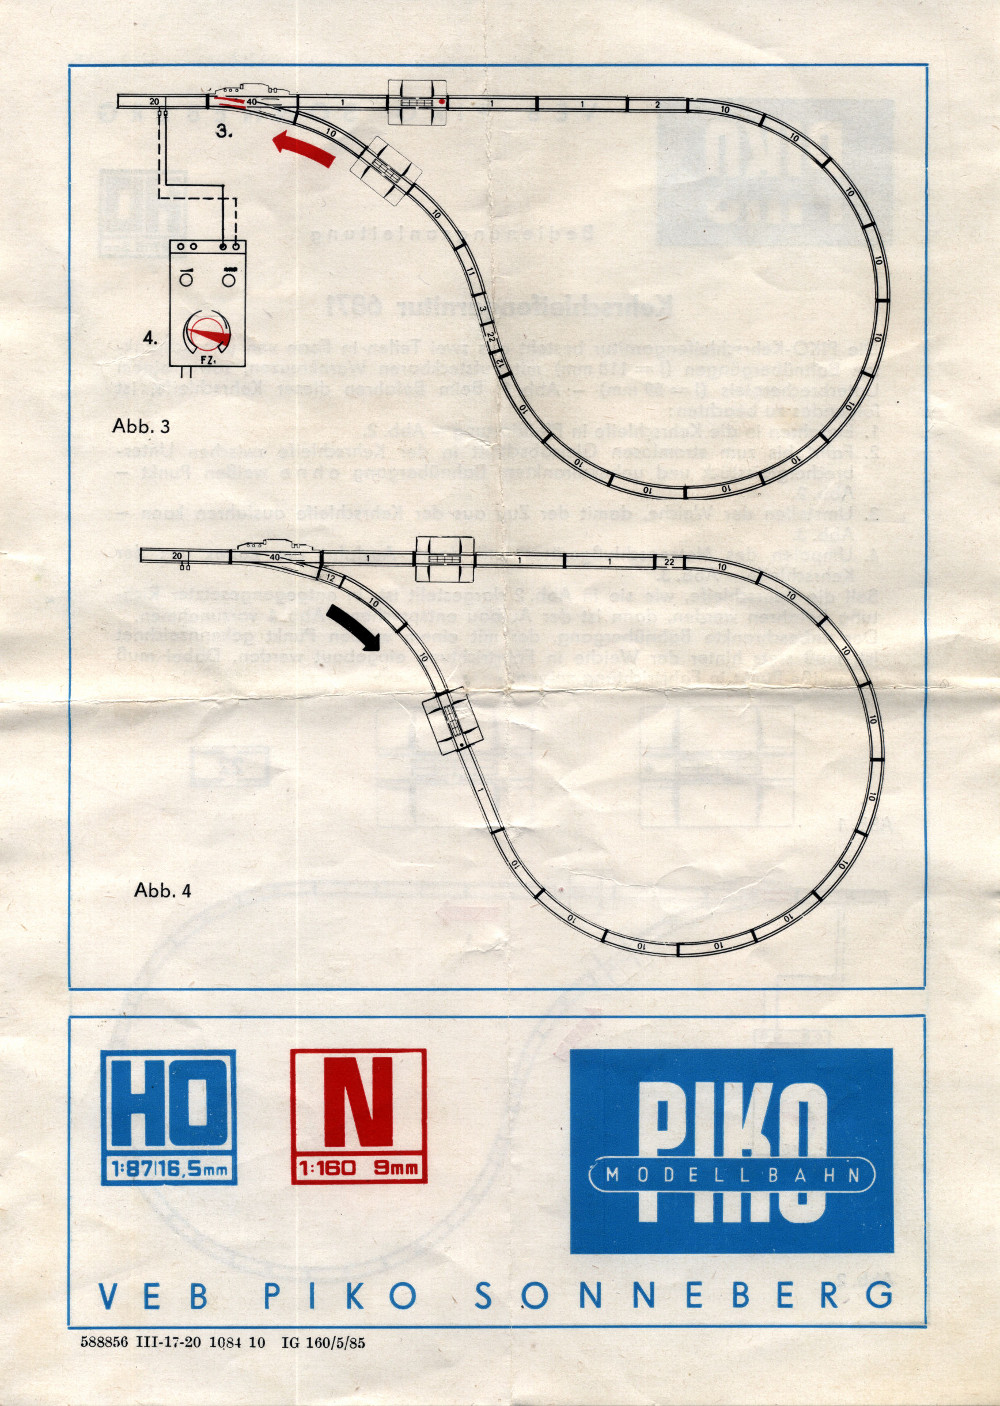 Bild 4 von 5 - Kehrschleifenmodul
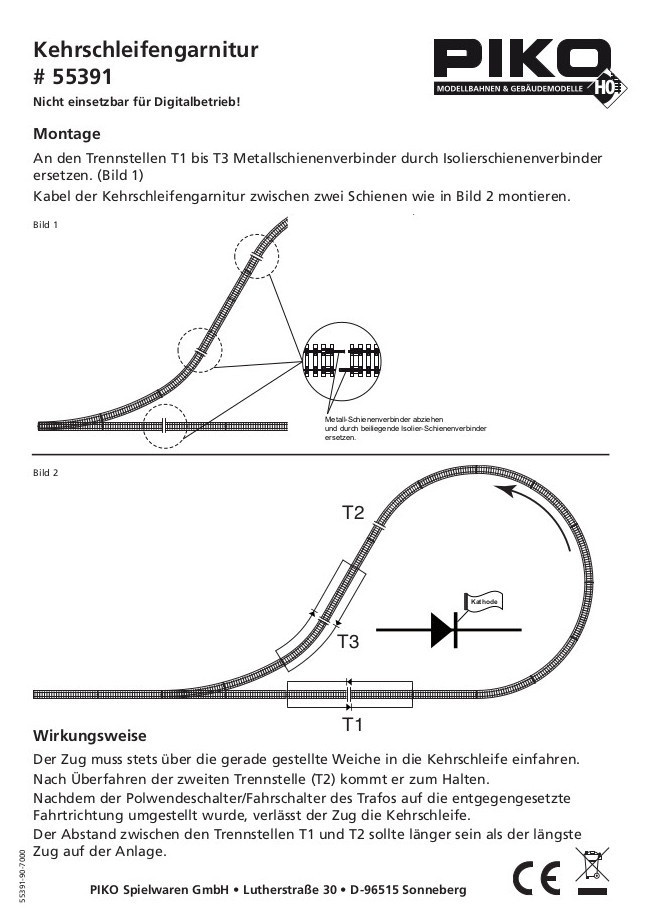 Bild 5 von 5 - Kehrschleifenmodul
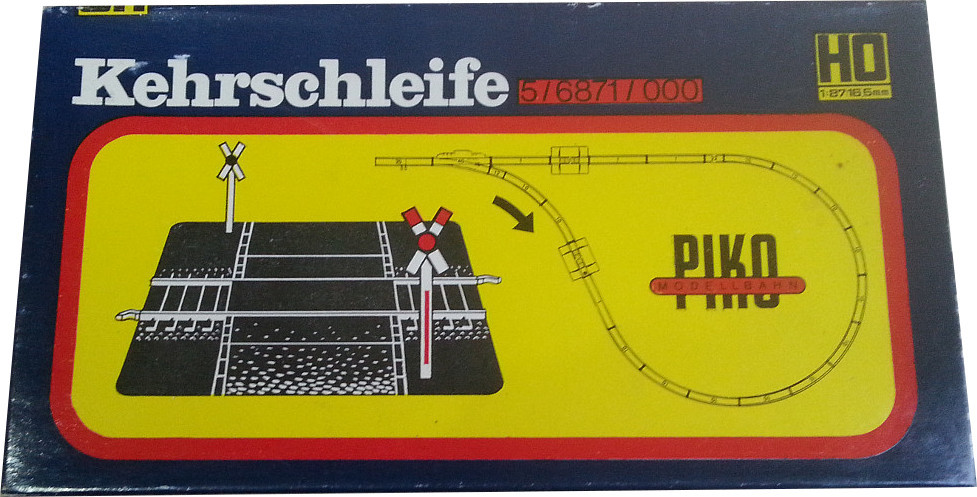
PIKO Kehrschleife
plus Alternativschaltung auf Bild 5
9 Bilder zu:
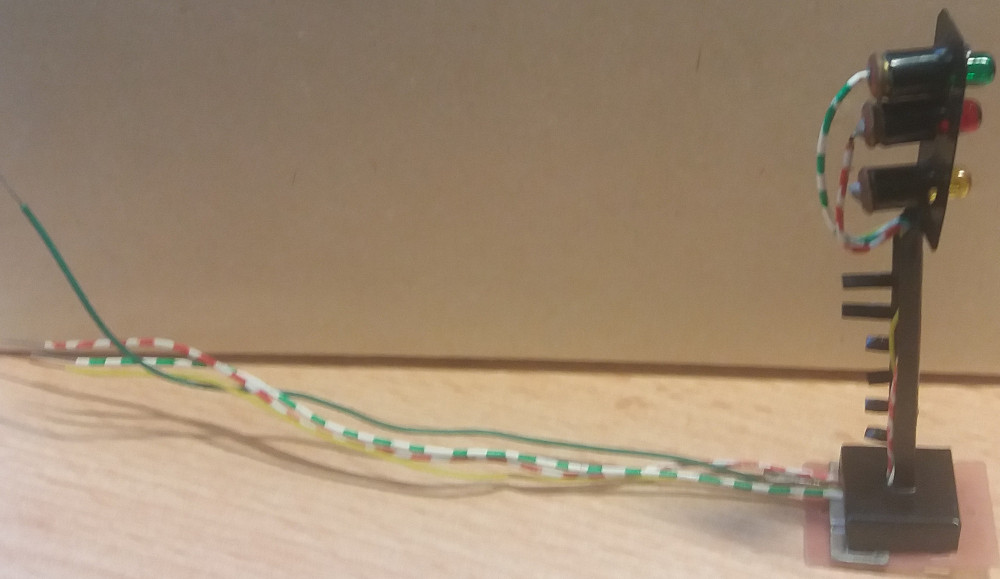
Bild 1 von 9 - PIKO Tageslichtsignal rot/grün/gelb
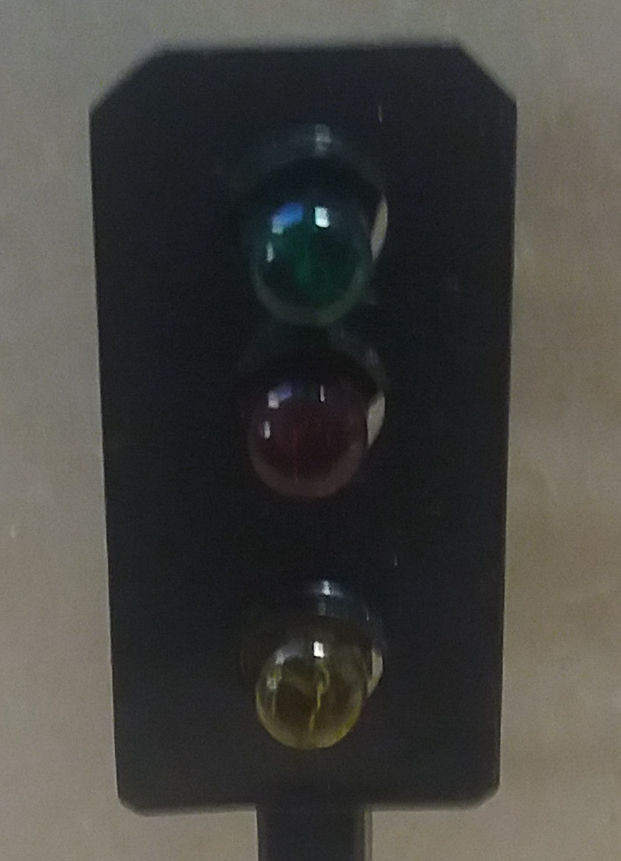 Bild 2 von 9 - PIKO Tageslichtsignal rot/grün/gelb
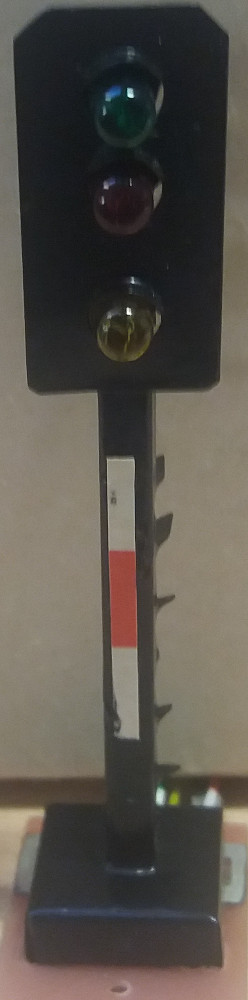 Bild 3 von 9 - PIKO Tageslichtsignal rot/grün/gelb
 Bild 4 von 9 - PIKO Tageslichtsignal rot/grün/gelb
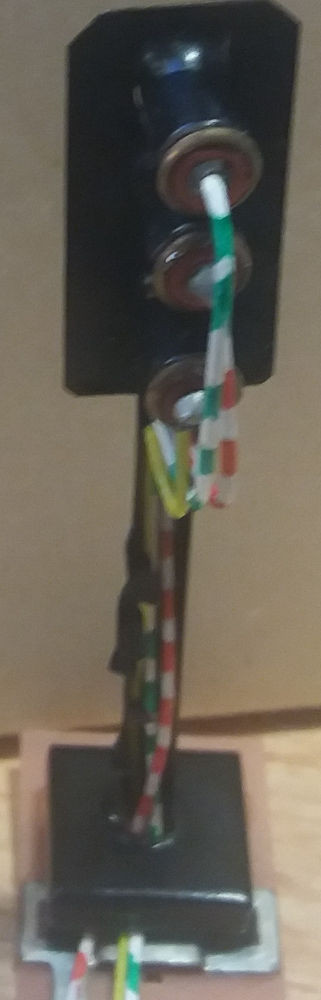 Bild 5 von 9 - PIKO Tageslichtsignal rot/grün/gelb
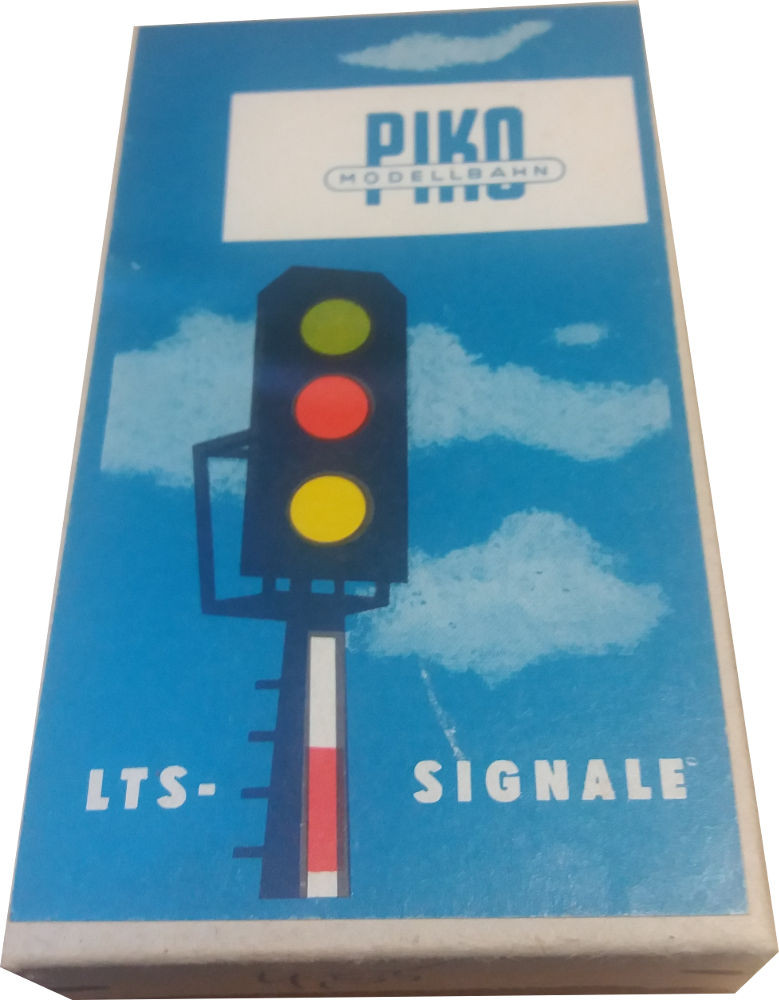 Bild 6 von 9 - PIKO Tageslichtsignal rot/grün/gelb
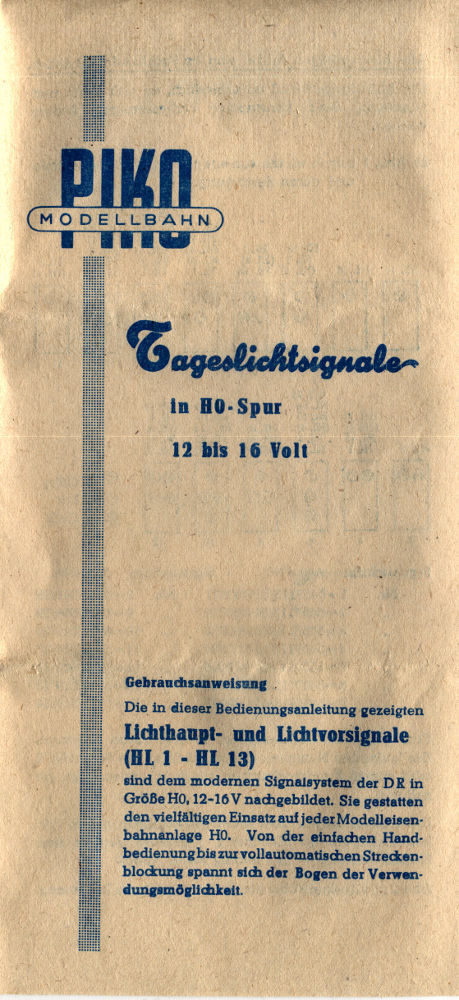 Bild 7 von 9 - PIKO Tageslichtsignal rot/grün/gelb
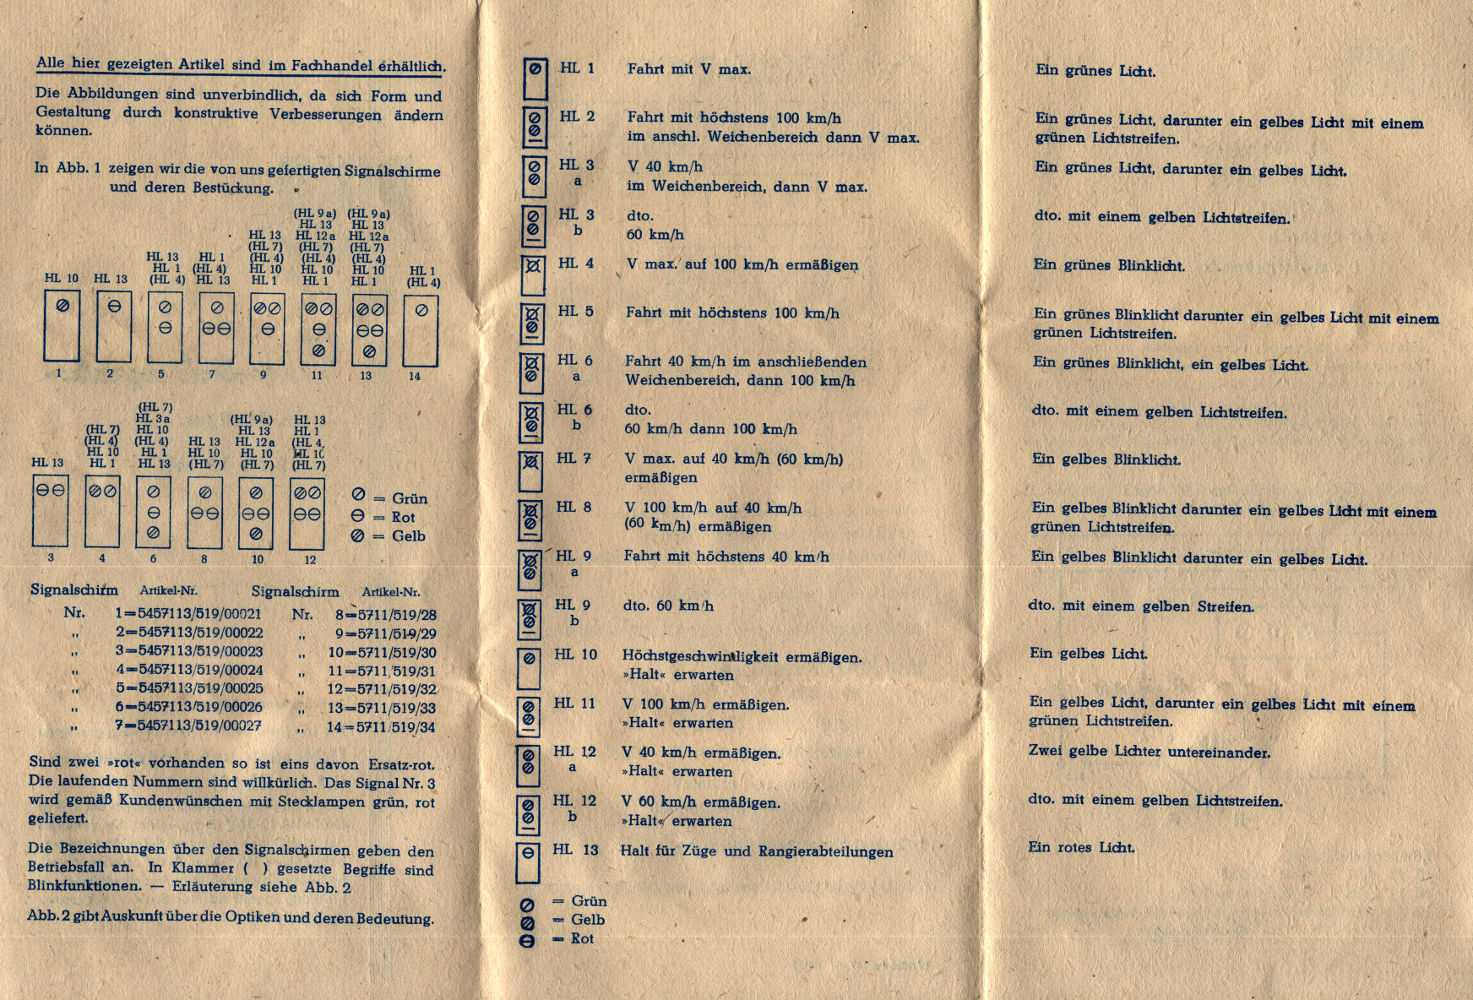 Bild 8 von 9 - PIKO Tageslichtsignal rot/grün/gelb
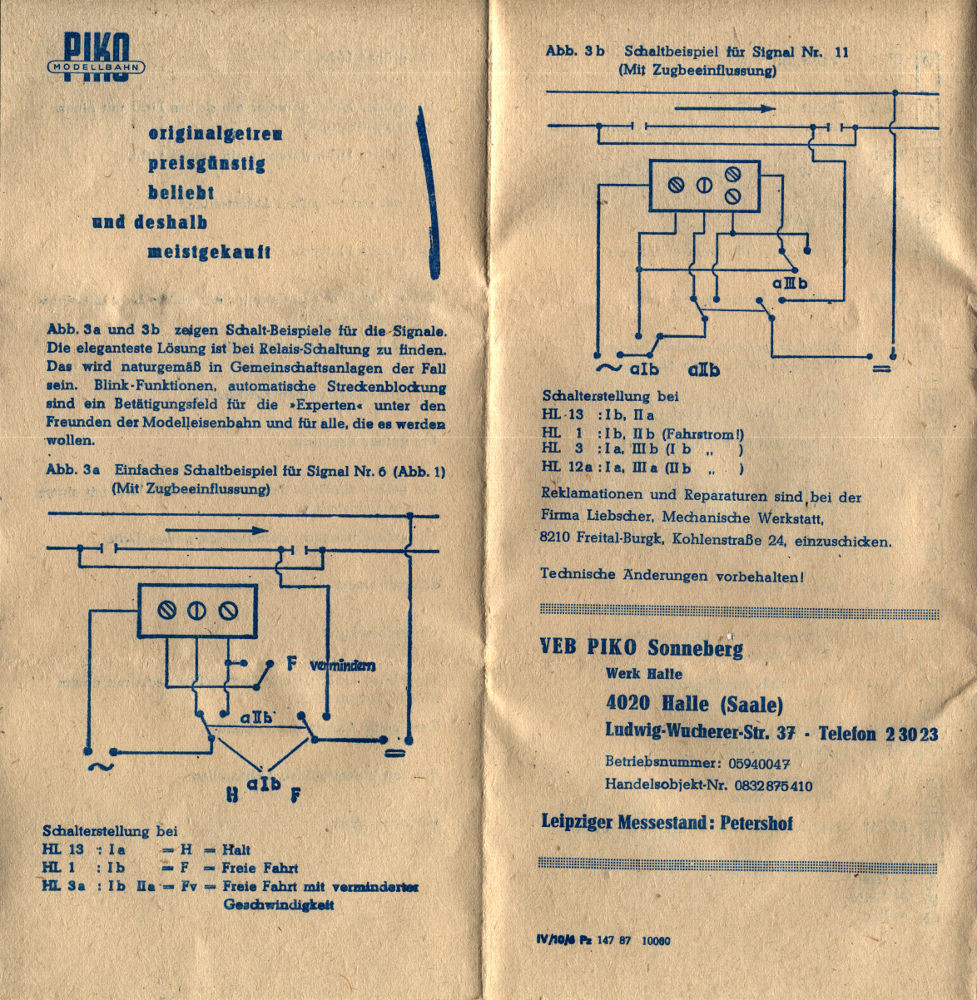 Bild 9 von 9 - PIKO Tageslichtsignal rot/grün/gelb
PIKO Tageslichtsignal rot/grün/gelb
incl. Beschreibung
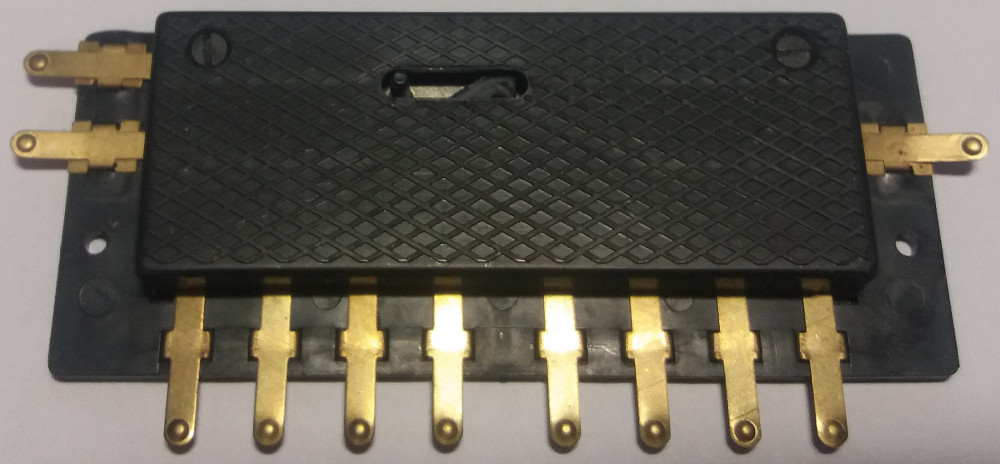
4 Bilder zu:
Bild 1 von 4 - Schaltrelais BTTB 8410
 Bild 2 von 4 - Schaltrelais BTTB 8410
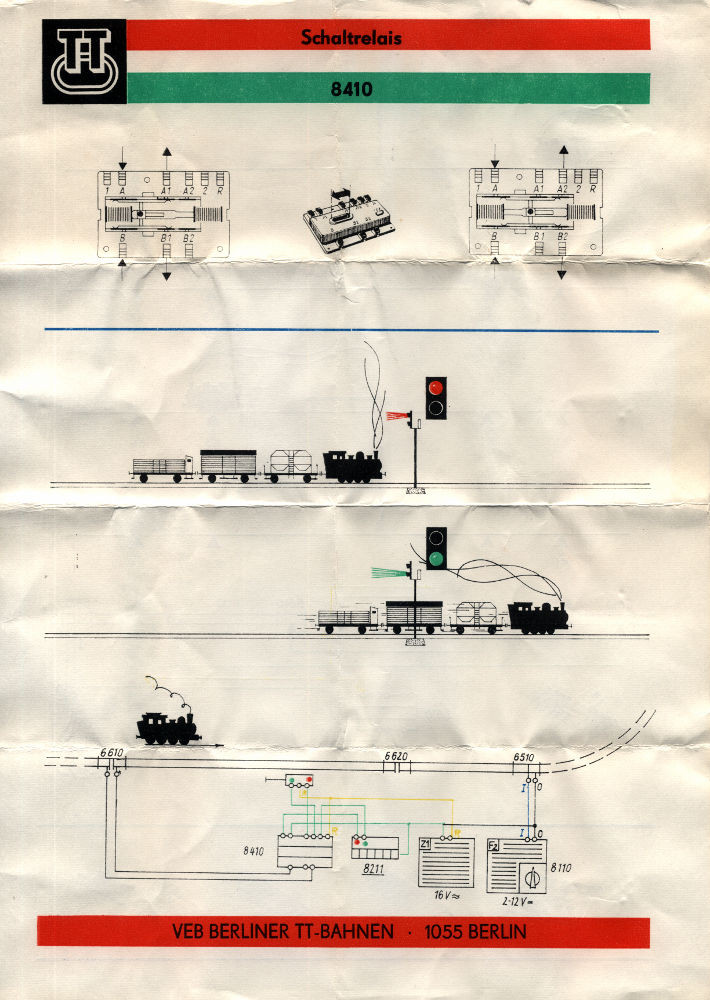 Bild 3 von 4 - Schaltrelais BTTB 8410
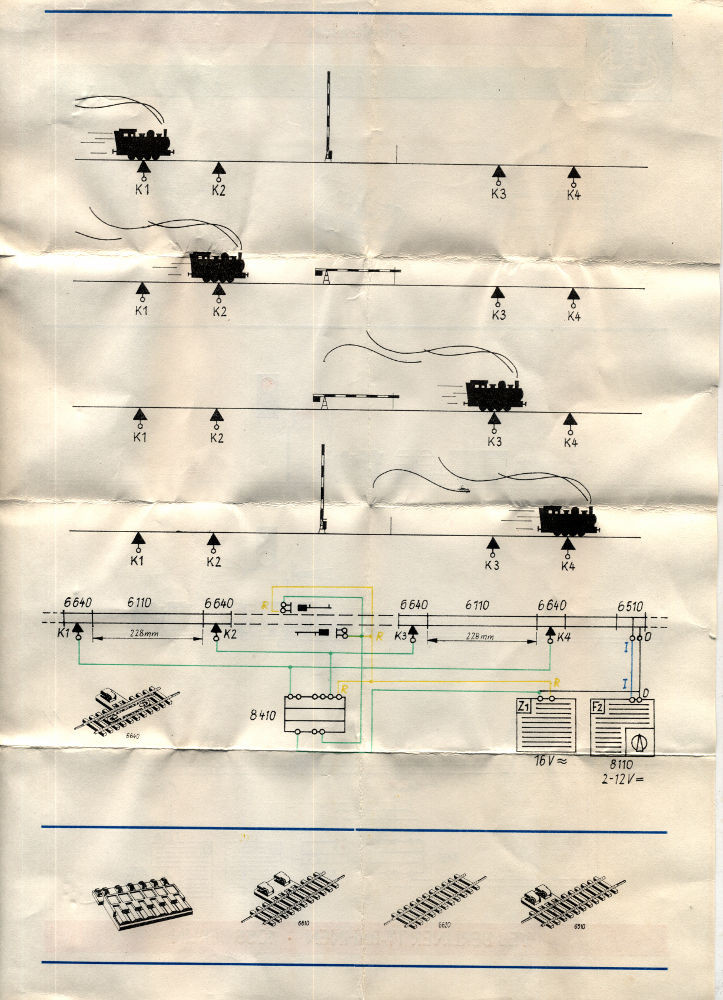 Bild 4 von 4 - Schaltrelais BTTB 8410
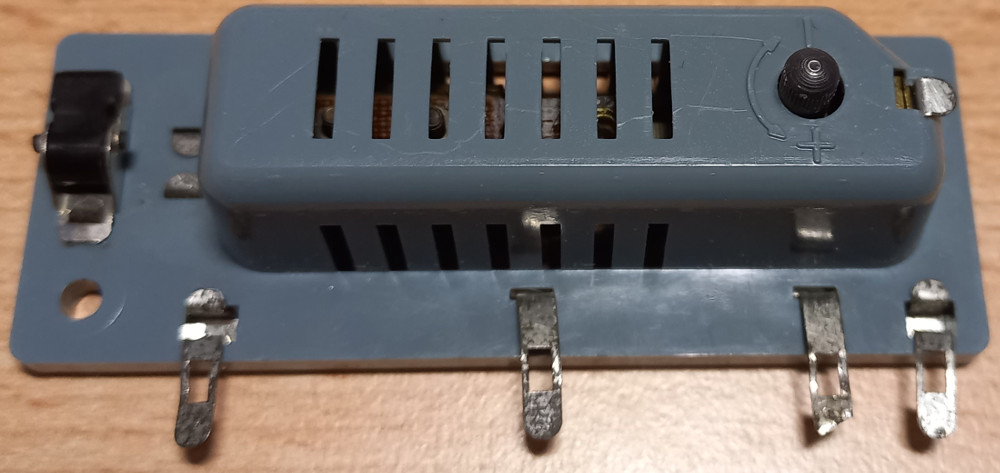
Schaltrelais BTTB 8410
incl. Beschreibung
3 Bilder zu:
Bild 1 von 3 - Schaltrelais PIKO 5/1774
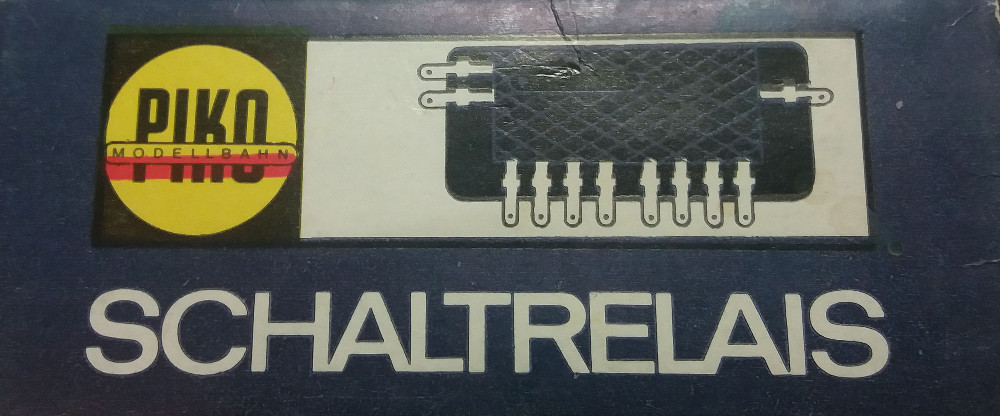 Bild 2 von 3 - Schaltrelais PIKO 5/1774
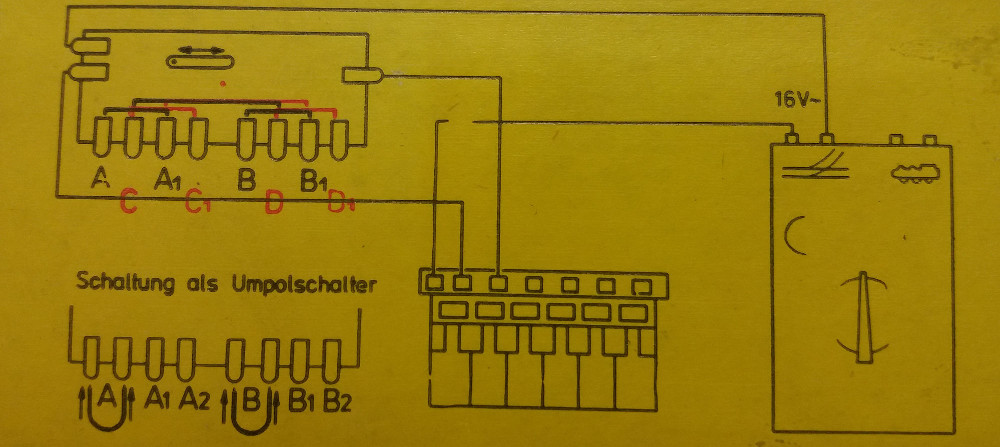 Bild 3 von 3 - Schaltrelais PIKO 5/1774
Schaltrelais PIKO 5/1774
incl. Beschreibung
6 Bilder zu:
Bild 1 von 6 - Zeitrelais BTTB 8420
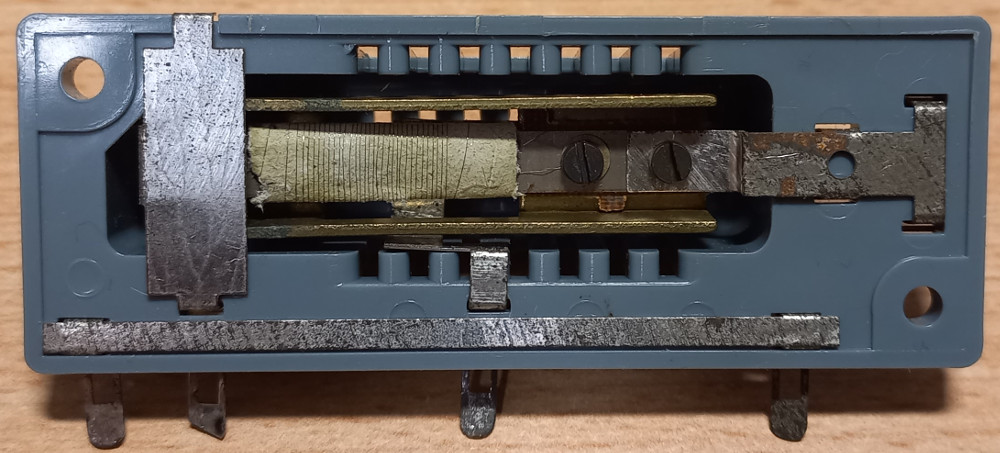 Bild 2 von 6 - Zeitrelais BTTB 8420
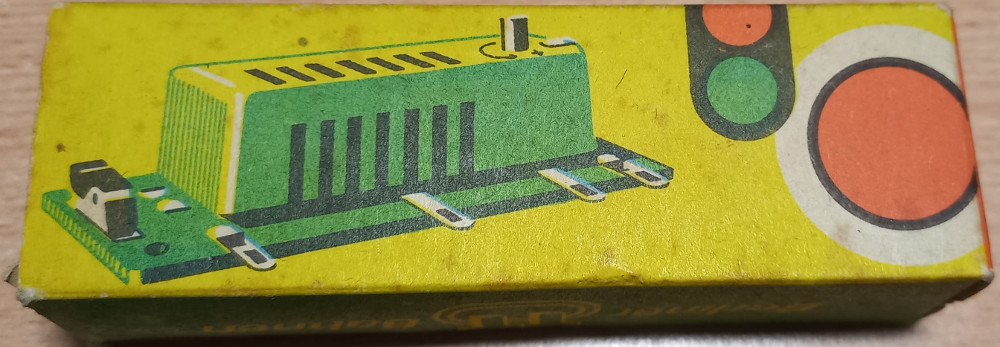 Bild 3 von 6 - Zeitrelais BTTB 8420
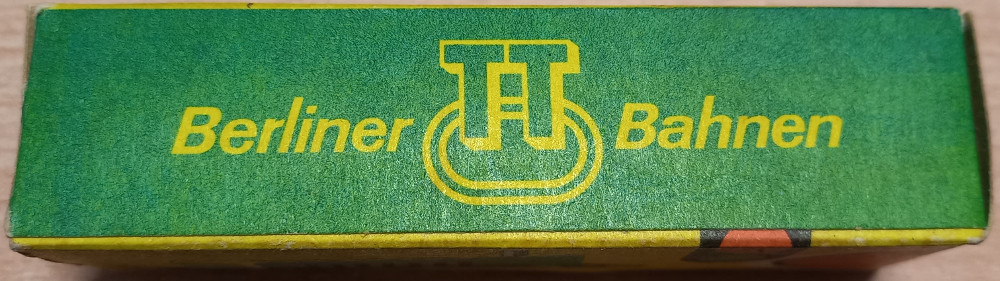 Bild 4 von 6 - Zeitrelais BTTB 8420
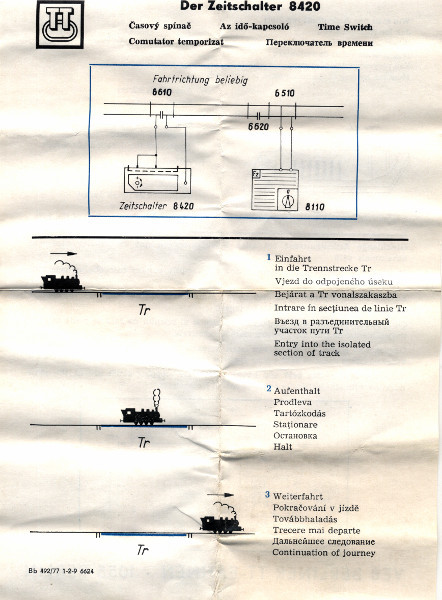 Bild 5 von 6 - Zeitrelais BTTB 8420
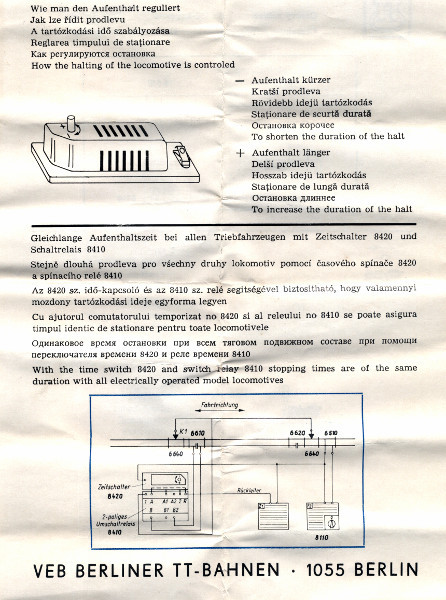 Bild 6 von 6 - Zeitrelais BTTB 8420
Zeitrelais BTTB 8420
incl. Beschreibung